 Spring Cloud:生产者与消费者
# 3.Spring Cloud:生产者与消费者
在微服务架构中,生产者和消费者扮演着核心角色。Spring Cloud作为一套强大的微服务框架,提供了丰富的功能和组件,使得开发者能够轻松构建和管理生产者和消费者之间的通信。本文将介绍Spring Cloud中的生产者和消费者概念,并探讨它们之间的交互方式。
# 1. 什么是生产者和消费者?
在微服务架构中,服务被拆分为多个小而自治的服务单元,每个单元都承担着特定的功能。其中,生产者是提供某种服务或数据的服务单元,它将自己的服务注册到注册中心,并等待消费者的请求。消费者则是通过调用生产者提供的服务来完成特定的业务逻辑。
生产者和消费者之间的通信通常是通过API进行,生产者将其可用的API暴露给消费者,消费者通过调用这些API来获取所需的功能或数据。
# 1.1.Spring Cloud中的生产者
在Spring Cloud中,生产者可以使用Spring Boot快速构建。生产者将自己的服务注册到注册中心,让消费者能够发现并调用它。Spring Cloud提供了多种注册中心的实现,如Netflix Eureka、Consul和Zookeeper等,开发者可以根据实际需求选择适合的注册中心。
通过Spring Cloud提供的注解和组件,生产者可以方便地将自己的服务注册到注册中心,并提供RESTful API或其他形式的接口供消费者调用。同时,Spring Cloud还提供了负载均衡、服务熔断、链路追踪等功能,以提高生产者的性能和可靠性。
# 1.2 Spring Cloud中的消费者
消费者通过注册中心发现并调用生产者的服务。Spring Cloud提供了多种方式来实现消费者的服务调用,其中最常用的是通过RESTful API进行通信。
在Spring Cloud中,消费者可以使用RestTemplate或Feign来发起对生产者服务的请求。RestTemplate是一个基于HTTP的客户端,可以发送HTTP请求并接收响应。Feign是一个声明式的HTTP客户端,它提供了更简洁的方式来定义和调用RESTful服务。
消费者可以通过注册中心获取生产者的服务实例列表,并使用负载均衡策略选择一个实例进行调用。Spring Cloud还提供了服务熔断和容错机制,以应对网络故障和服务不可用的情况,保证系统的稳定性和可靠性。
# 2.简单服务间调用代码示例
下面,我们通过一个案例来展示下一个简单的SpringCloud来演示服务之间的调用。
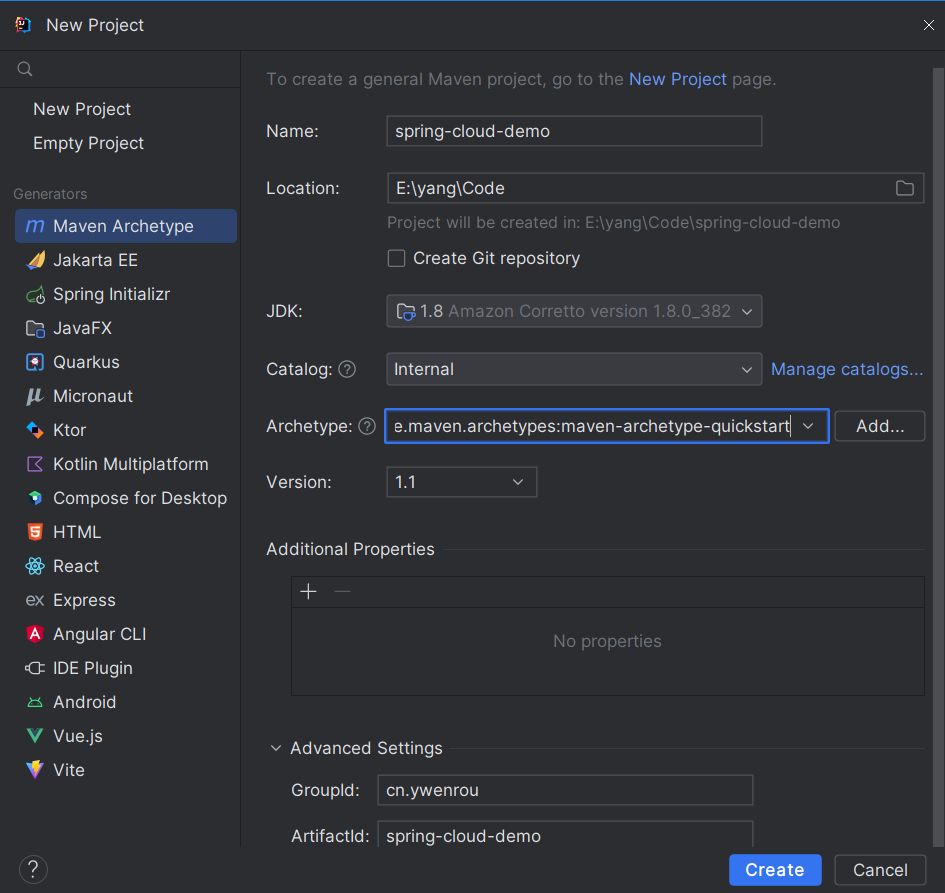
# 2.1 创建主工程(Maven Project)
由于本案例中,会涉及到多个由 Spring Boot 创建的微服务,为了方便管理,这里我们采用 Maven 的多 Module 结构(即一个 Project 包含多个 Module)来构建工程。创建一个名为 spring-cloud-demo 的 Maven 主工程。
<?xml version="1.0" encoding="UTF-8"?>
<project xmlns="http://maven.apache.org/POM/4.0.0"
         xmlns:xsi="http://www.w3.org/2001/XMLSchema-instance"
         xsi:schemaLocation="http://maven.apache.org/POM/4.0.0 http://maven.apache.org/xsd/maven-4.0.0.xsd">
    <modelVersion>4.0.0</modelVersion>

    <groupId>cn.ywenrou</groupId>
    <artifactId>spring-cloud-demo</artifactId>
    <version>1.0-SNAPSHOT</version>

    <name>spring-cloud-demo</name>
    <description>springcloud学习记录</description>
    <url>www.blog.ywenrou.cn</url>

    <packaging>pom</packaging>
    <modules>
        <module>cloud-service1</module>
        <module>cloud-service2</module>
    </modules>

    <properties>
        <maven.compiler.source>1.8</maven.compiler.source>
        <maven.compiler.target>1.8</maven.compiler.target>
        <project.build.sourceEncoding>UTF-8</project.build.sourceEncoding>
        <project.reporting.outputEncoding>UTF-8</project.reporting.outputEncoding>
        <java.version>1.8</java.version>
        <spring.boot.version>2.1.7.RELEASE</spring.boot.version>
        <spring.cloud.version>Greenwich.SR2</spring.cloud.version>
    </properties>

    <dependencies>

        <dependency>
            <groupId>org.springframework.boot</groupId>
            <artifactId>spring-boot-starter-test</artifactId>
        </dependency>
        <!-- Spring Boot Starter Web -->
        <dependency>
            <groupId>org.springframework.boot</groupId>
            <artifactId>spring-boot-starter-web</artifactId>
        </dependency>

    </dependencies>

    <dependencyManagement>
        <dependencies>

            <!-- SpringBoot的依赖配置-->
            <dependency>
                <groupId>org.springframework.boot</groupId>
                <artifactId>spring-boot-dependencies</artifactId>
                <version>${spring.boot.version}</version>
                <type>pom</type>
                <scope>import</scope>
            </dependency>
            <!-- SpringCloud的依赖配置-->
            <dependency>
                <groupId>org.springframework.cloud</groupId>
                <artifactId>spring-cloud-dependencies</artifactId>
                <version>${spring.cloud.version}</version>
                <type>pom</type>
                <scope>import</scope>
            </dependency>


        </dependencies>
    </dependencyManagement>

    <build>
        <plugins>
            <plugin>
                <groupId>org.apache.maven.plugins</groupId>
                <artifactId>maven-compiler-plugin</artifactId>
                <configuration>
                    <source>${java.version}</source>
                    <target>${java.version}</target>
                    <encoding>${project.build.sourceEncoding}</encoding>
                </configuration>
            </plugin>
        </plugins>
        <pluginManagement>
            <plugins>
                <plugin>
                    <groupId>org.springframework.boot</groupId>
                    <artifactId>spring-boot-maven-plugin</artifactId>
                    <version>${spring-boot.version}</version>
                    <executions>
                        <execution>
                            <goals>
                                <goal>repackage</goal>
                            </goals>
                        </execution>
                    </executions>
                </plugin>
            </plugins>
        </pluginManagement>
    </build>

    <repositories>
        <repository>
            <id>public</id>
            <name>aliyun nexus</name>
            <url>https://maven.aliyun.com/repository/public</url>
            <releases>
                <enabled>true</enabled>
            </releases>
        </repository>
    </repositories>

    <pluginRepositories>
        <pluginRepository>
            <id>public</id>
            <name>aliyun nexus</name>
            <url>https://maven.aliyun.com/repository/public</url>
            <releases>
                <enabled>true</enabled>
            </releases>
            <snapshots>
                <enabled>false</enabled>
            </snapshots>
        </pluginRepository>
    </pluginRepositories>

</project>
2
3
4
5
6
7
8
9
10
11
12
13
14
15
16
17
18
19
20
21
22
23
24
25
26
27
28
29
30
31
32
33
34
35
36
37
38
39
40
41
42
43
44
45
46
47
48
49
50
51
52
53
54
55
56
57
58
59
60
61
62
63
64
65
66
67
68
69
70
71
72
73
74
75
76
77
78
79
80
81
82
83
84
85
86
87
88
89
90
91
92
93
94
95
96
97
98
99
100
101
102
103
104
105
106
107
108
109
110
111
112
113
114
115
116
117
118
119
120
121
122
123
124
# 2.2 创建生产者
选中我们的父工程点击New,在点击Module,创建一个名为 cloud-service1 的springboot项目作为生产者模块,依赖可以选取spring-web。若没有用插件可以复制下面pom.xml文件:
<?xml version="1.0" encoding="UTF-8"?>
<project xmlns="http://maven.apache.org/POM/4.0.0" xmlns:xsi="http://www.w3.org/2001/XMLSchema-instance"
         xsi:schemaLocation="http://maven.apache.org/POM/4.0.0 https://maven.apache.org/xsd/maven-4.0.0.xsd">
    <modelVersion>4.0.0</modelVersion>
    <artifactId>cloud-service1</artifactId>
    <version>0.0.1-SNAPSHOT</version>
    <name>cloud-service1</name>
    <description>cloud-service1</description>
    <parent>
        <groupId>cn.ywenrou</groupId>
        <artifactId>spring-cloud-demo</artifactId>
        <version>1.0-SNAPSHOT</version>
    </parent>
    <dependencies>
        <dependency>
            <groupId>org.springframework.cloud</groupId>
            <artifactId>spring-cloud-starter-netflix-eureka-client</artifactId>
        </dependency>
    </dependencies>
2
3
4
5
6
7
8
9
10
11
12
13
14
15
16
17
18
19
Spring Cloud是基于rest的访问,所以我们添加一个Controller,在该Controller中提供一个访问入口:
@RestController
class HelloController {
    @RequestMapping(value = "/service1/hello", method = RequestMethod.GET)
    public String hello() {
        return "Hello Spring Cloud";
    }
}
2
3
4
5
6
7
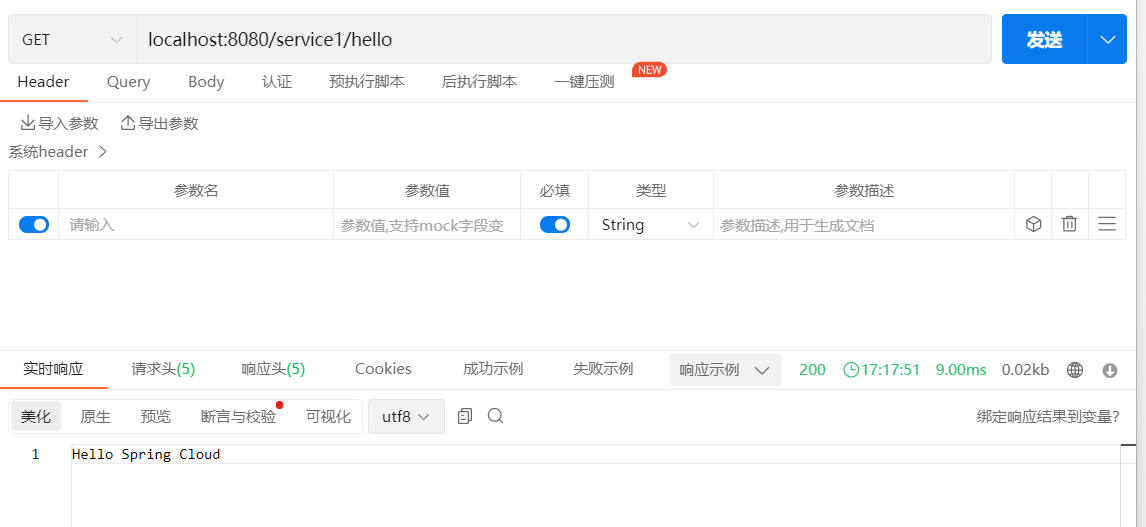
启动CloudService1Application类中并访问接口localhost:8080/service1/hello (opens new window):
# 2.3 创建消费者并进行服务间调用
选中我们的父工程点击New,在点击Module,创建一个名为 cloud-service2 的springboot项目作为消费者模块,依赖选取spring-web,maven配置和生产者类似。此时8080端口以及被占用所以要在application.yml中设置一个未占用的端口,我这里设置server.port=9000 。
@RestController
class ConsumerController {

    @RequestMapping(value="/service2/hello")
    public String helloController() {
        RestTemplate restTemplate = new RestTemplate();
        return restTemplate.getForEntity("http://localhost:8080/service1/hello", String.class).getBody();
    }
}
2
3
4
5
6
7
8
9
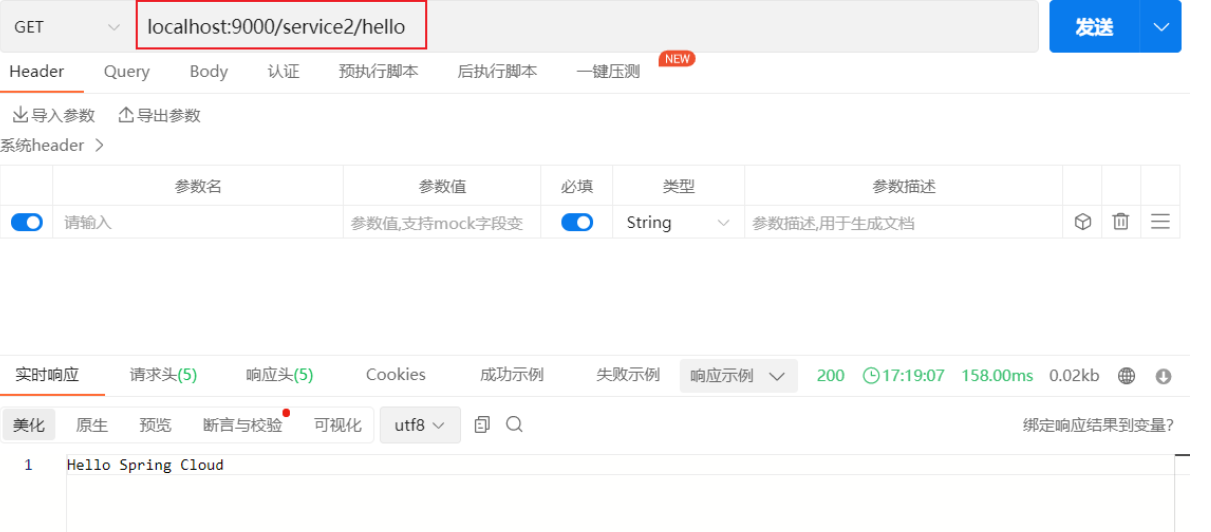
启动CloudService2Application类并访问localhost:9000/service2/hello (opens new window):
# 5. 结论
至此模拟了一个springcloud的简单的例子消费者和生产者之前的调用,但是你有没有发现问题,当消费者需要调用生产者的API时,硬编码主机名和端口号是一种不灵活的做法。为了解决这个问题,Spring Cloud提供了Eureka作为服务注册中心,以便消费者能够动态地发现和调用生产者的服务。下文介绍讲Spring Cloud的Eureka作为服务注册中心