 Spring介绍
# Spring框架
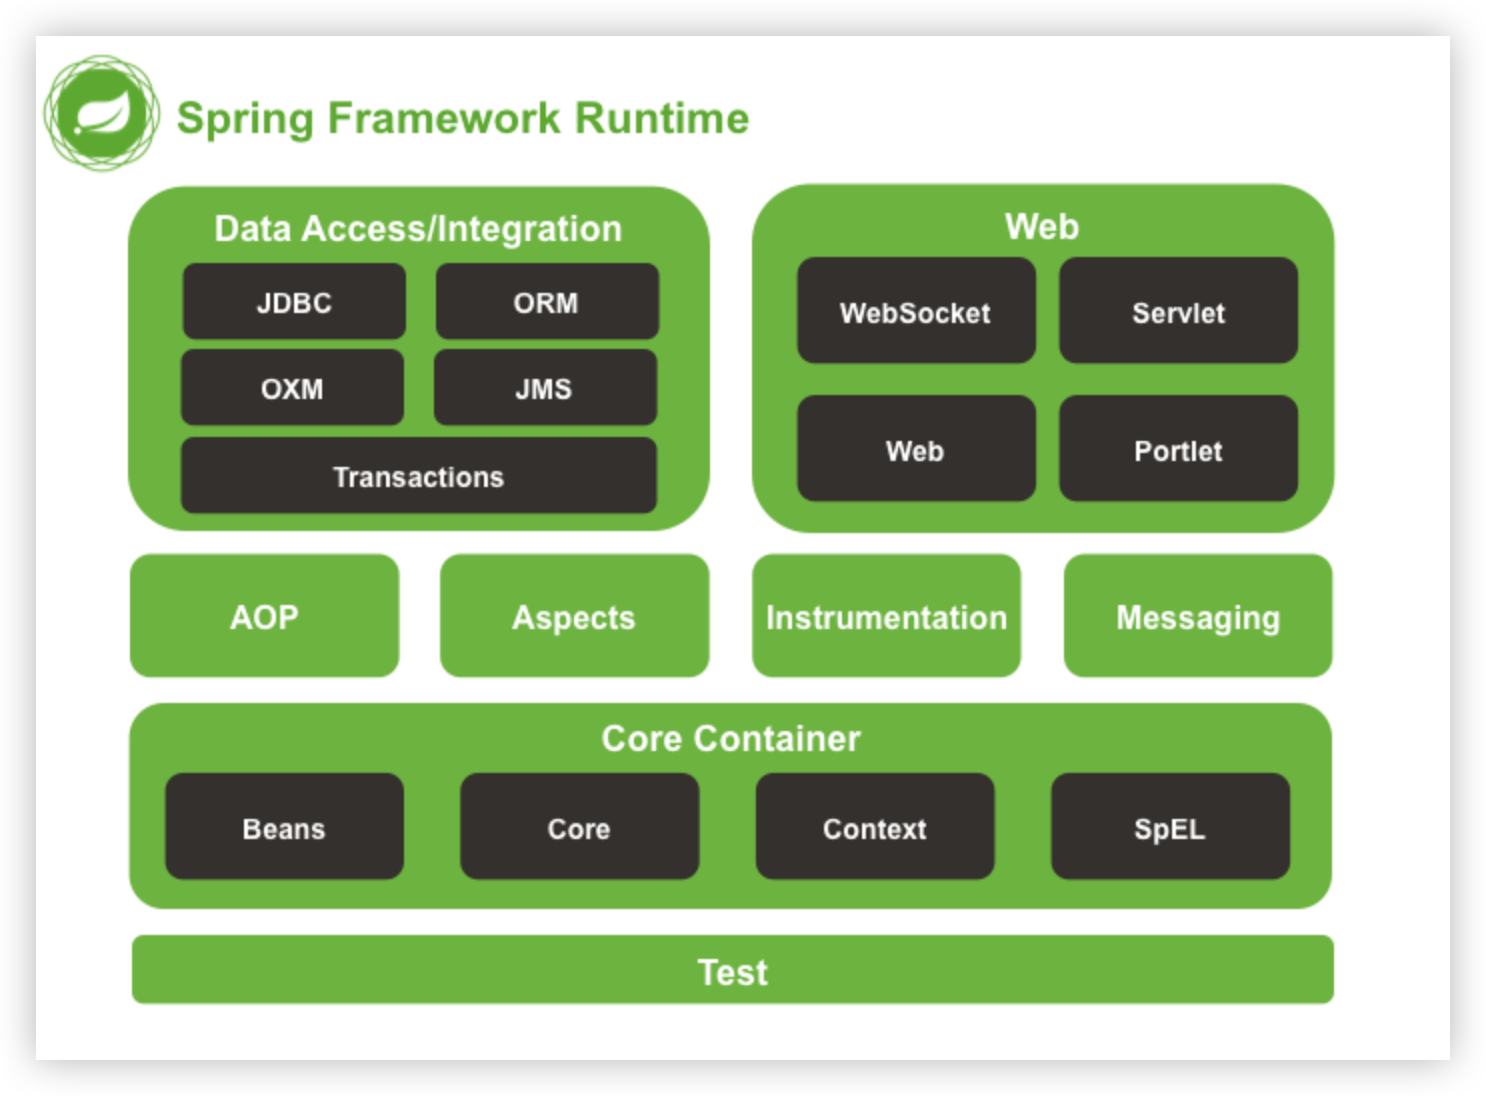
Spring 是一个轻量级、开源的 Java 开发框架,提供 依赖注入(DI) 和 面向切面编程(AOP) 机制,简化 Java 企业级开发。它涵盖 Spring Core(核心容器)、Spring MVC(Web 开发)、Spring JDBC(数据访问)、Spring Security(安全框架)、Spring Boot(简化配置) 及 Spring Cloud(微服务架构),支持高效的 事务管理、REST API 开发、微服务架构 等,广泛应用于企业级 Java 应用的开发。
# Spring 的 IOC(控制反转)
**IOC(Inversion of Control,控制反转)**是 Spring 框架的核心概念之一。它的主要思想是 将对象的创建和管理的控制权交给 Spring 容器,而不是由对象自身或调用者来管理,这样可以提高程序的可维护性和扩展性。
在传统的 Java 开发中,通常是由开发者在代码中 手动创建对象,比如:
public class UserService {
    private UserRepository userRepository = new UserRepository();
}
2
3
这种方式有几个问题:
- 紧耦合(Tightly Coupled):
UserService直接依赖UserRepository,如果要更换UserRepository的实现,就需要修改UserService的代码,违背了开闭原则(OCP)。 - 不易测试:由于
UserService内部直接创建UserRepository,在单元测试时无法轻松替换UserRepository为 Mock 对象。
IOC 如何解决这个问题?
Spring IOC 容器会 接管对象的创建、依赖关系的管理,从而让对象变得松耦合(Loosely Coupled)。在 Spring 框架中,我们可以这样使用 IOC:
@Component
public class UserRepository {
}
@Service
public class UserService {
    private final UserRepository userRepository;

    @Autowired
    public UserService(UserRepository userRepository) {
        this.userRepository = userRepository;
    }
}
2
3
4
5
6
7
8
9
10
11
12
在这里:
@Component和@Service注解告诉 Spring 这个类应该被 Spring 容器管理。@Autowired让 Spring 自动注入UserRepository的实例,而不是手动创建。
这样,Spring 负责创建 UserRepository 的实例,并在 UserService 中注入它。这样 UserService 不需要自己创建 UserRepository,也可以很方便地替换 UserRepository 为不同的实现。
# DI(依赖注入)与 IOC 的关系
DI(Dependency Injection,依赖注入) 是实现 IOC 的一种方式。IOC 是一种思想,而 DI 是一种具体的实现机制。
DI 的方式 Spring 提供了多种依赖注入的方式:
构造方法注入(Constructor Injection,推荐)
@Service
public class UserService {
    private final UserRepository userRepository;

    @Autowired
    public UserService(UserRepository userRepository) {
        this.userRepository = userRepository;
    }
}
1
2
3
4
5
6
7
8
9- 推荐使用构造方法注入,保证
UserService对象创建时必须传入UserRepository,避免null依赖。
- 推荐使用构造方法注入,保证
Setter 方法注入
@Service
public class UserService {
    private UserRepository userRepository;

    @Autowired
    public void setUserRepository(UserRepository userRepository) {
        this.userRepository = userRepository;
    }
}
1
2
3
4
5
6
7
8
9字段注入
@Service
public class UserService {
    @Autowired
    private UserRepository userRepository;
}
1
2
3
4
5
# 什么是 Spring 容器?
在 Spring 的 IOC(控制反转) 机制下,对象的创建 由 Spring 容器 负责,而不是由开发者手动创建。Spring 通过 Bean 的管理机制 来实现对象的创建、初始化、管理和销毁,并实现 依赖注入(Dependency Injection, DI)。Spring 容器的主要作用包括:
- 解析配置文件或注解,扫描并加载 Bean 定义
- 维护 Bean 的生命周期,包括创建、依赖注入、初始化、销毁
- 提供 Bean 之间的依赖管理,如单例、懒加载、循环依赖等
Spring 容器的主要接口:
- BeanFactory:Spring 的底层容器,提供最基本的 IOC 容器功能,如
DefaultListableBeanFactory - ApplicationContext:继承
BeanFactory,提供更强大的功能,如事件发布、国际化支持等,如ClassPathXmlApplicationContext、AnnotationConfigApplicationContext等
# Spring 容器的启动流程
Spring 容器的启动主要是 ApplicationContext 的创建过程,核心流程如下:
# (1)ApplicationContext 的创建
根据不同的配置方式,Spring 提供了几种 ApplicationContext:
ClassPathXmlApplicationContext:基于 XML 配置AnnotationConfigApplicationContext:基于 Java 代码和注解
Spring 启动的主要入口:
ApplicationContext context = new AnnotationConfigApplicationContext(AppConfig.class);
获取Bean方式:
- XML 配置方式:解析 XML 文件,获取 Bean 的定义
- 注解方式:扫描
@ComponentScan指定的包,获取所有@Component、@Service、@Repository、@Controller标注的类 - Java 配置方式:Spring 会扫描
@Configuration然后将其和所有@Bean标记的方法解析为BeanDefinition,存入BeanDefinitionMap。
# (2)BeanDefinition 解析和存储
Spring 会把所有扫描到的 Bean 解析为 BeanDefinition,存入 BeanDefinitionMap:
Map<String, BeanDefinition> beanDefinitionMap = new ConcurrentHashMap<>();
BeanDefinition 主要存储:
- Bean 的类信息(className)
- 作用域(单例
singleton或多例prototype) - 构造器参数
- 依赖关系
- 是否懒加载
# (3)实例化 Bean
- 通过
BeanFactory遍历BeanDefinitionMap,判断是否要创建 Bean(非懒加载和单例才创建,@Lazy // 只有 getBean("myService") 时才创建) - 反射调用构造方法创建 Bean
- 依赖注入,填充属性(有一个坑,循环依赖注入后面会讲)
- 初始化(执行
@PostConstruct或InitializingBean) - 放入 单例池(
singletonObjects)
# 怎么创建 Bean(IoC 机制解析)
Spring 采用 IoC(控制反转) 来管理 Bean,核心是 BeanFactory.getBean() 方法,创建 Bean 的完整流程如下:
# (1)查询 Bean
Spring 通过 getBean(beanName) 方法获取 Bean:
Object bean = singletonObjects.get(beanName);
if (bean != null) {
    return bean;
}
2
3
4
如果 Bean 已经存在于 singletonObjects(单例池),直接返回,否则执行创建过程。
# (2)实例化 Bean
如果 singletonObjects 里没有该 Bean,就去 BeanDefinitionMap 中查找 BeanDefinition 并进行实例化。
实例化方式:
- 默认通过 反射调用无参构造方法 创建对象
- 该 Bean 的 依赖项 可能还是
null - 这一步 Bean 只是被 创建,但还未进行属性填充和初始化
示例代码:
Class<?> clazz = beanDefinition.getBeanClass();
Constructor<?> constructor = clazz.getDeclaredConstructor();
Object instance = constructor.newInstance();
2
3
# (3)属性注入(依赖注入)
Spring 进行依赖注入:
- 解析
@Autowired或 XML 配置的依赖关系 - 递归调用
getBean()获取依赖项 - 通过 反射调用 setter 方法或直接赋值
示例:
Field field = clazz.getDeclaredField("userService");
field.setAccessible(true);
field.set(instance, getBean(field.getType().getName()));
2
3
# (4)初始化
初始化前处理(BeanPostProcessor 前置)
- Spring 调用所有注册的
BeanPostProcessor的postProcessBeforeInitialization方法。
初始化(Initialization)
- Bean 自身执行初始化逻辑:
@PostConstruct方法InitializingBean的afterPropertiesSet()- 自定义初始化方法(
init-method或@Bean(initMethod="..."))
初始化后处理(BeanPostProcessor 后置)
- Spring 调用所有注册的
BeanPostProcessor的postProcessAfterInitialization方法。 - 这是 AOP、代理等增强的关键点。
示例:
if (bean instanceof InitializingBean) {
    ((InitializingBean) bean).afterPropertiesSet();
}
2
3
# (5)放入单例池
完成初始化后,Bean 进入 singletonObjects(单例池):
singletonObjects.put(beanName, instance);
后续 getBean() 直接从单例池获取,无需重新创建。
# Spring 解决循环依赖
在 Spring 容器中,循环依赖(Circular Dependency)指的是 多个 Bean 之间存在相互依赖,导致在实例化过程中出现递归调用,最终抛出 BeanCurrentlyInCreationException。
Spring 默认支持 单例(singleton) Bean 的循环依赖,并通过 三级缓存(三级 Map) 解决问题,但 原型(prototype) Bean 也叫多例Bean的循环依赖默认不支持,每次调用 getBean() 都会创建一个新的实例。
# 1. 循环依赖的类型
Spring 中的循环依赖主要分为:
- 构造器循环依赖(不支持)
- A 通过构造方法依赖 B,B 通过构造方法依赖 A
- Spring 无法解决,Spring 在实例化阶段调用构造方法,而此时对象还未放入三级缓存。因为所有 Bean 都需要先实例化,无法在构造方法中拿到对方的引用。会抛出
BeanCurrentlyInCreationException
- Setter/字段循环依赖(支持)
- A 通过
@Autowired依赖 B,B 通过@Autowired依赖 A - Spring 通过三级缓存解决
- A 通过
prototype作用域循环依赖(不支持)prototypeBean 不会 放入 Spring 容器的单例池,因此 Spring 不能缓存它,从而无法解决循环依赖。
# 2. Bean 的生命周期
一个 Bean 从创建到销毁,大体可以分为以下几个阶段:
- 实例化(Instantiation)
- Spring 通过构造方法或工厂方法创建 Bean 对象。
- 属性注入(Populate Properties)
- 将配置的依赖注入到 Bean 中(通过
@Autowired、XML 配置、@Value等)。
- 将配置的依赖注入到 Bean 中(通过
- 初始化前处理(BeanPostProcessor 前置)
- Spring 调用所有注册的
BeanPostProcessor的postProcessBeforeInitialization方法。
- Spring 调用所有注册的
- 初始化(Initialization)
- Bean 自身执行初始化逻辑:
@PostConstruct方法InitializingBean的afterPropertiesSet()- 自定义初始化方法(
init-method或@Bean(initMethod="..."))
- Bean 自身执行初始化逻辑:
- 初始化后处理(BeanPostProcessor 后置)
- Spring 调用所有注册的
BeanPostProcessor的postProcessAfterInitialization方法。 - 这是 AOP、代理等增强的关键点。
- Spring 调用所有注册的
- 使用(Ready to use)
- Bean 完全初始化完毕,可以被依赖注入或使用。
- 销毁(Destruction)
- 如果是单例 Bean,在容器关闭时执行销毁逻辑:
@PreDestroyDisposableBean的destroy()- 自定义
destroy-method
- 如果是单例 Bean,在容器关闭时执行销毁逻辑:
注意BeanPostProcessor针对的是容器中所有 Bean适用于AOP、代理、统一增强
# 3. 什么是循环依赖?
循环依赖的概念:当两个或多个 Bean 互相依赖时,就会产生循环依赖。
示例代码:
public class A {
    @Autowired
    private B b;
}

public class B {
    @Autowired
    private A a;
}
2
3
4
5
6
7
8
9
在上面的例子中:
A依赖BB依赖A- 形成循环依赖
# 4. Spring 三级缓存
Spring 采用三级缓存存放单例模式下的 Bean:
| 缓存层级 | 变量 | 存放内容 |
|---|---|---|
| 一级缓存 | singletonObjects | 完全初始化好的 Bean(最终可用的对象) |
| 二级缓存 | earlySingletonObjects | 已实例化但未填充属性的 Bean(半成品,防止频繁创建) |
| 三级缓存 | singletonFactories | Bean 工厂对象,用于提前曝光 Bean |
源码示例:
/** 一级缓存:存放完全初始化好的 Bean */
private final Map<String, Object> singletonObjects = new ConcurrentHashMap<>(256);

/** 二级缓存:存放原始的 Bean 对象(尚未填充属性) */
private final Map<String, Object> earlySingletonObjects = new HashMap<>(16);

/** 三级缓存:存放 Bean 工厂对象 */
private final Map<String, ObjectFactory<?>> singletonFactories = new HashMap<>(16);
2
3
4
5
6
7
8
# 5. 三级缓存如何解决循环依赖?
getSingleton() 方法的执行逻辑
protected Object getSingleton(String beanName, boolean allowEarlyReference) {
    // 1. 尝试从一级缓存获取
    Object singletonObject = this.singletonObjects.get(beanName);

    // 2. 若一级缓存获取不到,且对象正在创建中,则尝试从二级缓存获取
    if (singletonObject == null && isSingletonCurrentlyInCreation(beanName)) {
        synchronized (this.singletonObjects) {
            singletonObject = this.earlySingletonObjects.get(beanName);

            // 3. 若二级缓存获取不到,并且允许提早引用,则从三级缓存中获取
            if (singletonObject == null && allowEarlyReference) {
                ObjectFactory<?> singletonFactory = this.singletonFactories.get(beanName);
                if (singletonFactory != null) {
                    singletonObject = singletonFactory.getObject();
                    // 4. 将 Bean 提升到二级缓存,并移除三级缓存
                    this.earlySingletonObjects.put(beanName, singletonObject);
                    this.singletonFactories.remove(beanName);
                }
            }
        }
    }
    return (singletonObject != NULL_OBJECT ? singletonObject : null);
}
2
3
4
5
6
7
8
9
10
11
12
13
14
15
16
17
18
19
20
21
22
23
- **二级缓存的作用:**二级缓存是一个
ConcurrentHashMap,支持并发操作。在多线程环境下,当多个线程同时创建相互依赖的 bean 时,二级缓存能保证半成品对象的线程安全访问,避免对象实例被多次创建或引用错乱。 - 三级缓存的核心作用: 提早暴露 Bean 的对象引用,使得依赖它的 Bean 能够在构造过程中获取到该引用,从而解决循环依赖问题。
完整流程:
实例化 Bean A(A 依赖 B)
在
singletonFactories放入一个 A 的 ObjectFactorySpring 解析
@Autowired,发现 A 依赖 B
实例化 Bean B(B 依赖 A)
在
singletonFactories放入一个 B 的 ObjectFactorySpring 解析
@Autowired,发现 B 依赖 A继续执行一遍获取A,发现三级缓存有。从
singletonFactories获取 A 的 ObjectFactory,并返回对象对象AA 进入
earlySingletonObjects,并移除三级缓存的A填充B对象
B 依赖注入完成,进入
singletonObjects- B 完全初始化后放入
singletonObjects
- B 完全初始化后放入
A 继续完成属性填充,进入
singletonObjects- A 获取到完整的 B 之后,也完成初始化,放入
singletonObjects
- A 获取到完整的 B 之后,也完成初始化,放入
# 6. 为什么一定要三级缓存?
是否可以用二级缓存解决循环依赖?
- 理论上,二级缓存/一级缓存也能解决循环依赖
- 但是,不能正确处理 AOP 代理对象
- 三级缓存的真正作用:延迟代理对象的创建,减少不必要的代理开销,代理对象的创建是在 Bean 初始化阶段
BeanPostProcessor完成的,但在循环依赖场景下入锅要是二级缓存需要提前创建代理对象。。
示例:如果使用二级缓存
protected void addSingletonFactory(String beanName, ObjectFactory<?> singletonFactory) {
    synchronized (this.singletonObjects) {
        if (!this.singletonObjects.containsKey(beanName)) {
            // 所有的 Bean 在实例化后,都会立即创建代理对象,而不是在初始化后再创建。
            Object bean = singletonFactory.getObject();
            // 直接放入二级缓存
            this.earlySingletonObjects.put(beanName, bean);
        }
    }
}
2
3
4
5
6
7
8
9
10
**三级缓存核心:**延迟到真的有需要(即别的 Bean 正在注入你)时,才去决定要不要代理、并生成代理对象。三级缓存不是一开始就创建代理对象,而是放了一个“能生成最终对象(包括代理)”的工厂;只有在发生循环依赖时,才会调用这个工厂创建早期 Bean —— 这时候就可以灵活决定是否创建代理了。
# 7. 循环依赖的几种场景
# (1)Setter 方式(Spring 可自动解决)
@Component
class A {
    @Autowired
    private B b;
}

@Component
class B {
    @Autowired
    private A a;
}
2
3
4
5
6
7
8
9
10
11
✅ Spring 通过三级缓存解决 Setter 方式循环依赖。
# (2)构造器循环依赖(Spring 无法解决)
@Component
class A {
    private final B b;
    @Autowired
    public A(B b) {
        this.b = b;
    }
}

@Component
class B {
    private final A a;
    @Autowired
    public B(A a) {
        this.a = a;
    }
}
2
3
4
5
6
7
8
9
10
11
12
13
14
15
16
17
⛔ Spring 无法解决 构造器注入的循环依赖,会抛出 BeanCurrentlyInCreationException。Spring 在实例化阶段调用构造方法,而此时对象还未放入三级缓存。因为所有 Bean 都需要先实例化,无法在构造方法中拿到对方的引用。会抛出 BeanCurrentlyInCreationException
解决方法:
改用
@Lazy@Component class A { @Autowired @Lazy private B b; } @Component class B { @Autowired private A a; }1
2
3
4
5
6
7
8
9
10
11
12@Lazy让 Spring 只在需要时创建 Bean,从而避免循环依赖。
改用
Setter注入- 避免构造器直接注入对方
使用
ObjectProvider(Spring 4.3+)@Component class A { private final B b; @Autowired public A(ObjectProvider<B> bProvider) { this.b = bProvider.getIfAvailable(); } }1
2
3
4
5
6
7
8
9- Spring 只在需要时创建 B,从而避免循环依赖。
# (3)prototype 作用域的循环依赖
@Component
@Scope("prototype")
class A {
    @Autowired
    private B b;
}

@Component
@Scope("prototype")
class B {
    @Autowired
    private A a;
}
2
3
4
5
6
7
8
9
10
11
12
13
⛔ Spring 不支持 prototype Bean 的循环依赖,因为 prototype Bean 不会进入 singletonObjects,无法通过缓存解决循环引用。
解决方案:
使用
ObjectFactory或ObjectProvider@Component @Scope("prototype") class A { @Autowired private ObjectProvider<B> bProvider; public B getB() { return bProvider.getIfAvailable(); } }1
2
3
4
5
6
7
8
9
10ObjectProvider让 Spring 延迟加载 依赖项,避免循环依赖。
使用
@Lazy@Component @Scope("prototype") class A { @Autowired @Lazy private B b; }1
2
3
4
5
6
7@Lazy让 Spring 只在需要时创建 B,避免循环依赖。
# 8. 总结
| 依赖类型 | Spring 解决方式 |
|---|---|
| 构造器循环依赖 | ❌ 不支持(可用 @Lazy、ObjectProvider 解决) |
| Setter 方式循环依赖 | ✅ Spring 通过 三级缓存 解决 |
| prototype 作用域循环依赖 | ❌ 不支持(可用 ObjectProvider 解决) |
✅ Spring 默认支持 singleton Bean 的循环依赖,通过 三级缓存机制 解决
⛔ prototype 和 @Autowired 构造器注入的循环依赖无法自动解决,需用 @Lazy 或 ObjectProvider 规避。
这样,Spring 既能保证 性能(不提前创建 Bean),又能解决 Setter 循环依赖。
# @Autowired和 @Resource区别
@Autowired 和 @Resource 都是 Spring 用于 依赖注入(Dependency Injection, DI) 的注解,但它们有以下主要区别:
# 1. @Autowired(Spring 提供的依赖注入方式)
特点
- Spring 提供,基于 Spring 依赖注入机制(JDK 反射 + BeanFactory)。
- **默认按类型(byType)注入,然后按照名字(byName)**如果有多个同类型的 Bean,可以结合
@Qualifier指定具体的 Bean。 - 只能用于 Spring 容器管理的 Bean,不能注入非 Spring Bean 对象。
- 可以用于构造方法、字段、Setter 方法、参数。
示例
# (1)默认按类型注入
@Component
public class UserService {
}
@Component
public class OrderService {
    @Autowired  // 按类型注入 UserService
    private UserService userService;
}
2
3
4
5
6
7
8
# (2)配合 @Qualifier 解决多个 Bean
如果同一个类型有多个 Bean,必须使用 @Qualifier 指定:
@Component("userService1")
public class UserServiceImpl1 implements UserService { }

@Component("userService2")
public class UserServiceImpl2 implements UserService { }
@Component
public class OrderService {
    @Autowired
    @Qualifier("userService1") // 指定注入 userService1
    private UserService userService;
}
2
3
4
5
6
7
8
9
10
11
# 2. @Resource(JDK javax.annotation.Resource 提供)
特点
- Java 提供,属于 JSR-250 规范,Spring 只是对它提供了支持。
- 默认按名称(byName)注入,如果找不到匹配的 Bean 才会按类型(byType)注入。
- 可以用于非 Spring Bean 的注入(如 JNDI 资源)。
- 只能用于字段或 Setter 方法,不能用于构造方法或参数。
示例
# (1)默认按名称注入
@Component("userService")
public class UserService {
}
@Component
public class OrderService {
    @Resource(name = "userService") // 按名称查找 "userService" Bean
    private UserService userService;
}
2
3
4
5
6
7
8
# (2)如果 name 没有指定,按字段名匹配
@Component
public class OrderService {
    @Resource  // 自动查找名为 "userService" 的 Bean
    private UserService userService;
}
2
3
4
5
相当于:
@Resource(name = "userService")
private UserService userService;
2
# 3. @Autowired vs @Resource 对比
@Autowired | @Resource | |
|---|---|---|
| 提供方 | Spring | Java(JSR-250 规范) |
| 默认注入方式 | 按类型(byType) | 按名称(byName) |
| 支持按名称注入 | 需要 @Qualifier("beanName") | 默认按名称,找不到才按类型 |
| 适用范围 | 构造方法、字段、Setter、参数 | 只能用于字段和 Setter |
| 是否支持非 Spring Bean | ❌ 只能注入 Spring 容器管理的 Bean | ✅ 支持 JNDI 资源注入 |
| 是否必须在 Spring 容器中 | ✅ 是 | ❌ 不是必须 |
# 4. 什么时候用 @Autowired?什么时候用 @Resource?
✅ 使用 @Autowired
- 如果你只在 Spring 容器内管理 Bean,推荐使用
@Autowired,因为它是 Spring 官方提供的注解,支持@Qualifier更灵活。
✅ 使用 @Resource
- 如果你的项目是 JavaEE 规范(比如 JNDI 资源),建议使用
@Resource,因为它符合 JSR-250 规范。 - 如果你的 Bean 需要按名称注入,但你不想使用
@Qualifier,可以直接使用@Resource(name = "beanName")。
# 5. 为什么官方不推荐使用 @Autowired
在 Spring 项目里,@Autowired 很常见,但官方其实早就不推荐使用字段注入(Field Injection)。原因很简单:难测、不可维护、不安全。下面是要点。
# (1)隐式依赖以及强耦合
字段注入让依赖“凭空出现”,接手代码的人不知道哪里来的,以及进行了强绑定,不符合依赖倒置,采用构造方法注入轻松破解
@Component
public class UserService {
    @Autowired
    private UserRepository userRepository;
}
2
3
4
5
# (2)难以测试
字段注入无法手动构造对象,单元测试必须依赖 Spring 容器。Mock 测试非常麻烦。
UserService service = new UserService(); // ❌ 无法直接实例化
service.setUserRepository(mockRepo);     // 还要写 setter,非常繁琐
2
构造函数注入则可以直接传入 mock:
UserService service = new UserService(mockRepo); // ✅ 轻松测试
# (3)破坏不可变性
字段注入要求字段不能是 final,对象就不再是不可变的。在并发或多线程场景下,这可能引发隐性 bug。
执行流程是这样的:
- Spring 先用 无参构造函数 创建
UserService实例; - 然后在 对象已经创建之后,通过反射找到带
@Autowired的字段; - 再用
Field.set()把依赖对象注入进去。
也就是说,Spring 注入发生在 构造函数执行完之后。如果这个字段是 final,在构造阶段之后就再也不能改了。反射再去 set,会直接抛出 IllegalAccessException。
# (4)生命周期不清晰
字段注入在对象实例化后才反射注入依赖。这意味着在构造函数或初始化阶段访问依赖可能是 null,容易踩坑。
# Bean 的生命周期
Spring Bean 的生命周期主要包括 创建、实例化、初始化、存入单例池、使用、销毁。流程如下:
- 创建(Create):Spring 解析
BeanDefinition,准备创建 Bean。 - 实例化(Instantiation):通过 反射 调用 无参构造方法 实例化 Bean(此时 Bean 还未进行属性注入)。
- 初始化(Initialization):
- BeanPostProcessor(
postProcessBeforeInitialization()):初始化前增强。 - 执行
@PostConstruct/ 实现InitializingBean#afterPropertiesSet()/init-method。 - BeanPostProcessor(
postProcessAfterInitialization()):初始化后增强。
- BeanPostProcessor(
- 加入单例池(Singleton Pool):
- 单例模式下,Bean 存入
singletonObjects(Spring 容器管理的单例池)。
- 单例模式下,Bean 存入
- 使用(Using):在程序运行期间被调用。
- 销毁(Destroy):
- 程序正常运行:Bean 一直存在,不会销毁。
- 调用
close()或shutdown():@PreDestroyDisposableBean#destroy()destroy-method配置的方法。
# ApplicationContext 和 BeanFactory 的区别
# 共同点
- 都是 Spring 容器,可以管理 Bean 的生命周期。
- 都能实现 IoC(控制反转),进行依赖注入。
# 区别
| 对比项 | ApplicationContext | BeanFactory |
|---|---|---|
| 定义 | 高级容器,扩展了 BeanFactory,提供了更多功能。 | 基础容器,是 Spring IoC 容器的最底层实现。 |
| Bean 预初始化 | 默认 预加载单例 Bean,启动时就创建所有单例 Bean。 | 懒加载,默认在 getBean() 时才创建 Bean。 |
| 支持 AOP | 直接支持 AOP,如 @Transactional | 不直接支持 AOP,需要手动添加 BeanPostProcessor。 |
| 事件监听 | 支持 事件发布和监听机制(ApplicationListener)。 | 不支持。 |
| 国际化支持 | 内置 MessageSource,支持多语言。 | 不支持国际化。 |
| 使用场景 | 一般用在 Spring Boot / Spring MVC。 | 适合 轻量级容器或测试环境。 |
# AOP(面向切面编程)详解
# 1. 什么是 AOP?
Spring AOP(Aspect-Oriented Programming,面向切面编程)是 Spring 框架提供的一种重要功能,它允许在不修改原有业务代码的情况下,为方法添加额外的行为(如日志记录、事务管理等)。Spring AOP 主要是通过 动态代理 技术来实现的,分为 JDK 动态代理 和 CGLIB 动态代理。
# 2. AOP 的核心概念
| 术语 | 作用 |
|---|---|
| Aspect(切面) | 具体增强的功能,如日志、事务管理。 |
| JoinPoint(连接点) | 目标方法执行的具体位置(方法调用、构造方法等)。 |
| Pointcut(切点) | 定义在哪些方法上应用 AOP。 |
| Advice(通知) | 具体的增强逻辑,如 @Before、@After。 |
| Weaving(织入) | 把切面逻辑动态应用到目标方法上的过程。 |
# 3. Spring AOP 的通知类型
| 通知类型 | 注解 | 作用 |
|---|---|---|
| 前置通知(Before) | @Before("execution(切点表达式)") | 方法执行前增强 |
| 后置通知(After) | @After("execution(切点表达式)") | 方法执行后增强 |
| 返回通知(AfterReturning) | @AfterReturning("execution(切点表达式)") | 方法成功返回后增强 |
| 异常通知(AfterThrowing) | @AfterThrowing("execution(切点表达式)") | 方法抛出异常后增强 |
| 环绕通知(Around) | @Around("execution(切点表达式)") | 包裹整个方法,可以控制方法执行 |
# 4. AOP 示例
定义切面
@Aspect
@Component
public class LogAspect {

    @Pointcut("execution(* com.example.service.*.*(..))")
    public void logPointCut() {}

    @Before("logPointCut()")
    public void beforeAdvice() {
        System.out.println("方法执行前");
    }

    @After("logPointCut()")
    public void afterAdvice() {
        System.out.println("方法执行后");
    }

    @AfterReturning("logPointCut()")
    public void afterReturningAdvice() {
        System.out.println("方法返回值后");
    }

    @Around("logPointCut()")
    public Object aroundAdvice(ProceedingJoinPoint joinPoint) throws Throwable {
        System.out.println("方法执行前(环绕通知)");
        Object result = joinPoint.proceed();
        System.out.println("方法执行后(环绕通知)");
        return result;
    }
}
2
3
4
5
6
7
8
9
10
11
12
13
14
15
16
17
18
19
20
21
22
23
24
25
26
27
28
29
30
配置 AOP(Spring Boot 自动生效)
@Configuration
@EnableAspectJAutoProxy
public class AopConfig {
}
2
3
4
# 5. AOP 代理模式
Spring AOP 主要使用 动态代理 来增强目标对象:
| 代理模式 | 适用场景 | 底层实现 |
|---|---|---|
| JDK 动态代理 | 目标对象 实现了接口 | java.lang.reflect.Proxy |
| CGLIB 代理 | 目标对象 没有接口 | 继承目标类,使用 ASM 生成子类 |
注意:Spring Boot 2.0 以后,默认使用 CGLIB 代理(即使有接口)。
# 6. 注解如何与 AOP 切面配合
在 Spring AOP 中,可以通过 自定义注解 结合 切面(Aspect),实现更加灵活的切面编程(如日志、权限校验、事务管理等)。
# 主要步骤
- 定义自定义注解(用于标记哪些方法需要 AOP 增强)。
- 定义 AOP 切面(拦截带有该注解的方法,实现增强逻辑)。
- 应用注解到目标方法(业务方法上加上自定义注解)。
- Spring Boot 自动扫描,切面生效。
# 代码示例
# 1 .定义自定义注解
@Retention(RetentionPolicy.RUNTIME)  // 运行时生效
@Target(ElementType.METHOD)  // 作用于方法
public @interface LogExecutionTime {
}
2
3
4
📌 解释:
@Retention(RetentionPolicy.RUNTIME):让注解在 运行时可用,AOP 需要反射解析它。@Target(ElementType.METHOD):只作用在 方法 上。
# 2.定义 AOP 切面
@Aspect
@Component
public class LogAspect {

    @Around("@annotation(com.example.annotation.LogExecutionTime)")  // 拦截标注了 @LogExecutionTime 的方法
    public Object logExecutionTime(ProceedingJoinPoint joinPoint) throws Throwable {
        long start = System.currentTimeMillis();

        Object result = joinPoint.proceed();  // 执行目标方法

        long end = System.currentTimeMillis();
        System.out.println(joinPoint.getSignature() + " 方法执行耗时: " + (end - start) + "ms");

        return result;
    }
}
2
3
4
5
6
7
8
9
10
11
12
13
14
15
16
📌 解释:
@Around("@annotation(全路径注解名)"):拦截 带有@LogExecutionTime注解的方法。joinPoint.proceed():执行目标方法。- 记录方法执行时间,增强业务逻辑。
# 3 .应用自定义注解
@Service
public class UserService {

    @LogExecutionTime  // 这个方法会被 AOP 代理
    public void process() {
        System.out.println("正在执行 UserService.process() 方法...");
        try {
            Thread.sleep(1000);  // 模拟耗时操作
        } catch (InterruptedException e) {
            e.printStackTrace();
        }
    }
}
2
3
4
5
6
7
8
9
10
11
12
13
# 4 .启用 AOP(Spring Boot 自动生效)
Spring Boot 默认开启 AOP,如果手动配置:
@Configuration
@EnableAspectJAutoProxy  // 开启 AOP 代理
public class AopConfig {
}
2
3
4
# 总结
✅ AOP + 自定义注解 实现了 无侵入式增强:
- 业务代码 不需要修改,只需加注解。
- 适用于 日志、权限、事务、监控 等场景。
- Spring AOP 默认使用 CGLIB 代理(非接口类),但 JDK 代理(基于接口) 也可用。
🚀 如果你要在 Spring Boot 项目中用 AOP,强烈建议结合自定义注解,这样切面逻辑清晰,代码可维护性高!
# Spring Aop的底层实现原理
AOP 是 IoC(控制反转) 的扩展功能,它在 Spring 容器管理 Bean 的过程中 增加了一个扩展点,用于对 Bean 进行动态代理,实现方法级增强,如日志记录、权限校验等。
Spring Bean 的创建流程(结合 AOP 代理):
- Spring IoC 容器初始化
- 扫描并解析 Bean 定义
- 创建 Bean 实例(new)
- 执行 BeanPostProcessor
AnnotationAwareAspectJAutoProxyCreator解析@Aspect- 判断 Bean 是否需要 AOP 代理
- 如果需要,使用 JDK 代理或 CGLIB 代理生成代理对象
- 注册到 IoC 容器(代理对象)
- 外部调用 Bean 方法时,实际调用代理对象的方法
- 代理对象执行 AOP 逻辑 + 目标方法
# Spring事务的支持
在企业级应用开发中,事务是保障数据一致性与完整性的重要手段。Spring 框架通过抽象层为不同持久化技术(JDBC、Hibernate、JPA、MyBatis 等)提供了统一的事务管理支持。本文将从 事务抽象模型、AOP 实现原理、事务失效场景、传播机制 四个角度,系统介绍 Spring 对事务的支持。
# Spring 事务抽象模型的运行逻辑
# 1. 外部调用
你在 Service 方法上写了一个 @Transactional:
@Service
public class UserService {

    @Transactional
    public void saveUser() {
        // 业务逻辑
    }
}
2
3
4
5
6
7
8
调用 saveUser() 的时候,其实调用的是 Spring AOP 代理对象,而不是原始对象。
这一步由 TransactionInterceptor 接管。
# 2. AOP 拦截器 —— TransactionInterceptor
- 作用:拦截方法调用,决定是否要开启事务。
- 核心逻辑:
- 解析
@Transactional注解 → 得到事务定义信息(即TransactionDefinition); - 调用事务管理器(
PlatformTransactionManager)的getTransaction(definition)获取事务; - 执行目标方法(即你的业务逻辑);
- 如果方法正常执行,调用
commit(status)提交事务; - 如果抛出异常,根据回滚规则调用
rollback(status)。
- 解析
所以 TransactionInterceptor 就是事务边界的统一入口。
# 3. 事务管理器 —— PlatformTransactionManager
- 作用:真正和数据库交互,控制事务的开启、提交、回滚。
- 它只依赖抽象接口,对外暴露统一的方法:
getTransaction(TransactionDefinition definition)commit(TransactionStatus status)rollback(TransactionStatus status)
关键点:
Spring 并不知道你底层是 JDBC、JPA 还是 JTA。
不同技术的差异,通过 PlatformTransactionManager 的具体实现来屏蔽:
- JDBC →
DataSourceTransactionManager - JPA/Hibernate →
JpaTransactionManager - 多数据源 →
ChainedTransactionManager
# 4. 事务定义 —— TransactionDefinition
- 作用:描述事务的“配置参数”。
- 在
@Transactional注解里配置的东西(传播、隔离、超时、只读)最终都会转成TransactionDefinition。 PlatformTransactionManager拿到它之后,才能决定要不要开启事务、以什么样的隔离级别执行。
比如:
- 如果传播行为是
REQUIRES_NEW,就必须挂起当前事务、重新开启一个新事务。 - 如果隔离级别是
SERIALIZABLE,就要用最高的数据库隔离机制。
# 5. 事务状态 —— TransactionStatus
- 作用:保存当前事务的运行时信息。
- 它会被
PlatformTransactionManager创建,并返回给TransactionInterceptor。 - 里面记录的信息有:
- 是否是新建的事务(
isNewTransaction) - 是否被标记为仅回滚(
setRollbackOnly) - 是否有保存点(NESTED 嵌套事务用)
- 是否是新建的事务(
当 TransactionInterceptor 在执行完方法后,需要提交或回滚时,就会把这个 TransactionStatus 再传回给事务管理器,事务管理器根据其中的状态做最终处理。
# 6.总结
TransactionInterceptor:拦截方法,拿到事务定义(TransactionDefinition),调用事务管理器。PlatformTransactionManager:根据定义,返回事务状态(TransactionStatus)。- 业务方法执行。
TransactionInterceptor:根据执行结果,调用事务管理器的commit或rollback,并把事务状态传入。PlatformTransactionManager:最终提交/回滚事务。
# Spring事务使用方式
Spring 提供了两种事务管理方式:编程式事务 和 声明式事务。
# 1. 编程式事务
直接通过 PlatformTransactionManager 或 TransactionTemplate 控制事务边界,适用于对事务粒度要求极细的场景。
@Autowired
private PlatformTransactionManager transactionManager;

public void programmaticTransaction() {
    DefaultTransactionDefinition def = new DefaultTransactionDefinition();
    def.setPropagationBehavior(TransactionDefinition.PROPAGATION_REQUIRED);
    TransactionStatus status = transactionManager.getTransaction(def);
    try {
        // 执行业务逻辑
        userMapper.insert(...);
        transactionManager.commit(status);
    } catch (Exception e) {
        transactionManager.rollback(status);
        throw e;
    }
}
2
3
4
5
6
7
8
9
10
11
12
13
14
15
16
更常见的是使用 TransactionTemplate 简化:
@Autowired
private TransactionTemplate transactionTemplate;

public void programmaticTransactionTemplate() {
    transactionTemplate.execute(status -> {
        userMapper.insert(...);
        return null;
    });
}
2
3
4
5
6
7
8
9
# 2. 声明式事务
更常用的方式是基于注解的声明式事务,借助 AOP 完成事务边界控制。
@Service
public class UserService {
    @Transactional(rollbackFor = Exception.class)
    public void createUser(User user) {
        userMapper.insert(user);
        if (user.getAge() < 18) {
            throw new IllegalArgumentException("未成年禁止注册");
        }
    }
}
2
3
4
5
6
7
8
9
10
配置方式:
XML 配置事务驱动
<tx:annotation-driven transaction-manager="transactionManager"/>
Java Config 配置
@Configuration
@EnableTransactionManagement
public class TransactionConfig {
    @Bean
    public PlatformTransactionManager transactionManager(DataSource dataSource) {
        return new DataSourceTransactionManager(dataSource);
    }
}
2
3
4
5
6
7
8
注解驱动
- 类或方法上添加
@Transactional。 - 可指定传播行为、隔离级别、超时和回滚策略。
# 3. 两种方式对比
| 特点 | 编程式事务 | 声明式事务 |
|---|---|---|
| 灵活性 | 高,代码精确控制事务范围 | 较低,由框架自动管理 |
| 开发效率 | 低,需要手动写边界逻辑 | 高,业务逻辑更简洁 |
| 使用场景 | 特殊、复杂事务控制 | 大部分常规业务场景 |
# Spring事务失效的常见场景
虽然 Spring 提供了强大的事务支持,但在实践中仍有一些常见的“事务不生效”情况:
- 自调用问题
- 类内方法调用绕过代理,事务失效。
- 解决:使用代理对象调用,或拆分到不同 Bean。
- 方法非 public
- Spring 默认基于代理机制,事务只对 public 方法生效。
- 异常类型不匹配
- 默认只回滚 RuntimeException 和 Error。
- 可通过
rollbackFor配置。
- 数据库不支持事务
- 如 MyISAM 引擎,Spring 层即使控制事务也无效。
- 多线程调用
- 事务上下文绑定在 ThreadLocal,跨线程则失效。
- 非 Spring 管理的对象
- 手动
new出来的对象不受 AOP 代理控制。
- 手动
# Spring事务传播机制
Spring 提供了 7 种事务传播行为 来应对方法嵌套调用:
| 传播行为 | 语义 | 应用场景 |
|---|---|---|
REQUIRED(默认) | 有事务则加入,无事务则新建 | 业务方法 |
REQUIRES_NEW | 每次新建事务,挂起已有事务 | 日志、补偿 |
SUPPORTS | 有事务则加入,无事务则非事务执行 | 只读查询 |
NOT_SUPPORTED | 总是非事务,若有事务则挂起 | 大数据量查询 |
MANDATORY | 必须在事务中执行,否则抛异常 | 强制依赖外部事务 |
NEVER | 必须在非事务中执行,否则抛异常 | 特殊场景 |
NESTED | 在事务中开启保存点,子事务回滚不影响外部事务 | 局部回滚 |
源码逻辑
传播行为由 AbstractPlatformTransactionManager#getTransaction() 处理:
if (definition.getPropagationBehavior() == PROPAGATION_REQUIRED) {
    if (existingTransaction != null) {
        // 已存在事务 -> 加入
        return handleExistingTransaction(definition, transaction, debugEnabled);
    } else {
        // 不存在事务 -> 新建
        return startTransaction(definition, transaction, debugEnabled);
    }
}
2
3
4
5
6
7
8
9
其中 REQUIRES_NEW 会调用 suspend() 挂起当前事务,而 NESTED 则通过 JDBC Savepoint 实现嵌套事务。