 设计模式
设计模式
# 23种设计模式
# 设计模式概述
在软件开发过程中,随着系统规模的扩大和复杂度的提升,代码的可维护性、复用性和扩展性成为关键问题。设计模式(Design Patterns) 是一套被广泛认可的代码组织和设计方案,它总结了软件开发中常见的设计经验,帮助开发者编写更加优雅、灵活和可扩展的代码。
GoF(Gang of Four,四人帮) 在《设计模式:可复用面向对象软件的基础》中,将设计模式分为三大类:
# 创建型模式(Creational Patterns)
关注对象的创建方式,其核心思想是将对象的创建与使用分离,以提高代码的灵活性和可维护性。GoF 提供了以下 5 种创建型模式:
- 单例模式(Singleton):确保一个类只有一个实例,并提供全局访问点。
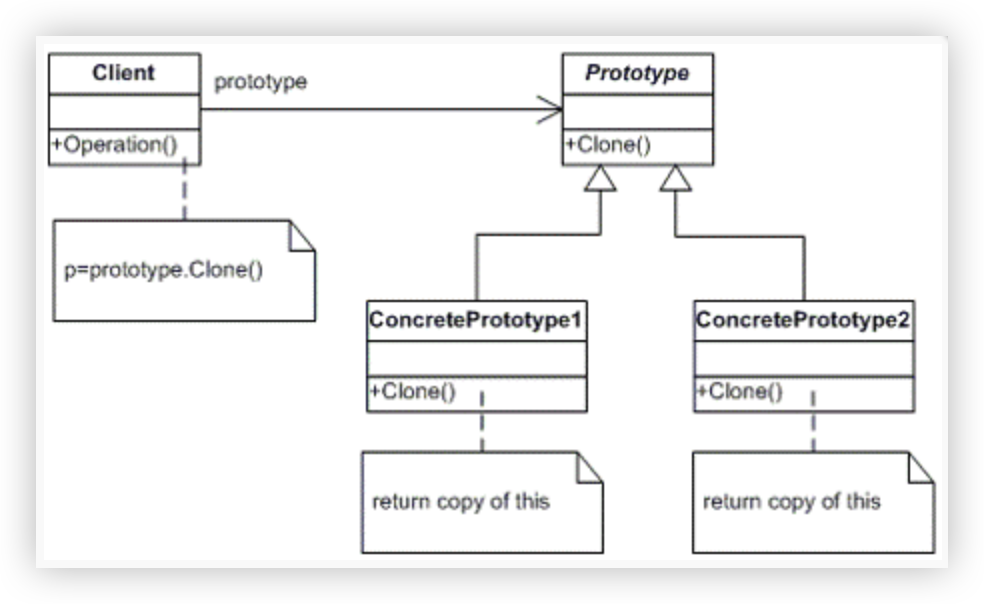
- 原型模式(Prototype):通过复制已有实例来创建新对象,避免创建开销。
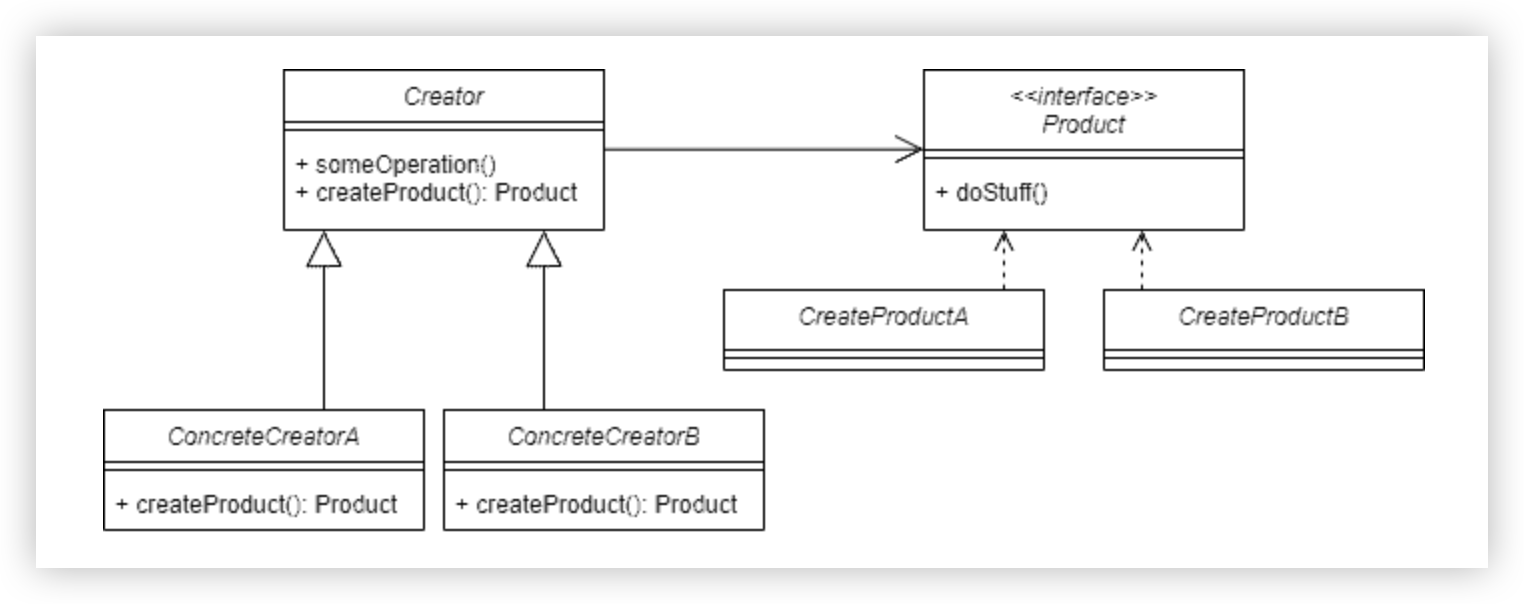
- 工厂方法模式(Factory Method):定义一个接口用于创建对象,但由子类决定实例化哪种类。
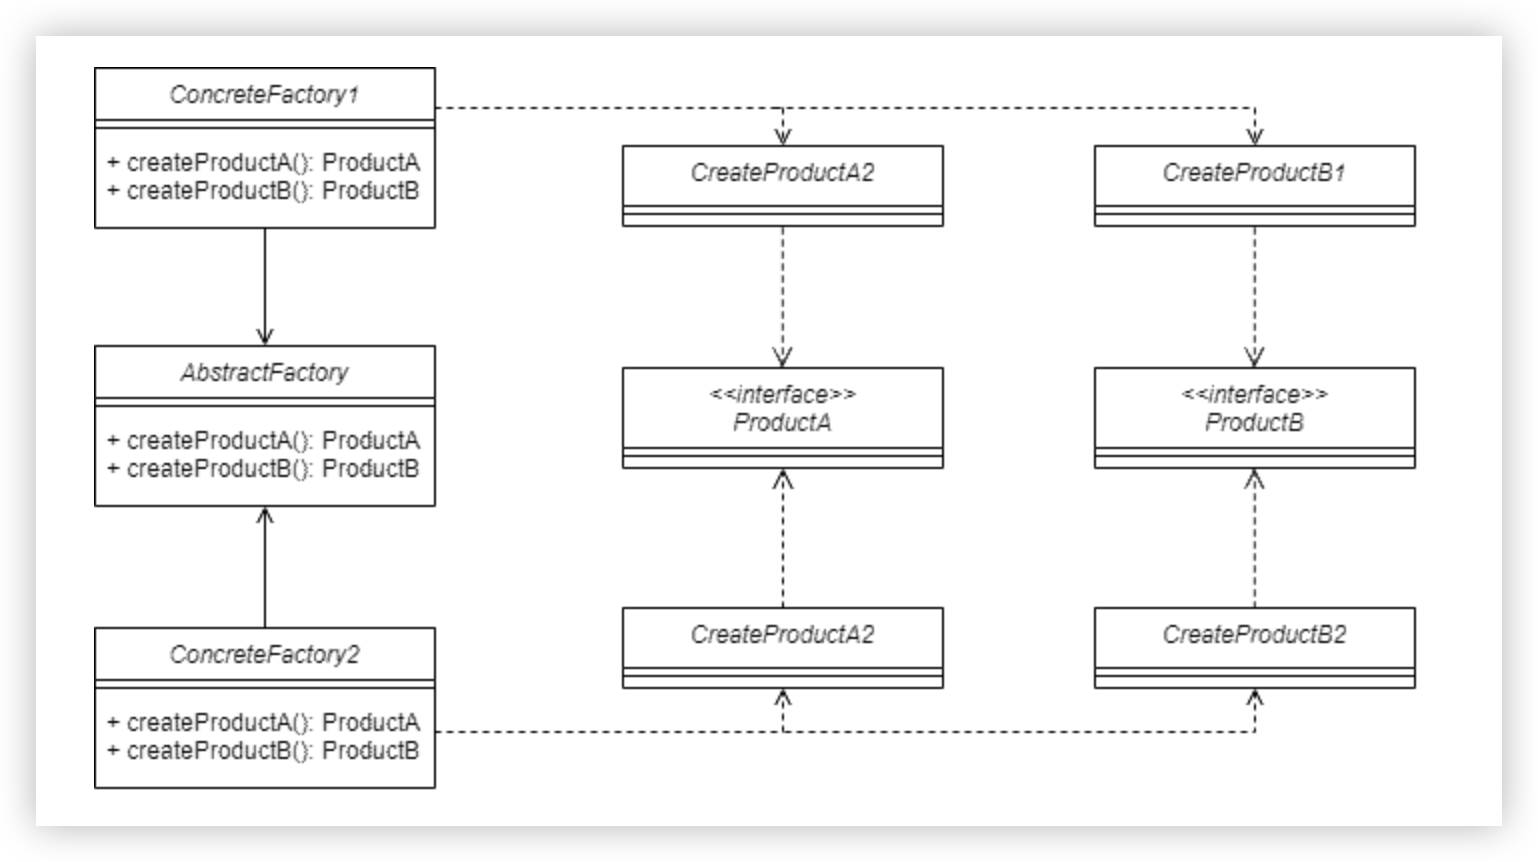
- 抽象工厂模式(Abstract Factory):提供多个相关对象的创建接口,封装具体的实例化逻辑。
- 建造者模式(Builder):将复杂对象的构造过程与表示分离,使同样的构建过程可以创建不同的表示。
# 结构型模式(Structural Patterns)
结构型模式主要关注如何组织类和对象,它们的目标是让不同的组件能够高效、灵活地组合在一起,以构建更大的系统结构。
💡 关键词:适配、封装、组合、代理、扩展
📌 案例理解
想象你在搭建乐高积木,每个小积木可以单独存在,也可以通过不同的方式组合在一起,形成一个更大的结构。
GoF 提供了 7 种结构型模式:
- 代理模式(Proxy):通过代理对象控制对目标对象的访问。
- 适配器模式(Adapter):将一个接口转换为客户端期望的另一种接口,使原本不兼容的类可以协同工作。
- 桥接模式(Bridge):将抽象部分与实现部分分离,使它们可以独立变化。
- 装饰者模式(Decorator):动态扩展对象的功能,而不会影响其他对象。
- 外观模式(Facade):提供一个统一的接口,简化子系统的使用。
- 享元模式(Flyweight):通过共享技术有效地支持大量细粒度对象的复用,减少内存开销。
- 组合模式(Composite):将对象组织成树形结构,使客户端可以统一对待单个对象和组合对象。
# 行为型模式(Behavioral Patterns)
行为型模式关注的是对象之间的通信和职责分配,它们解决的是如何让多个对象高效协作。
💡 关键词:交互、职责分配、事件驱动、控制流
📌 案例理解
想象一个公司团队,每个人都有不同的角色和职责,如何高效协作完成任务?
GoF 提供了 11 种行为型模式:
- 模板方法模式(Template Method):定义算法框架,具体实现由子类完成。
- 策略模式(Strategy):定义一系列算法,将它们封装起来,并使它们可以互相替换。
- 命令模式(Command):将请求封装为对象,以支持可撤销操作。
- 职责链模式(Chain of Responsibility):将请求沿着链传递,直到被某个处理者处理。
- 状态模式(State):允许对象在内部状态改变时改变其行为。
- 观察者模式(Observer):定义对象间的一对多依赖关系,使得一个对象状态改变时,所有依赖它的对象都会收到通知。
- 中介者模式(Mediator):用一个中介对象封装一系列对象的交互,减少对象间的耦合。
- 迭代器模式(Iterator):提供一种方法顺序访问聚合对象,而无需暴露其内部表示。
- 访问者模式(Visitor):在不改变数据结构的前提下,为对象结构增加新功能。
- 备忘录模式(Memento):捕获对象的内部状态,并允许恢复到之前的状态。
- 解释器模式(Interpreter):为特定语言提供解释器,处理语法和解析问题。
通过这些设计模式,我们可以提高代码的复用性、降低耦合、增强可维护性,从而构建更加稳定和灵活的软件系统。接下来,我们将逐一探索这些模式的应用场景和实现方式。
# 1.单例模式(Singleton Pattern)
单例模式是一种 创建型模式,用于确保一个类在整个应用程序生命周期中只有一个实例,并提供一个全局访问点。
特点:
- 唯一实例:确保一个类只有一个实例,并提供全局访问点,Spring 默认的 Bean 作用域(Scope)是单例,即
@Scope("singleton")。 - 延迟加载(可选):实例只在需要时创建,节省资源。
- 线程安全(可选):保证在多线程环境下不会创建多个实例。
# 1.1 饿汉式(Eager Initialization)
特点:类加载时直接创建实例,线程安全,但可能浪费资源。
public class Singleton {
    private static final Singleton INSTANCE = new Singleton();

    private Singleton() {}  // 私有构造方法,防止外部创建

    public static Singleton getInstance() {
        return INSTANCE; // 直接返回已创建的实例
    }
}
2
3
4
5
6
7
8
9
✅ 优点:线程安全,简单易用。
❌ 缺点:类加载时就初始化,占用内存,即使没用到。
# 1.2 懒汉式(Lazy Initialization,线程不安全)
特点:只有在调用 getInstance() 方法时才创建实例,节省资源,但多线程环境下可能创建多个实例(线程不安全)。
public class Singleton {
    private static Singleton instance;

    private Singleton() {}

    public static Singleton getInstance() {
        if (instance == null) { // 只有在需要时才创建
            instance = new Singleton();
        }
        return instance;
    }
}
2
3
4
5
6
7
8
9
10
11
12
❌ 缺点:多线程环境下,可能会创建多个实例,不推荐!
# 1.3 线程安全的懒汉式(synchronized,方法加锁影响性能)
public class Singleton {
    private static Singleton instance;

    private Singleton() {}

    public static synchronized Singleton getInstance() {
        if (instance == null) {
            instance = new Singleton();
        }
        return instance;
    }
}
2
3
4
5
6
7
8
9
10
11
12
❌ 缺点:每次获取实例都要加锁,性能较低。
# 1.4 双重检查锁(DCL,推荐)
特点:使用 volatile 关键字 + 双重检查,保证线程安全,同时提高性能。
public class Singleton {
    private static volatile Singleton instance;

    private Singleton() {}

    public static Singleton getInstance() {
        if (instance == null) { // 第一次检查
            synchronized (Singleton.class) {
                if (instance == null) { // 第二次检查
                    instance = new Singleton();
                }
            }
        }
        return instance;
    }
}
2
3
4
5
6
7
8
9
10
11
12
13
14
15
16
✅ 优点:线程安全 + 高性能,推荐!
# 1.5 静态内部类(推荐)
特点:利用类加载机制,实现懒加载,线程安全,推荐使用。
public class Singleton {
    private Singleton() {}

    private static class Holder {
        private static final Singleton INSTANCE = new Singleton();
    }

    public static Singleton getInstance() {
        return Holder.INSTANCE;
    }
}
2
3
4
5
6
7
8
9
10
11
✅ 优点:
JVM 类加载机制保证线程安全静态内部类 Holder 只有在 getInstance() 第一次调用时才会被加载**,确保懒加载。JVM 类加载是线程安全的**,保证 INSTANCE 只会初始化一次,避免同步锁的开销。
# 2. 工厂模式
# 2.1 简单工厂
简单工厂模式并非正式的设计模式,而是编程习惯,通过一个类或方法根据输入参数创建对象,通常使用静态方法实现。它适合简单场景,不需要频繁修改创建逻辑,但扩展性较差,因为添加新类型需要修改工厂类,违反开闭原则。
例如,考虑一个形状创建场景:
- 定义
Shape接口及其实现类Circle和Square。 - 创建
ShapeFactory类,包含静态方法createShape,根据输入字符串返回对应形状对象。
代码示例:
public class ShapeFactory {
    public static Shape createShape(String type) {
        if (type.equals("circle")) {
            return new Circle();
        } else if (type.equals("square")) {
            return new Square();
        }
        throw new IllegalArgumentException("Invalid shape type");
    }
}

public interface Shape {
    void draw();
}

public class Circle implements Shape {
    @Override
    public void draw() {
        System.out.println("Drawing a circle");
    }
}

public class Square implements Shape {
    @Override
    public void draw() {
        System.out.println("Drawing a square");
    }
}
2
3
4
5
6
7
8
9
10
11
12
13
14
15
16
17
18
19
20
21
22
23
24
25
26
27
28
这种实现简单直观,适合初学者,但不适合复杂场景。
✅ 优点:
- 统一管理对象创建,调用者不需要 new 具体类。
❌ 缺点:
- 不符合开闭原则,新增产品需要修改
createShape。 - 不能通过继承扩展新的产品。
# 2.2 工厂方法模式
工厂方法模式是正式的设计模式,定义一个接口让子类决定实例化哪个类。它使用继承和多态,允许通过创建新子类添加新类型对象,符合开闭原则,增强代码的扩展性和可维护性。

例如,创建一个抽象形状工厂:
- 定义抽象类
ShapeFactory,包含抽象方法createShape。 - 具体工厂类如
CircleFactory和SquareFactory继承ShapeFactory,实现createShape方法。
代码示例:
public abstract class ShapeFactory {
    public abstract Shape createShape();
}

public class CircleFactory extends ShapeFactory {
    @Override
    public Shape createShape() {
        return new Circle();
    }
}

public class SquareFactory extends ShapeFactory {
    @Override
    public Shape createShape() {
        return new Square();
    }
}

public interface Shape {
    void draw();
}

public class Circle implements Shape {
    @Override
    public void draw() {
        System.out.println("Drawing a circle");
    }
}

public class Square implements Shape {
    @Override
    public void draw() {
        System.out.println("Drawing a square");
    }
}
public class Main {
    public static void main(String[] args) {
        ShapeFactory circleFactory = new CircleFactory();
        Shape circle = circleFactory.createShape();
        circle.draw(); // 输出: Drawing a circle

        ShapeFactory squareFactory = new SquareFactory();
        Shape square = squareFactory.createShape();
        square.draw(); // 输出: Drawing a square
    }
}
2
3
4
5
6
7
8
9
10
11
12
13
14
15
16
17
18
19
20
21
22
23
24
25
26
27
28
29
30
31
32
33
34
35
36
37
38
39
40
41
42
43
44
45
46
这种模式在Java框架中常见,如Spring和Struts,用于提供高灵活性的对象创建。其实这里
✅ 优点:
- 符合开闭原则,扩展新产品时只需新增工厂类。
❌ 缺点:
- 类的数量增多,每新增一个产品都要创建一个工厂。
# 3. 抽象工厂模式
抽象工厂模式提供接口创建相关对象家族,不指定具体类,确保家族内对象一致性,一个工厂可以创建一组相关产品。它适合需要多个相关对象的场景,如不同平台的UI组件(Windows风格和Mac风格)。
例如,创建一个小部件工厂:
- 定义
WidgetFactory接口,包含创建按钮和文本框的方法。 - 具体工厂类如
WindowsWidgetFactory和MacWidgetFactory实现接口,创建对应平台的按钮和文本框。
代码示例:
public interface WidgetFactory {
    Button createButton();
    TextBox createTextBox();
}

public class WindowsWidgetFactory implements WidgetFactory {
    @Override
    public Button createButton() {
        return new WindowsButton();
    }
    @Override
    public TextBox createTextBox() {
        return new WindowsTextBox();
    }
}

public class MacWidgetFactory implements WidgetFactory {
    @Override
    public Button createButton() {
        return new MacButton();
    }
    @Override
    public TextBox createTextBox() {
        return new MacTextBox();
    }
}

public interface Button {
    void paint();
}

public interface TextBox {
    void paint();
}

public class WindowsButton implements Button {
    @Override
    public void paint() {
        System.out.println("Painting a Windows button");
    }
}

public class WindowsTextBox implements TextBox {
    @Override
    public void paint() {
        System.out.println("Painting a Windows text box");
    }
}

public class MacButton implements Button {
    @Override
    public void paint() {
        System.out.println("Painting a Mac button");
    }
}

public class MacTextBox implements TextBox {
    @Override
    public void paint() {
        System.out.println("Painting a Mac text box");
    }
}
public class Main {
    public static void main(String[] args) {
        WidgetFactory windowsFactory = new WindowsWidgetFactory();
        Button winButton = windowsFactory.createButton();
        TextBox winTextBox = windowsFactory.createTextBox();
        winButton.paint();    // 输出: Painting a Windows button
        winTextBox.paint();   // 输出: Painting a Windows text box

        WidgetFactory macFactory = new MacWidgetFactory();
        Button macButton = macFactory.createButton();
        TextBox macTextBox = macFactory.createTextBox();
        macButton.paint();    // 输出: Painting a Mac button
        macTextBox.paint();   // 输出: Painting a Mac text box
    }
}
2
3
4
5
6
7
8
9
10
11
12
13
14
15
16
17
18
19
20
21
22
23
24
25
26
27
28
29
30
31
32
33
34
35
36
37
38
39
40
41
42
43
44
45
46
47
48
49
50
51
52
53
54
55
56
57
58
59
60
61
62
63
64
65
66
67
68
69
70
71
72
73
74
75
76
77
这种模式确保创建的对象家族(如Windows风格或Mac风格)保持一致,适合需要切换不同风格的场景。
✅ 优点:
- 确保一组产品的兼容性(Windows 工厂只生产 Windows 组件)。
- 符合开闭原则,扩展新产品族时不修改已有代码。
❌ 缺点:
- 扩展新产品族困难(新增
Label组件需要修改所有工厂接口)。 - 类的数量增多。
# 4. 原型模式(Prototype)
原型模式(Prototype Pattern) 属于 创建型模式,其核心思想是 通过复制已有对象来创建新对象,而不是使用 new 关键字直接实例化。
关键点:
- 适用于对象创建成本高的场景,例如涉及数据库、网络请求、大量计算等。
- 避免重复初始化,提高性能。
- 支持复杂对象的复制,避免手动
new造成的维护成本。
原型模式的核心是:
- 定义一个可以复制自己的对象(Prototype)。
- 提供一个
clone()方法来复制对象。 - 支持浅拷贝和深拷贝(如果对象内部有引用类型,需要额外处理)。
# 4.1 传统 new 方式
class Product {
    String name;

    public Product(String name) {
        this.name = name;
        System.out.println("Product 被创建");
    }
}

public class Main {
    public static void main(String[] args) {
        Product p1 = new Product("商品A");
        Product p2 = new Product("商品A");  // 重新 new,浪费资源
    }
}
2
3
4
5
6
7
8
9
10
11
12
13
14
15
💥 问题:
- 每次
new都会执行构造方法,可能涉及 数据库查询、复杂计算等,影响性能。 - 代码不灵活,需要显式
new对象。
# 4.2 浅拷贝
- 复制基本数据类型(
int、boolean、double等)。 - 引用类型变量(对象)不会复制,而是复制地址(即多个对象共享同一个引用)。
class Address {
    String city;

    public Address(String city) {
        this.city = city;
    }
}

class User implements Cloneable {
    String name;
    Address address; // 引用类型

    public User(String name, Address address) {
        this.name = name;
        this.address = address;
    }

    @Override
    public User clone() {
        try {
            return (User) super.clone();
        } catch (CloneNotSupportedException e) {
            throw new RuntimeException(e);
        }
    }
}

public class Main {
    public static void main(String[] args) {
        Address addr = new Address("北京");
        User user1 = new User("张三", addr);
        User user2 = user1.clone();  // 浅拷贝

        user2.address.city = "上海"; // 修改 user2 的地址
        System.out.println(user1.address.city); // 💥 变成 "上海",user1 也受影响
    }
}
2
3
4
5
6
7
8
9
10
11
12
13
14
15
16
17
18
19
20
21
22
23
24
25
26
27
28
29
30
31
32
33
34
35
36
37
💥 问题: user1 和 user2 共享 Address 对象,修改 user2.address 会影响 user1.address。
# 4.3 深拷贝
- 需要手动复制引用类型变量,保证每个对象完全独立。
- 解决共享对象的问题。
class Address implements Cloneable {
    String city;

    public Address(String city) {
        this.city = city;
    }

    @Override
    public Address clone() {
        try {
            return (Address) super.clone();
        } catch (CloneNotSupportedException e) {
            throw new RuntimeException(e);
        }
    }
}

class User implements Cloneable {
    String name;
    Address address;

    public User(String name, Address address) {
        this.name = name;
        this.address = address;
    }

    @Override
    public User clone() {
        try {
            User cloned = (User) super.clone();
            cloned.address = this.address.clone(); // 手动克隆引用类型
            return cloned;
        } catch (CloneNotSupportedException e) {
            throw new RuntimeException(e);
        }
    }
}

public class Main {
    public static void main(String[] args) {
        Address addr = new Address("北京");
        User user1 = new User("张三", addr);
        User user2 = user1.clone();  // 深拷贝

        user2.address.city = "上海";  // 修改 user2 的地址
        System.out.println(user1.address.city);  // ✅ 仍然是 "北京",user1 未受影响
    }
}
2
3
4
5
6
7
8
9
10
11
12
13
14
15
16
17
18
19
20
21
22
23
24
25
26
27
28
29
30
31
32
33
34
35
36
37
38
39
40
41
42
43
44
45
46
47
48
✅ 深拷贝保证 user1 和 user2 的 Address 是完全独立的!
# 5. 建造者模式(Builder Pattern)
建造者模式(Builder Pattern)是一种创建型设计模式,用于构建复杂对象,将对象的创建与表示分离,使同样的构建过程可以创建不同的对象。
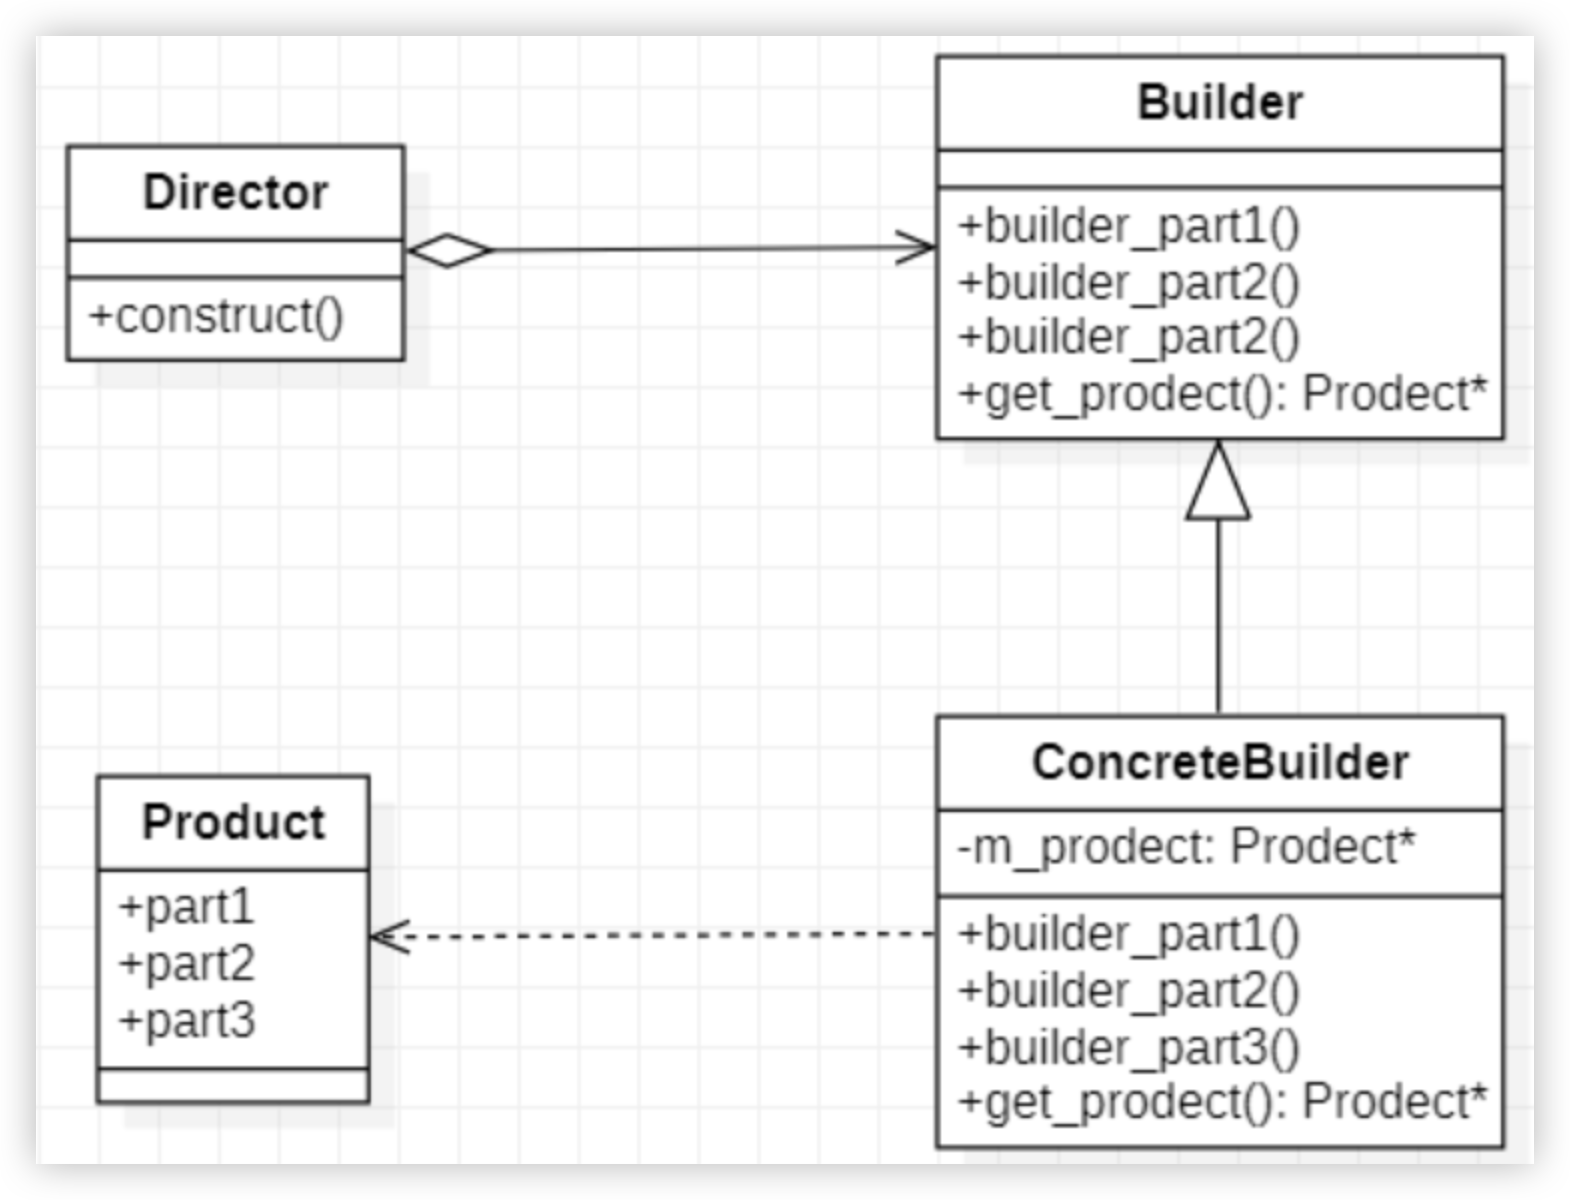
建造者模式的目标是:
- 将对象的创建过程封装在“建造者”中,避免在
Product类中定义多个构造方法。 - 分步构建对象,使得代码更清晰、可读性更高。
- 支持链式调用,流畅 API 设计。
建造者模式通常包含 4 个角色:
Product(产品): 需要创建的复杂对象。Builder(抽象建造者): 定义构造Product的抽象方法。ConcreteBuilder(具体建造者): 实现Builder,负责创建Product的具体部分。Director(指挥者): 负责调用Builder构建最终的Product。
# 5.1 传统方式:构造方法过载
class Product {
    private String name;
    private String type;
    private double price;
    private String brand;
    private String color;

    public Product(String name, String type, double price) {
        this.name = name;
        this.type = type;
        this.price = price;
    }

    public Product(String name, String type, double price, String brand) {
        this(name, type, price);
        this.brand = brand;
    }

    public Product(String name, String type, double price, String brand, String color) {
        this(name, type, price, brand);
        this.color = color;
    }
}
2
3
4
5
6
7
8
9
10
11
12
13
14
15
16
17
18
19
20
21
22
23
💥 问题:
- 构造方法随属性增多而不断扩展,难以维护。
# 5.2 使用建造者模式
// 1️⃣ Product 类(最终创建的对象)
class Product {
    private String name;
    private String type;
    private double price;
    private String brand;
    private String color;

    // 私有化构造方法,防止外部直接 new
    private Product() {}

    @Override
    public String toString() {
        return "Product{name='" + name + "', type='" + type + "', price=" + price +
                ", brand='" + brand + "', color='" + color + "'}";
    }

    // 2️⃣ 静态内部类 Builder(具体建造者)
    public static class Builder {
        private Product product = new Product();

        public Builder setName(String name) {
            product.name = name;
            return this;
        }

        public Builder setType(String type) {
            product.type = type;
            return this;
        }

        public Builder setPrice(double price) {
            product.price = price;
            return this;
        }

        public Builder setBrand(String brand) {
            product.brand = brand;
            return this;
        }

        public Builder setColor(String color) {
            product.color = color;
            return this;
        }

        public Product build() {
            return product;
        }
    }
}

// 3️⃣ 客户端调用(Client)
public class Main {
    public static void main(String[] args) {
        Product product = new Product.Builder()
                .setName("iPhone 15")
                .setType("Smartphone")
                .setPrice(7999)
                .setBrand("Apple")
                .setColor("Black")
                .build();

        System.out.println(product);
    }
}
2
3
4
5
6
7
8
9
10
11
12
13
14
15
16
17
18
19
20
21
22
23
24
25
26
27
28
29
30
31
32
33
34
35
36
37
38
39
40
41
42
43
44
45
46
47
48
49
50
51
52
53
54
55
56
57
58
59
60
61
62
63
64
65
66
🌟 优势:
✅ 链式调用,代码更优雅。
✅ 可选参数灵活设置(不需要传入所有参数)。
✅ 避免构造函数过载,增强可读性。
✅ 扩展性更好,如果增加属性,只需修改 Builder 类,不影响 Product 类的构造。
# 5.3 建造者模式的实际应用
| 应用场景 | 示例 |
|---|---|
| Java StringBuilder | new StringBuilder().append("Hello").append("World").toString(); |
| MyBatis 构造 SQL | SqlSessionFactoryBuilder.build(configStream); |
Lombok @Builder 注解 | User.builder().name("Tom").age(25).build(); |
| Spring BeanDefinitionBuilder | BeanDefinitionBuilder.rootBeanDefinition(User.class).addPropertyValue("name", "Tom").getBeanDefinition(); |
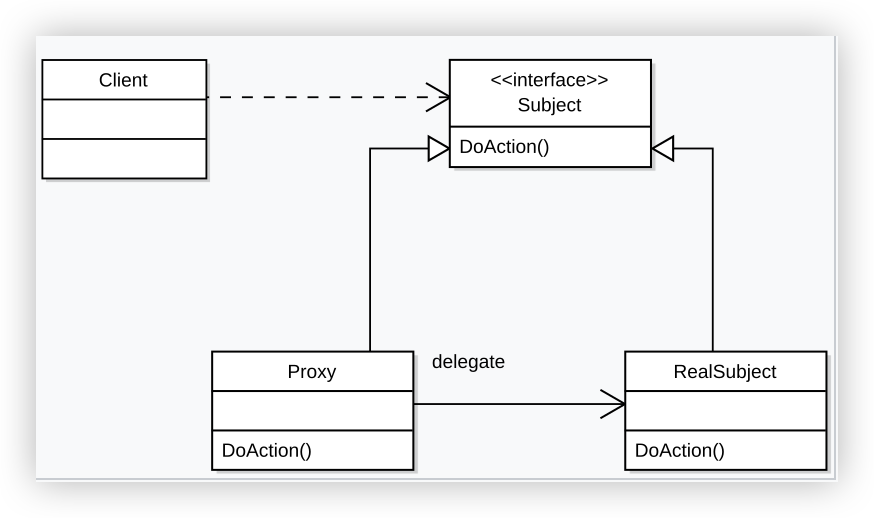
# 6. 代理模式(Proxy Pattern)
代理模式(Proxy Pattern) 是一种 结构型设计模式,它的核心思想是为某个对象提供一个代理对象,以控制对目标对象的访问。代理对象在客户端和目标对象之间起到了中介作用,可以增强对象的功能,如 权限控制、延迟加载、日志记录、远程调用 等。
# 6.1 为什么需要代理模式?
在某些场景下,我们可能 不能直接访问某个对象,或者 希望在访问前后添加额外的功能但是又不能去修改代码逻辑去强行适配,例如:
- 权限控制:某些操作需要管理员权限。
- 日志记录:调用方法时自动记录日志。
- 远程访问:对象可能在远程服务器上(如 RMI)。
- 性能优化:懒加载、缓存等。
传统方式:
class RealSubject {
    public void request() {
        System.out.println("执行目标对象的请求...");
    }
}

public class Main {
    public static void main(String[] args) {
        RealSubject subject = new RealSubject();
        subject.request();  // 直接访问目标对象
    }
}
2
3
4
5
6
7
8
9
10
11
12
⚠️ 问题:
- 如果我们要添加日志记录、权限校验,只能修改
RealSubject代码,违反开闭原则(OCP)。 - 不支持远程访问、懒加载等增强功能。
# 6.2 代理模式的核心思想
代理模式通过代理对象控制对目标对象的访问,在不修改目标对象的情况下,增强功能。
代理模式通常包含 3 个核心角色:
Subject(抽象主题): 定义目标对象和代理对象的公共接口。RealSubject(真实主题): 具体的业务对象,执行核心逻辑。Proxy(代理对象): 负责控制对RealSubject的访问,可以添加额外的逻辑。
# 6.3 静态代理(Static Proxy)
// 1️⃣ 定义接口(抽象主题)
interface Subject {
    void request();
}

// 2️⃣ 真实对象(RealSubject)
class RealSubject implements Subject {
    @Override
    public void request() {
        System.out.println("执行目标对象的请求...");
    }
}

// 3️⃣ 代理对象(Proxy)
class Proxy implements Subject {
    private RealSubject realSubject; // 持有真实对象的引用

    @Override
    public void request() {
        // 代理逻辑:前置增强
        System.out.println("代理:权限校验...");

        if (realSubject == null) {
            realSubject = new RealSubject();
        }
        realSubject.request(); // 调用真实对象方法

        // 代理逻辑:后置增强
        System.out.println("代理:记录日志...");
    }
}

// 4️⃣ 客户端调用
public class Main {
    public static void main(String[] args) {
        Subject proxy = new Proxy(); // 创建代理对象
        proxy.request(); // 通过代理访问目标对象
    }
}
2
3
4
5
6
7
8
9
10
11
12
13
14
15
16
17
18
19
20
21
22
23
24
25
26
27
28
29
30
31
32
33
34
35
36
37
38
39
输出:
代理:权限校验...
执行目标对象的请求...
代理:记录日志...
2
3
✅ 优点
- 符合开闭原则(OCP):不修改
RealSubject代码,即可增强功能。 - 增强目标对象的能力,如日志、权限控制、远程调用。
❌ 缺点
- 需要为每个类手动创建代理类,代码冗余。
- 不灵活,如果
Subject接口增加方法,代理类也需要修改。
# 6.4 动态代理(Dynamic Proxy)
动态代理可以解决上面的缺点问题**,通过 Java 反射机制在运行时**动态生成代理对象。下面是基于JDK 动态代理(基于 InvocationHandler)
import java.lang.reflect.InvocationHandler;
import java.lang.reflect.Method;
import java.lang.reflect.Proxy;

// 1️⃣ 目标接口(Subject)
interface Subject {
    void request();
}

// 2️⃣ 真实对象(RealSubject)
class RealSubject implements Subject {
    @Override
    public void request() {
        System.out.println("执行目标对象的请求...");
    }
}

// 3️⃣ 代理处理器(InvocationHandler)
class DynamicProxyHandler implements InvocationHandler {
    private final Object target; // 持有真实对象的引用

    public DynamicProxyHandler(Object target) {
        this.target = target;
    }

    @Override
    public Object invoke(Object proxy, Method method, Object[] args) throws Throwable {
        System.out.println("代理:前置增强(日志)...");
        Object result = method.invoke(target, args); // 反射调用真实对象方法
        System.out.println("代理:后置增强(安全检查)...");
        return result;
    }
}

// 4️⃣ 客户端调用
public class Main {
    public static void main(String[] args) {
        // 创建真实对象
        RealSubject realSubject = new RealSubject();

        // 创建动态代理对象
        Subject proxy = (Subject) Proxy.newProxyInstance(
                realSubject.getClass().getClassLoader(),
                new Class[]{Subject.class},
                new DynamicProxyHandler(realSubject)
        );

        proxy.request(); // 调用代理对象的方法
    }
}
2
3
4
5
6
7
8
9
10
11
12
13
14
15
16
17
18
19
20
21
22
23
24
25
26
27
28
29
30
31
32
33
34
35
36
37
38
39
40
41
42
43
44
45
46
47
48
49
50
输出:
代理:前置增强(日志)...
执行目标对象的请求...
代理:后置增强(安全检查)...
2
3
✅ 不需要手动编写代理类,使用 Proxy.newProxyInstance() 运行时动态生成。
✅ 增强灵活性,可以为任何实现了接口的类创建代理对象。
❌ 只能代理实现了接口的类(无法代理普通类,可以使用CGLib)。
🚀 Spring AOP、MyBatis、RPC 远程调用等大量使用代理模式,掌握它能让你更懂 Java 框架的底层原理!
# 7. 适配器模式(Adapter Pattern)
适配器模式(Adapter Pattern) 是一种结构型设计模式,用于连接两个不兼容的接口,使它们能够协同工作。
它的作用类似于 电源适配器(220V 转 5V),在不修改原有代码的情况下,使旧代码适应新的接口。
# 7.1 适配器模式的应用场景
| 场景 | 示例 |
|---|---|
| 接口不兼容 | 老代码返回 List<String>,但新代码需要 Set<String> |
| 第三方库适配 | MySQL 代码迁移到 MongoDB,但不想修改原有业务代码 |
| 类库升级 | Java 8 代码适配 Java 11 新接口 |
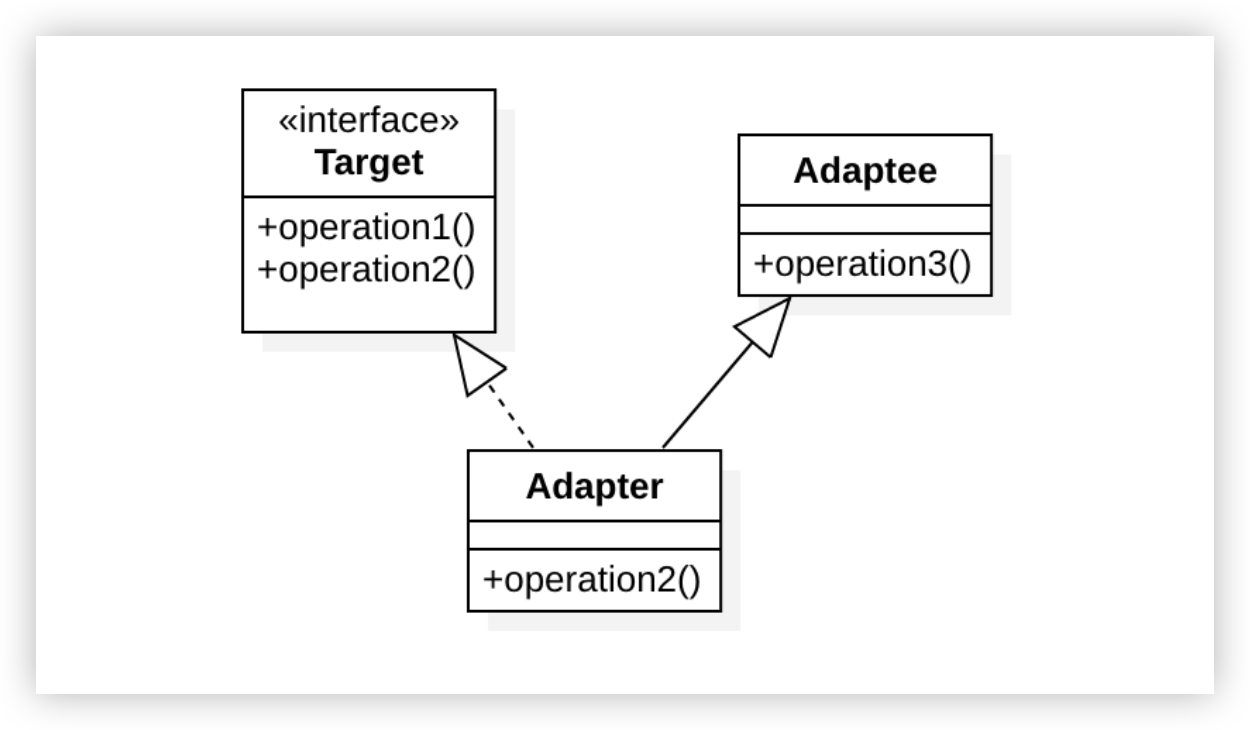
# 7.2. 适配器模式的核心角色
适配器模式一般包含 3 个核心角色:
Target(目标接口): 期望使用的新接口(标准接口)。Adaptee(被适配者): 现有的旧接口(不兼容的接口)。Adapter(适配器): 负责转换Target和Adaptee,使二者兼容。
# 7.3 类适配器模式(基于继承,使用 extends)
适配器继承被适配者,并实现目标接口,通过重写方法让它兼容。
// 1️⃣ 目标接口(客户端希望使用的接口)
interface Target {
    void request();
}

// 2️⃣ 被适配者(已有的旧接口,不能修改)
class Adaptee {
    public void specificRequest() {
        System.out.println("执行旧接口方法...");
    }
}

// 3️⃣ 适配器(继承 Adaptee 并实现 Target)
class Adapter extends Adaptee implements Target {
    @Override
    public void request() {
        System.out.println("适配器转换...");
        specificRequest();  // 调用旧方法
    }
}

// 4️⃣ 客户端调用
public class Main {
    public static void main(String[] args) {
        Target adapter = new Adapter(); // 创建适配器
        adapter.request(); // 通过适配器调用新接口
    }
}
2
3
4
5
6
7
8
9
10
11
12
13
14
15
16
17
18
19
20
21
22
23
24
25
26
27
28
🌟 输出
适配器转换...
执行旧接口方法...
2
✅ 优点
- 无需修改原始类(
Adaptee代码保持不变)。 - 兼容老代码,避免大规模重构。
❌ 缺点
- 类适配器采用继承方式,只能适配一个
Adaptee(Java 不支持多继承)。 - 违反组合优先原则(推荐使用对象适配器)。
# 7.4 对象适配器模式(基于组合,使用 has-a)
适配器持有 Adaptee 实例,通过调用方法适配接口。
// 1️⃣ 目标接口(新接口)
interface Target {
    void request();
}

// 2️⃣ 被适配者(旧接口)
class Adaptee {
    public void specificRequest() {
        System.out.println("执行旧接口方法...");
    }
}

// 3️⃣ 适配器(组合 Adaptee)
class ObjectAdapter implements Target {
    private final Adaptee adaptee; // 持有 Adaptee 实例

    public ObjectAdapter(Adaptee adaptee) {
        this.adaptee = adaptee;
    }

    @Override
    public void request() {
        System.out.println("适配器转换...");
        adaptee.specificRequest(); // 调用旧方法
    }
}

// 4️⃣ 客户端调用
public class Main {
    public static void main(String[] args) {
        Adaptee adaptee = new Adaptee(); // 旧接口对象
        Target adapter = new ObjectAdapter(adaptee); // 适配器
        adapter.request(); // 通过适配器调用新接口
    }
}
2
3
4
5
6
7
8
9
10
11
12
13
14
15
16
17
18
19
20
21
22
23
24
25
26
27
28
29
30
31
32
33
34
35
🌟 输出
适配器转换...
执行旧接口方法...
2
✅ 优点
- 更灵活,支持多个
Adaptee适配(可以传入不同的Adaptee)。 - 符合组合优先原则,代码更加可维护。
❌ 缺点
- 比类适配器多了一层对象封装,调用开销略大(但可忽略)。
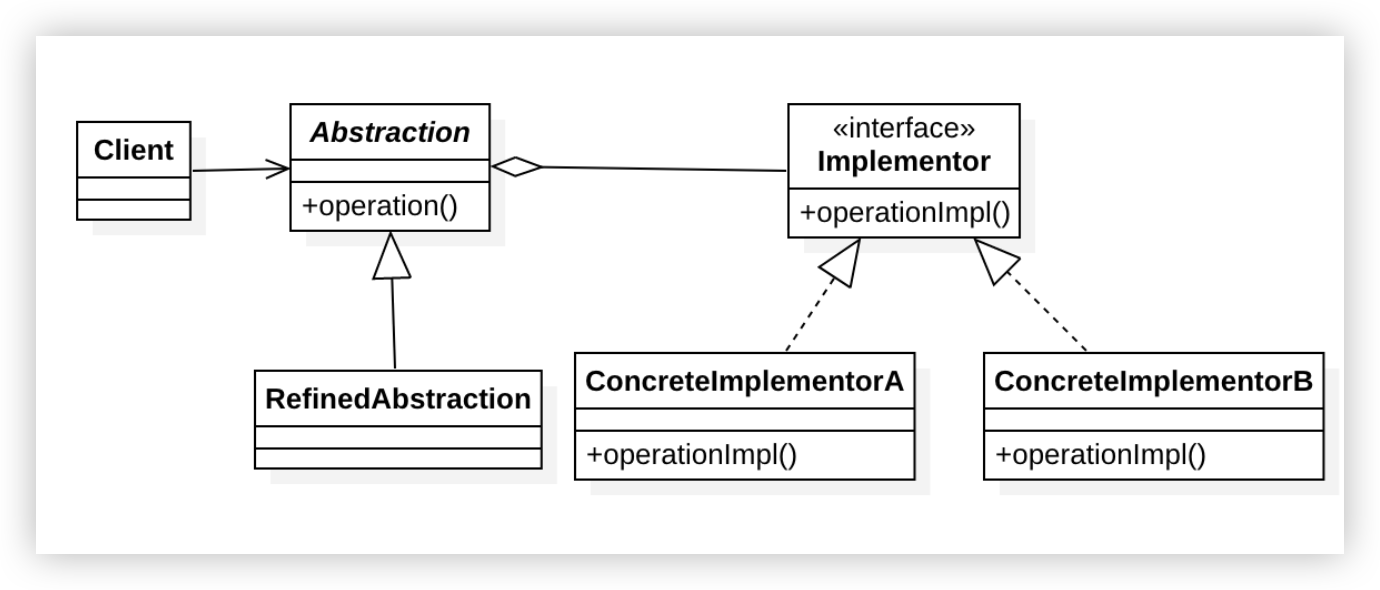
# 8. 桥接模式(Bridge Pattern)
是一种 结构型设计模式,用于将抽象部分与实现部分分离,使它们可以独立变化。
核心思想: 通过组合代替继承,避免层级爆炸,提高代码的可扩展性。
📌 适用场景
- 类层级过深,多个维度扩展导致子类组合爆炸(如颜色 × 形状)。
- 需要在运行时动态切换实现方式(如不同数据库的日志实现)。
- 希望扩展时不影响已有代码(如跨平台 UI 渲染)。
桥接模式通常包含 4 个核心角色:
| 角色 | 职责 |
|---|---|
| Abstraction(抽象类) | 维护 Implementor 的引用,定义高层接口 |
| RefinedAbstraction(扩展抽象类) | 具体的业务抽象层,实现 Abstraction |
| Implementor(实现接口) | 定义实现层的通用接口 |
| ConcreteImplementor(具体实现类) | 提供实现层的具体逻辑 |
示例:
假设我们有形状(Shape) 和 颜色(Color) 两个维度。如果用 继承方式 组合,可能需要:
- 圆形-红色
- 圆形-蓝色
- 矩形-红色
- 矩形-蓝色
- ...(随维度增加,子类爆炸💥)
使用桥接模式,可以将 "形状" 和 "颜色" 分离,避免子类组合爆炸。
// 1️⃣ Implementor(实现接口):颜色
interface Color {
    void applyColor();
}

// 2️⃣ ConcreteImplementor(具体实现类):不同颜色
class RedColor implements Color {
    @Override
    public void applyColor() {
        System.out.println("使用红色");
    }
}

class BlueColor implements Color {
    @Override
    public void applyColor() {
        System.out.println("使用蓝色");
    }
}

// 3️⃣ Abstraction(抽象类):形状,持有 Color 引用
abstract class Shape {
    protected Color color;

    public Shape(Color color) {
        this.color = color;
    }

    abstract void draw();
}

// 4️⃣ RefinedAbstraction(扩展抽象类):具体形状
class Circle extends Shape {
    public Circle(Color color) {
        super(color);
    }

    @Override
    void draw() {
        System.out.print("绘制圆形,");
        color.applyColor();
    }
}

class Rectangle extends Shape {
    public Rectangle(Color color) {
        super(color);
    }

    @Override
    void draw() {
        System.out.print("绘制矩形,");
        color.applyColor();
    }
}

// 5️⃣ 客户端调用
public class BridgePatternDemo {
    public static void main(String[] args) {
        Shape redCircle = new Circle(new RedColor());
        redCircle.draw();  // 输出: 绘制圆形,使用红色

        Shape blueRectangle = new Rectangle(new BlueColor());
        blueRectangle.draw();  // 输出: 绘制矩形,使用蓝色
    }
}
2
3
4
5
6
7
8
9
10
11
12
13
14
15
16
17
18
19
20
21
22
23
24
25
26
27
28
29
30
31
32
33
34
35
36
37
38
39
40
41
42
43
44
45
46
47
48
49
50
51
52
53
54
55
56
57
58
59
60
61
62
63
64
65
66
🌟 输出
绘制圆形,使用红色
绘制矩形,使用蓝色
2
✅ 优点
- 降低耦合:抽象和实现分离,形状和颜色可以独立变化。
- 减少子类数量:不同形状和颜色不再组合出大量子类,扩展更容易。
- 运行时动态切换:可以在运行时自由组合颜色和形状。
❌ 缺点
- 增加复杂度:相比直接继承,多了一层抽象,初学者可能不易理解。
- 需要提前设计:如果需求简单,可能不值得使用桥接模式。
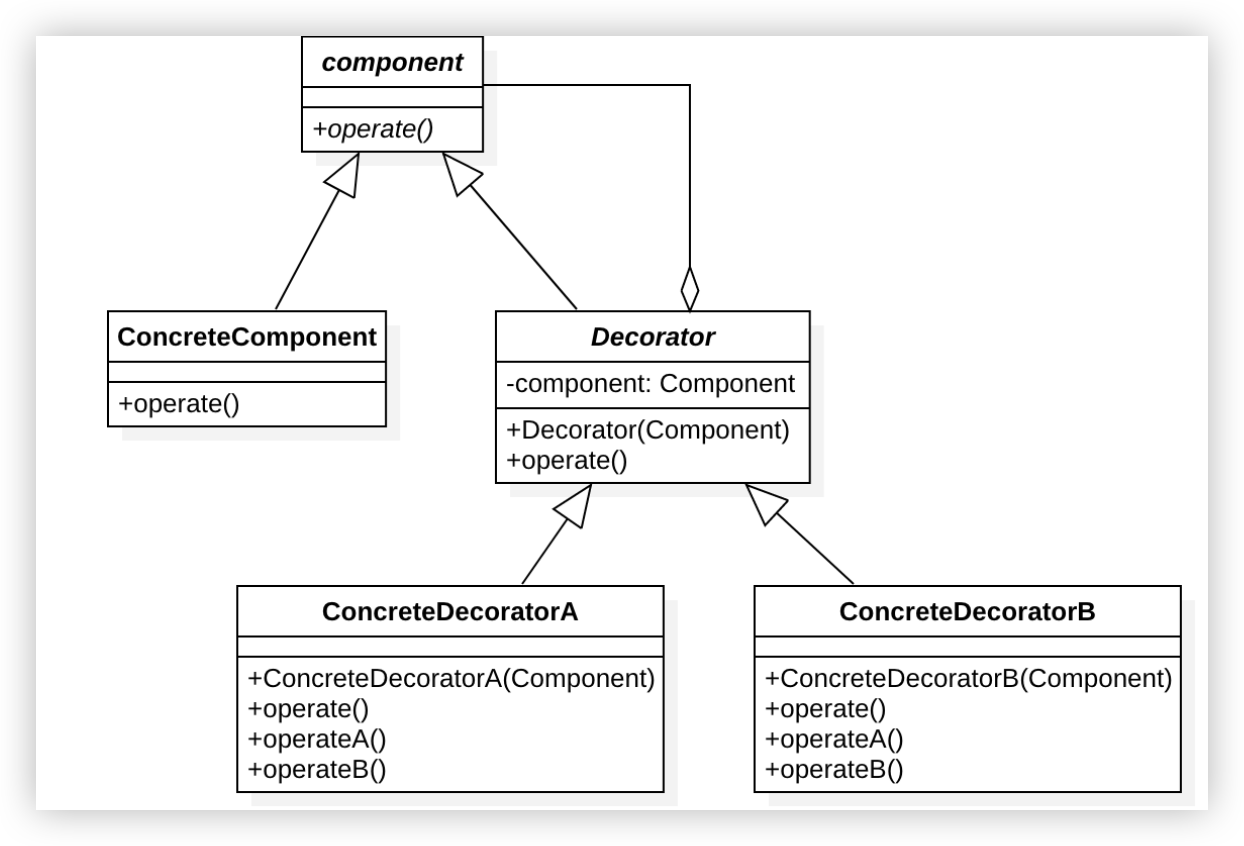
# 9. 装饰器模式(Decorator Pattern
装饰器模式(Decorator Pattern) 是一种 结构型设计模式,它允许动态地向对象添加额外功能,而不改变其原始代码。
核心思想: 用 组合代替继承,避免创建大量子类。
🌟 现实例子:
- 咖啡店:基础咖啡(
Coffee)+ 额外功能(牛奶、糖浆、奶泡)。 - Java I/O 流:
BufferedReader装饰FileReader以提供缓冲功能。
装饰器模式的核心角色:
| 角色 | 职责 |
|---|---|
Component(抽象组件) | 定义被装饰对象的通用接口 |
ConcreteComponent(具体组件) | 需要被装饰的原始类 |
Decorator(装饰器抽象类) | 持有 Component 引用,扩展功能 |
ConcreteDecorator(具体装饰器) | 具体的装饰功能(如加牛奶、加糖) |
代码示例
// 1️⃣ Component(抽象组件):定义基本接口
interface Coffee {
    String getDescription(); // 获取描述
    double cost(); // 计算价格
}

// 2️⃣ ConcreteComponent(具体组件):基础咖啡
class SimpleCoffee implements Coffee {
    @Override
    public String getDescription() {
        return "普通咖啡";
    }

    @Override
    public double cost() {
        return 10.0;
    }
}

// 3️⃣ Decorator(装饰器抽象类):持有 Coffee 引用
abstract class CoffeeDecorator implements Coffee {
    protected Coffee decoratedCoffee;

    public CoffeeDecorator(Coffee coffee) {
        this.decoratedCoffee = coffee;
    }

    @Override
    public String getDescription() {
        return decoratedCoffee.getDescription();
    }

    @Override
    public double cost() {
        return decoratedCoffee.cost();
    }
}

// 4️⃣ ConcreteDecorator(具体装饰器):加糖
class SugarDecorator extends CoffeeDecorator {
    public SugarDecorator(Coffee coffee) {
        super(coffee);
    }

    @Override
    public String getDescription() {
        return super.getDescription() + " + 糖";
    }

    @Override
    public double cost() {
        return super.cost() + 2.0;
    }
}

// 5️⃣ ConcreteDecorator(具体装饰器):加牛奶
class MilkDecorator extends CoffeeDecorator {
    public MilkDecorator(Coffee coffee) {
        super(coffee);
    }

    @Override
    public String getDescription() {
        return super.getDescription() + " + 牛奶";
    }

    @Override
    public double cost() {
        return super.cost() + 3.0;
    }
}

// 6️⃣ 客户端代码
public class DecoratorPatternDemo {
    public static void main(String[] args) {
        Coffee coffee = new SimpleCoffee(); // 10.0
        System.out.println(coffee.getDescription() + " 价格: " + coffee.cost());

        coffee = new SugarDecorator(coffee); // + 糖(2.0)
        System.out.println(coffee.getDescription() + " 价格: " + coffee.cost());

        coffee = new MilkDecorator(coffee); // + 牛奶(3.0)
        System.out.println(coffee.getDescription() + " 价格: " + coffee.cost());
    }
}
2
3
4
5
6
7
8
9
10
11
12
13
14
15
16
17
18
19
20
21
22
23
24
25
26
27
28
29
30
31
32
33
34
35
36
37
38
39
40
41
42
43
44
45
46
47
48
49
50
51
52
53
54
55
56
57
58
59
60
61
62
63
64
65
66
67
68
69
70
71
72
73
74
75
76
77
78
79
80
81
82
83
84
85
🌟 输出
普通咖啡 价格: 10.0
普通咖啡 + 糖 价格: 12.0
普通咖啡 + 糖 + 牛奶 价格: 15.0
2
3
✅ 优点
- 灵活扩展功能,不修改原始类即可动态增强对象行为。
- 避免子类爆炸,不需要创建大量子类(相比继承)。
- 符合开闭原则,可以扩展新功能而不影响旧代码。
❌ 缺点
- 比继承稍复杂,每次装饰都需要创建新对象。
- 过度使用会导致大量小对象,增加维护成本。
| 应用场景 | 示例 |
|---|---|
| Java I/O | BufferedInputStream 装饰 FileInputStream |
| Java Servlet | HttpServletRequestWrapper 增强 HttpServletRequest |
| Spring AOP | TransactionInterceptor 增强 @Transactional 方法 |
| GUI 组件 | JScrollPane 装饰 JTextArea |
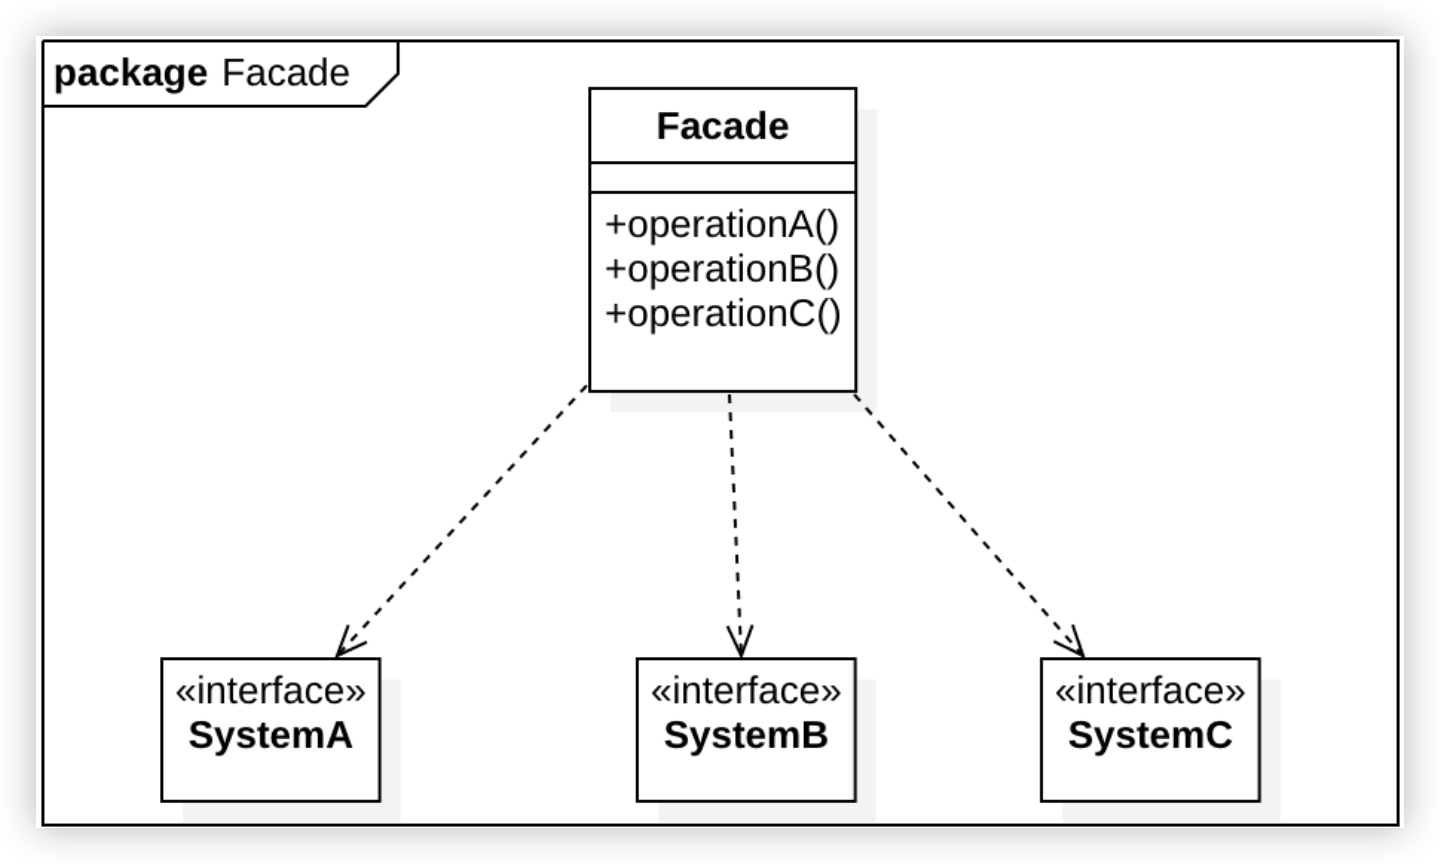
# 10. 外观模式(Facade Pattern)
外观模式(Facade Pattern) 是一种 结构型设计模式,为子系统提供一个统一的访问接口,隐藏内部实现细节,简化外部调用。
核心思想: 通过一个高层接口(Facade),让外部调用者不用关心子系统的复杂性,降低耦合。
📌 适用场景
| 场景 | 示例 |
|---|---|
| 简化复杂系统的调用 | 电脑启动(电源 → CPU → 内存 → 硬盘) |
| 隐藏子系统的复杂性 | Spring JdbcTemplate 简化数据库操作 |
| 解耦,提高维护性 | Controller → Service → DAO 层级分离 |
📌 外观模式的核心角色
| 角色 | 职责 |
|---|---|
Facade(外观类) | 提供统一的对外接口,封装子系统 |
Subsystem(子系统) | 具体业务模块,提供不同的功能 |
Client(客户端) | 通过 Facade 访问子系统,而不直接调用它们 |
代码示例:
启动一台电脑需要:CPU 初始化------->内存加载-------->硬盘读取------->电源开启
如果让客户端直接调用这些子系统,会很麻烦。因此,我们使用 外观模式(Facade) 统一管理这些调用。
// 1️⃣ 子系统:CPU
class CPU {
    void start() {
        System.out.println("CPU 启动");
    }

    void shutdown() {
        System.out.println("CPU 关闭");
    }
}

// 2️⃣ 子系统:内存
class Memory {
    void load() {
        System.out.println("内存加载");
    }

    void release() {
        System.out.println("内存释放");
    }
}

// 3️⃣ 子系统:硬盘
class HardDrive {
    void readData() {
        System.out.println("硬盘读取数据");
    }

    void stop() {
        System.out.println("硬盘停止");
    }
}

// 4️⃣ 子系统:电源
class Power {
    void powerOn() {
        System.out.println("电源开启");
    }

    void powerOff() {
        System.out.println("电源关闭");
    }
}

// 5️⃣ 外观类(Facade):封装所有复杂调用
class ComputerFacade {
    private CPU cpu;
    private Memory memory;
    private HardDrive hardDrive;
    private Power power;

    public ComputerFacade() {
        this.cpu = new CPU();
        this.memory = new Memory();
        this.hardDrive = new HardDrive();
        this.power = new Power();
    }

    // 统一提供"开机"接口
    public void startComputer() {
        power.powerOn();
        cpu.start();
        memory.load();
        hardDrive.readData();
        System.out.println("电脑启动成功!\n");
    }

    // 统一提供"关机"接口
    public void shutdownComputer() {
        hardDrive.stop();
        memory.release();
        cpu.shutdown();
        power.powerOff();
        System.out.println("电脑已关机!\n");
    }
}

// 6️⃣ 客户端代码
public class FacadePatternDemo {
    public static void main(String[] args) {
        ComputerFacade computer = new ComputerFacade();

        // 客户端只需要调用外观类,而不关心内部细节
        computer.startComputer();
        computer.shutdownComputer();
    }
}
2
3
4
5
6
7
8
9
10
11
12
13
14
15
16
17
18
19
20
21
22
23
24
25
26
27
28
29
30
31
32
33
34
35
36
37
38
39
40
41
42
43
44
45
46
47
48
49
50
51
52
53
54
55
56
57
58
59
60
61
62
63
64
65
66
67
68
69
70
71
72
73
74
75
76
77
78
79
80
81
82
83
84
85
86
87
✅ 优点
- 简化客户端调用:客户端只需与
Facade交互,无需关心内部逻辑。 - 降低耦合:外部调用者与子系统 解耦,子系统可以独立修改。
- 符合迪米特法则(最少知道原则):降低模块之间的依赖,提高可维护性。
❌ 缺点
- 可能增加不必要的封装:如果子系统已经很简单,使用
Facade可能多此一举。 - 可能导致过多的入口:如果
Facade设计不合理,可能需要多个外观类,反而增加复杂性。
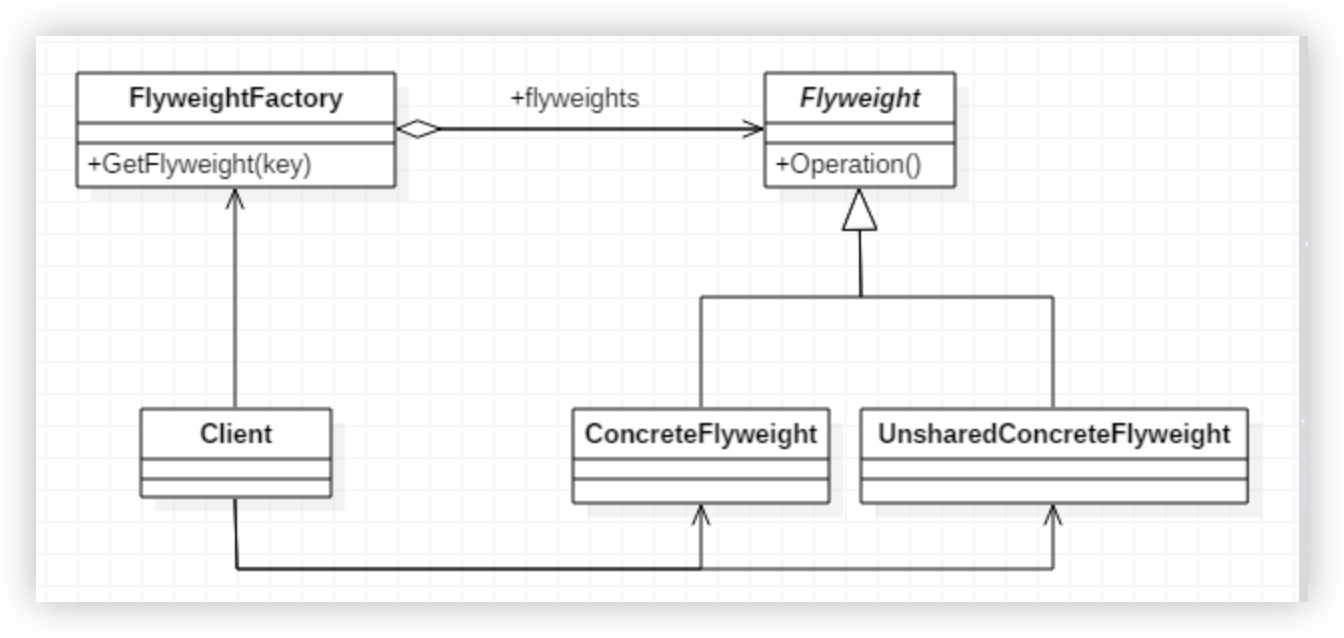
# 11. 享元模式(Flyweight Pattern)
享元模式(Flyweight Pattern) 是一种 结构型设计模式,通过共享对象来减少内存占用,提高系统性能。
核心思想: 共享相同对象,避免创建大量重复实例,降低内存消耗。
🌟 现实例子:
- 文本编辑器:同一个字母在文档中可能出现上千次,每个字母共享相同的对象,只存储它的坐标和样式。
- 线程池:复用已有线程,避免频繁创建销毁线程。
- 数据库连接池:共享数据库连接,减少连接创建的开销。
📌 享元模式的核心角色
| 角色 | 职责 |
|---|---|
Flyweight(享元接口) | 定义可共享的对象接口 |
ConcreteFlyweight(具体享元) | 共享的具体对象,包含内部状态 |
UnsharedConcreteFlyweight(非共享享元) | 不能共享的对象,通常是组合对象 |
FlyweightFactory(享元工厂) | 管理享元对象池,负责对象复用 |
Client(客户端) | 需要使用享元对象的代码 |
代码示例(数据库连接池)
import java.sql.Connection;
import java.sql.DriverManager;
import java.sql.SQLException;
import java.util.HashMap;
import java.util.Map;

// 1️⃣ 享元接口:数据库连接接口
interface DBConnection {
    Connection getConnection() throws SQLException; // 获取数据库连接
}

// 2️⃣ 具体享元(共享对象):MySQL 连接
class MySQLConnection implements DBConnection {
    private static final String URL = "jdbc:mysql://localhost:3306/mydb";
    private static final String USER = "root";
    private static final String PASSWORD = "password";

    @Override
    public Connection getConnection() throws SQLException {
        return DriverManager.getConnection(URL, USER, PASSWORD);
    }
}

// 3️⃣ 具体享元(共享对象):PostgreSQL 连接
class PostgreSQLConnection implements DBConnection {
    private static final String URL = "jdbc:postgresql://localhost:5432/mydb";
    private static final String USER = "user";
    private static final String PASSWORD = "password";

    @Override
    public Connection getConnection() throws SQLException {
        return DriverManager.getConnection(URL, USER, PASSWORD);
    }
}

// 4️⃣ 非共享享元:连接池配置管理类(不可共享)
class ConnectionPoolConfig {
    private int maxConnections;
    private int minConnections;

    public ConnectionPoolConfig(int max, int min) {
        this.maxConnections = max;
        this.minConnections = min;
    }

    public void setMaxConnections(int max) {
        this.maxConnections = max;
    }

    public void setMinConnections(int min) {
        this.minConnections = min;
    }

    public int getMaxConnections() {
        return maxConnections;
    }

    public int getMinConnections() {
        return minConnections;
    }
}

// 5️⃣ 享元工厂:连接池管理类(负责复用共享对象)
class ConnectionPool {
    private Map<String, DBConnection> connectionMap = new HashMap<>();
    private ConnectionPoolConfig config;

    // 初始化连接池配置
    public ConnectionPool(int maxConnections, int minConnections) {
        this.config = new ConnectionPoolConfig(maxConnections, minConnections);
    }

    // 获取数据库连接
    public DBConnection getConnection(String dbType) {
        DBConnection connection = connectionMap.get(dbType);
        if (connection == null) {
            switch (dbType) {
                case "mysql":
                    connection = new MySQLConnection();
                    break;
                case "postgresql":
                    connection = new PostgreSQLConnection();
                    break;
                default:
                    throw new IllegalArgumentException("Unsupported DB Type");
            }
            connectionMap.put(dbType, connection); // 缓存到连接池
        }
        return connection;
    }

    // 获取连接池的配置
    public ConnectionPoolConfig getConfig() {
        return config;
    }

    // 获取连接池中的缓存连接数
    public int getConnectionPoolSize() {
        return connectionMap.size();
    }
}

// 6️⃣ 客户端代码:模拟数据库操作
public class FlyweightPatternDemo {
    public static void main(String[] args) throws SQLException {
        // 创建连接池,并初始化最大、最小连接数
        ConnectionPool pool = new ConnectionPool(10, 2);

        // 获取 MySQL 连接
        DBConnection mysqlConnection1 = pool.getConnection("mysql");
        DBConnection mysqlConnection2 = pool.getConnection("mysql");

        // 获取 PostgreSQL 连接
        DBConnection postgresqlConnection1 = pool.getConnection("postgresql");
        DBConnection postgresqlConnection2 = pool.getConnection("postgresql");

        // 执行一些数据库操作
        System.out.println("使用 MySQL 连接: " + mysqlConnection1.getConnection());
        System.out.println("使用 PostgreSQL 连接: " + postgresqlConnection1.getConnection());

        // 输出连接池中的缓存连接数
        System.out.println("连接池中的连接数:" + pool.getConnectionPoolSize());
        System.out.println("连接池配置:最大连接数=" + pool.getConfig().getMaxConnections());
    }
}
2
3
4
5
6
7
8
9
10
11
12
13
14
15
16
17
18
19
20
21
22
23
24
25
26
27
28
29
30
31
32
33
34
35
36
37
38
39
40
41
42
43
44
45
46
47
48
49
50
51
52
53
54
55
56
57
58
59
60
61
62
63
64
65
66
67
68
69
70
71
72
73
74
75
76
77
78
79
80
81
82
83
84
85
86
87
88
89
90
91
92
93
94
95
96
97
98
99
100
101
102
103
104
105
106
107
108
109
110
111
112
113
114
115
116
117
118
119
120
121
122
123
124
125
126
✅ 优点
- 减少内存占用:复用对象,减少实例数量。
- 提高性能:避免频繁创建、销毁对象,提升运行效率。
- 符合享元模式的核心思想:共享对象,避免冗余。
❌ 缺点
- 复杂度增加:需要维护享元对象池,管理对象的创建与销毁。
- 可能导致线程安全问题:如果多个线程共享对象,可能需要同步控制。
- 不适用于所有场景:如果对象的共享状态较少,则使用享元模式收益不大。
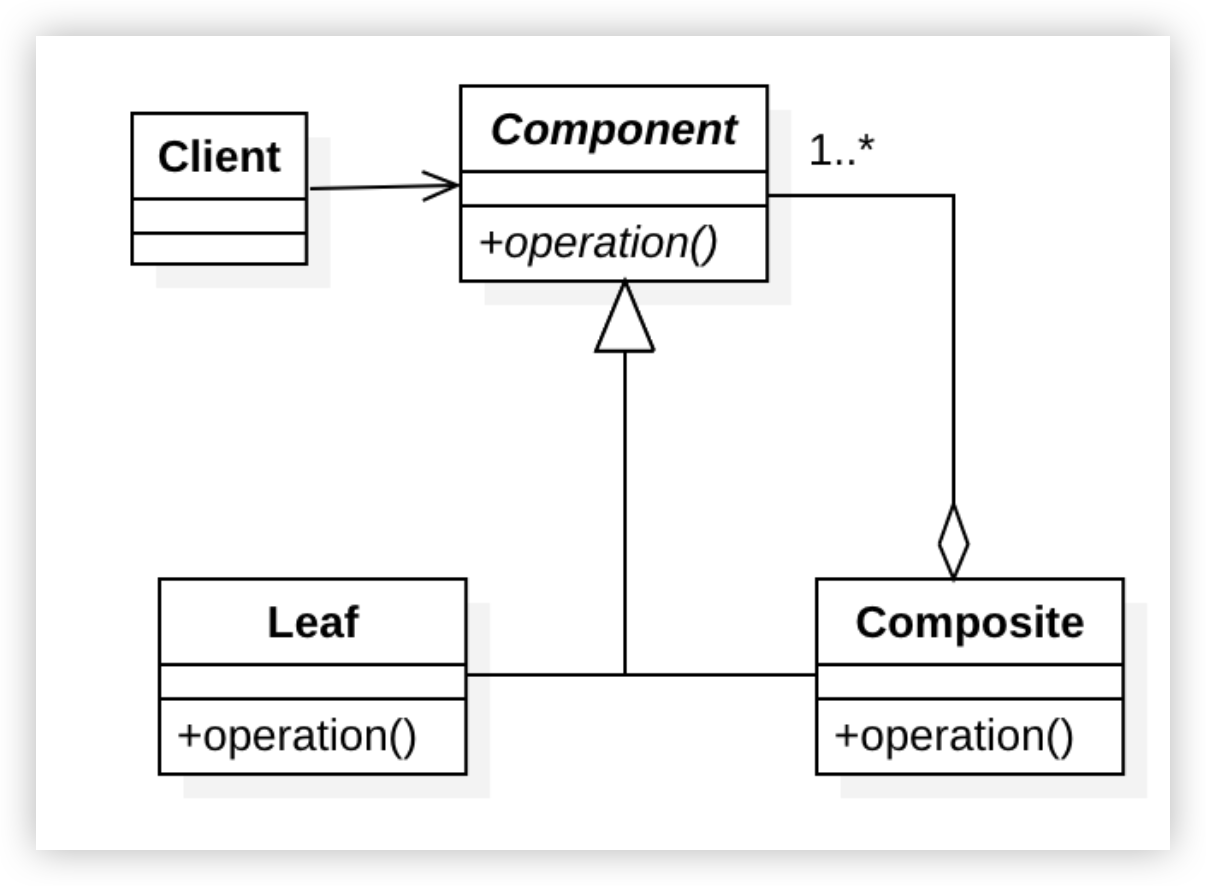
# 12. 组合模式(Composite Pattern)
组合模式是一种 结构型设计模式,它允许你将对象组合成树形结构,从而使客户端可以用一致的方式处理单个对象和组合对象。
核心思想: 通过递归组合形成层次结构,使单个对象和组合对象的接口一致,让客户端无须区分。
📌 适用场景
- 需要表示层次结构(如文件系统、UI 组件树、组织架构)。
- 需要客户端能够一致地处理单个对象和组合对象,不关心具体类型。
- 需要在整体和部分之间进行递归操作。
组合模式通常包含 3 个核心角色:
| 角色 | 职责 |
|---|---|
| Component(组件) | 统一接口,定义所有子类的通用方法 |
| Leaf(叶子节点) | 叶子节点,表示不可再分的对象,如文件 |
| Composite(组合节点) | 组合节点,表示包含子节点的对象,如文件夹 |
示例:文件系统结构
假设我们要实现一个文件系统,其中:
- 文件(File) 是叶子节点,不能包含子节点。
- 文件夹(Folder) 是组合节点,可以包含文件或其他文件夹。
import java.util.ArrayList;
import java.util.List;

// 1️⃣ Component(组件):文件系统通用接口
interface FileSystemComponent {
    void showDetails();  // 展示文件/文件夹信息
}

// 2️⃣ Leaf(叶子节点):文件
class File implements FileSystemComponent {
    private String name;
    private int size;

    public File(String name, int size) {
        this.name = name;
        this.size = size;
    }

    @Override
    public void showDetails() {
        System.out.println("📄 文件: " + name + " (大小: " + size + "KB)");
    }
}

// 3️⃣ Composite(组合节点):文件夹
class Folder implements FileSystemComponent {
    private String name;
    private List<FileSystemComponent> components = new ArrayList<>();

    public Folder(String name) {
        this.name = name;
    }

    // 添加子组件(文件或文件夹)
    public void add(FileSystemComponent component) {
        components.add(component);
    }

    // 移除子组件
    public void remove(FileSystemComponent component) {
        components.remove(component);
    }

    @Override
    public void showDetails() {
        System.out.println("📂 文件夹: " + name);
        for (FileSystemComponent component : components) {
            component.showDetails();  // 递归展示文件夹内容
        }
    }
}

// 4️⃣ 客户端代码
public class CompositePatternDemo {
    public static void main(String[] args) {
        // 创建文件
        File file1 = new File("文档.txt", 10);
        File file2 = new File("图片.jpg", 20);

        // 创建文件夹并添加文件
        Folder folder1 = new Folder("我的文件夹");
        folder1.add(file1);

        // 创建子文件夹
        Folder subFolder = new Folder("子文件夹");
        subFolder.add(file2);
        folder1.add(subFolder);  // 将子文件夹加入父文件夹

        // 显示文件系统的层次结构
        folder1.showDetails();
    }
}
2
3
4
5
6
7
8
9
10
11
12
13
14
15
16
17
18
19
20
21
22
23
24
25
26
27
28
29
30
31
32
33
34
35
36
37
38
39
40
41
42
43
44
45
46
47
48
49
50
51
52
53
54
55
56
57
58
59
60
61
62
63
64
65
66
67
68
69
70
71
72
🌟 输出
📂 文件夹: 我的文件夹
📄 文件: 文档.txt (大小: 10KB)
📂 文件夹: 子文件夹
📄 文件: 图片.jpg (大小: 20KB)
2
3
4
✅ 优点
- 统一处理:客户端可以一致地处理单个对象和组合对象,无需区分文件和文件夹。
- 灵活扩展:新增文件类型(如视频、音乐)或新的组合类型(如压缩包)时,只需扩展类,而无需修改现有代码(符合 开闭原则)。
- 递归结构:可以自然地表示 树形层次结构,如文件系统、组织架构、UI 组件等。
❌ 缺点
- 可能造成不必要的复杂性:如果对象结构较为简单,使用组合模式可能会增加代码复杂度,引入不必要的抽象。
- 难以约束:组合模式让叶子节点和组合节点拥有相同的接口,但有些操作可能只适用于组合对象(如
add()和remove()),但对叶子节点无意义。
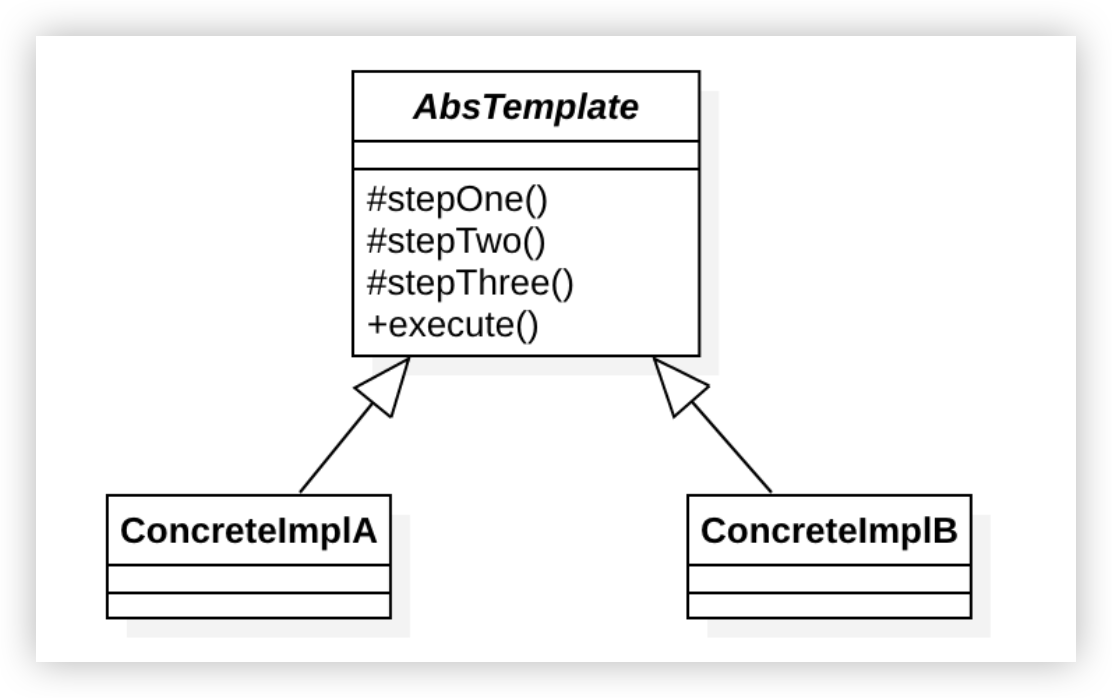
# 13. 模板方法(Template Method Pattern)
模板方法模式是一种行为型设计模式,它在父类中定义算法的骨架,将一些步骤延迟到子类中实现,使得子类在不改变算法结构的情况下可以重新定义算法的某些步骤。
核心思想: 通过抽象类定义算法框架,把一些不变的行为固定在父类中,而可变的行为由子类通过重写的方式实现,从而实现代码复用和扩展。
📌 适用场景
- 多个类共享相同的算法结构,但算法的某些步骤有差异。
- 需要控制子类扩展,只允许子类重写算法的特定部分,而不允许改变算法的整体结构。
- 需要消除子类中的重复代码,提高代码复用性。
模板方法模式通常包含 2 个核心角色:
**角色职责AbstractClass(抽象类)定义算法骨架和抽象方法,声明模板方法ConcreteClass(具体类)**实现抽象方法,提供算法步骤的具体实现
示例:咖啡和茶的制备过程
假设我们要实现饮料制备流程,其中:
- 咖啡(Coffee) 和 茶(Tea) 都遵循相似的制备步骤。
- 但具体步骤(如添加配料)在不同饮料中有所不同。
// 1️⃣ AbstractClass(抽象类):饮料制备模板
abstract class Beverage {

    // 模板方法:定义了制备饮料的算法骨架
    // 用 final 修饰防止子类重写整个流程
    public final void prepareBeverage() {
        boilWater();
        brew();
        pourInCup();
        if (customerWantsCondiments()) {
            addCondiments();
        }
        System.out.println("饮料准备完成!\n");
    }

    // 基本方法:这些方法在所有饮料中都相同
    private void boilWater() {
        System.out.println("将水煮沸");
    }

    private void pourInCup() {
        System.out.println("倒入杯中");
    }

    // 抽象方法:必须由子类实现的方法
    protected abstract void brew();
    protected abstract void addCondiments();

    // 钩子方法:子类可以选择性地覆盖
    protected boolean customerWantsCondiments() {
        return true;  // 默认添加配料
    }
}

// 2️⃣ ConcreteClass(具体类):咖啡
class Coffee extends Beverage {

    @Override
    protected void brew() {
        System.out.println("用热水冲泡咖啡粉");
    }

    @Override
    protected void addCondiments() {
        System.out.println("加入糖和牛奶");
    }
}

// 2️⃣ ConcreteClass(具体类):茶
class Tea extends Beverage {

    @Override
    protected void brew() {
        System.out.println("用热水浸泡茶叶");
    }

    @Override
    protected void addCondiments() {
        System.out.println("加入柠檬");
    }

    @Override
    protected boolean customerWantsCondiments() {
        // 假设茶客户不想加配料
        return false;
    }
}

// 3️⃣ 客户端代码
public class TemplateMethodDemo {
    public static void main(String[] args) {
        System.out.println("=== 制作咖啡 ===");
        Beverage coffee = new Coffee();
        coffee.prepareBeverage();

        System.out.println("=== 制作茶 ===");
        Beverage tea = new Tea();
        tea.prepareBeverage();
    }
}
2
3
4
5
6
7
8
9
10
11
12
13
14
15
16
17
18
19
20
21
22
23
24
25
26
27
28
29
30
31
32
33
34
35
36
37
38
39
40
41
42
43
44
45
46
47
48
49
50
51
52
53
54
55
56
57
58
59
60
61
62
63
64
65
66
67
68
69
70
71
72
73
74
75
76
77
78
79
80
🌟 输出
=== 制作咖啡 ===
将水煮沸
用热水冲泡咖啡粉
倒入杯中
加入糖和牛奶
饮料准备完成!

=== 制作茶 ===
将水煮沸
用热水浸泡茶叶
倒入杯中
饮料准备完成!
2
3
4
5
6
7
8
9
10
11
12
✅ 优点
- 代码复用:将公共算法结构提取到父类中,避免子类中的重复代码。
- 扩展灵活:只需要实现特定步骤,不必重写整个算法(符合开闭原则)。
- 控制反转:父类调用子类的操作,而不是相反,体现了"好莱坞原则"(Don't call us, we'll call you)。
❌ 缺点
- 继承的局限性:因为使用继承实现,每个子类只能使用一个模板,不如组合方式灵活。
- 维护成本:模板方法中的步骤越多,维护时需要小心处理每个步骤的依赖关系。
- 抽象程度要适中:过度抽象会导致理解困难,不足的抽象则无法实现复用。
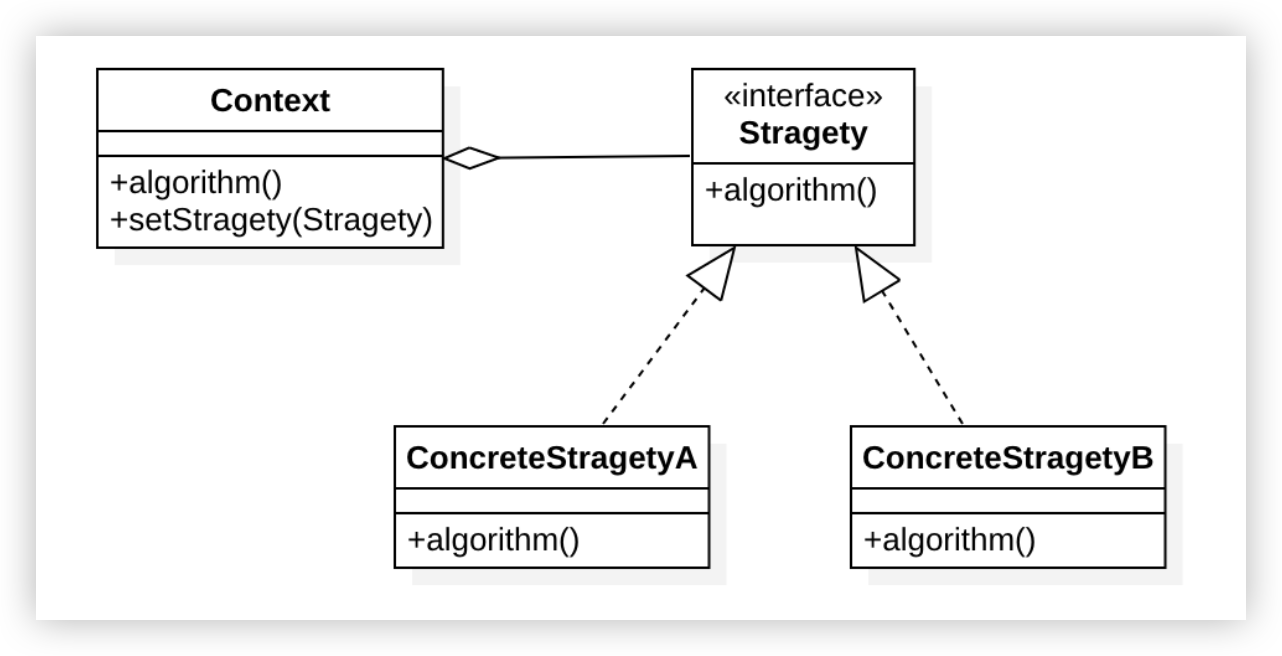
# 14. 策略模式(Strategy Pattern)
策略模式是一种行为型设计模式,它定义了一系列算法族,把它们封装起来,使它们可以相互替换,让算法的变化独立于使用算法的客户端。
核心思想: 将算法抽象成独立的策略类,并通过组合而非继承关系在运行时动态选择不同策略,实现算法的灵活切换。
📌 适用场景
- 需要在运行时动态选择不同算法的场景。
- 有许多相似的类,但它们之间的行为只有细微差别。
- 需要避免使用多重条件选择语句,如复杂的 if-else 或 switch。
- 算法的用户不需要关心算法的具体实现细节。
策略模式通常包含 3 个核心角色:
| 角色 | 职责 |
|---|---|
| Context(上下文) | 维护一个策略对象的引用,调用策略对象的方法 |
| Strategy(策略接口) | 定义所有支持的算法的公共接口 |
| ConcreteStrategy(具体策略) | 实现策略接口的具体算法 |
示例:支付方式的选择
假设我们要实现一个支付系统,其中:
- 系统支持多种支付方式(如支付宝、微信支付、银行卡)。
- 用户可以随时切换不同的支付方式。
// 1️⃣ Strategy(策略接口):支付策略
interface PaymentStrategy {
    void pay(int amount);
}

// 2️⃣ ConcreteStrategy(具体策略):支付宝支付
class AlipayStrategy implements PaymentStrategy {
    private String id;

    public AlipayStrategy(String id) {
        this.id = id;
    }

    @Override
    public void pay(int amount) {
        System.out.println("🔵 通过支付宝支付 " + amount + " 元(账号: " + id + ")");
    }
}

// 2️⃣ ConcreteStrategy(具体策略):微信支付
class WeChatPayStrategy implements PaymentStrategy {
    private String phone;

    public WeChatPayStrategy(String phone) {
        this.phone = phone;
    }

    @Override
    public void pay(int amount) {
        System.out.println("🟢 通过微信支付 " + amount + " 元(手机: " + phone + ")");
    }
}

// 2️⃣ ConcreteStrategy(具体策略):银行卡支付
class CreditCardStrategy implements PaymentStrategy {
    private String cardNumber;
    private String cvv;
    private String expiryDate;

    public CreditCardStrategy(String cardNumber, String cvv, String expiryDate) {
        this.cardNumber = cardNumber;
        this.cvv = cvv;
        this.expiryDate = expiryDate;
    }

    @Override
    public void pay(int amount) {
        System.out.println("💳 通过银行卡支付 " + amount + " 元(卡号: " + cardNumber + ")");
    }
}

// 3️⃣ Context(上下文):付款处理器
class PaymentProcessor {
    private PaymentStrategy paymentStrategy;

    // 设置支付策略
    public void setPaymentStrategy(PaymentStrategy paymentStrategy) {
        this.paymentStrategy = paymentStrategy;
    }

    // 处理支付
    public void processPayment(int amount) {
        paymentStrategy.pay(amount);
    }
}

// 4️⃣ 客户端代码
public class StrategyPatternDemo {
    public static void main(String[] args) {
        PaymentProcessor processor = new PaymentProcessor();

        // 创建不同的支付策略
        PaymentStrategy alipay = new AlipayStrategy("xiaoming@example.com");
        PaymentStrategy wechat = new WeChatPayStrategy("13866668888");
        PaymentStrategy creditCard = new CreditCardStrategy("1234-5678-9012-3456", "123", "12/25");

        // 使用支付宝支付
        System.out.println("=== 购买商品A ===");
        processor.setPaymentStrategy(alipay);
        processor.processPayment(100);

        // 切换到微信支付
        System.out.println("\n=== 购买商品B ===");
        processor.setPaymentStrategy(wechat);
        processor.processPayment(200);

        // 切换到银行卡支付
        System.out.println("\n=== 购买商品C ===");
        processor.setPaymentStrategy(creditCard);
        processor.processPayment(500);
    }
}
2
3
4
5
6
7
8
9
10
11
12
13
14
15
16
17
18
19
20
21
22
23
24
25
26
27
28
29
30
31
32
33
34
35
36
37
38
39
40
41
42
43
44
45
46
47
48
49
50
51
52
53
54
55
56
57
58
59
60
61
62
63
64
65
66
67
68
69
70
71
72
73
74
75
76
77
78
79
80
81
82
83
84
85
86
87
88
89
90
91
92
🌟 输出
=== 购买商品A ===
🔵 通过支付宝支付 100 元(账号: xiaoming@example.com)

=== 购买商品B ===
🟢 通过微信支付 200 元(手机: 13866668888)

=== 购买商品C ===
💳 通过银行卡支付 500 元(卡号: 1234-5678-9012-3456)
2
3
4
5
6
7
8
✅ 优点
- 算法可替换:可以在运行时动态切换策略,满足不同场景需求。
- 避免条件判断:消除了复杂的条件语句,使代码更清晰易读。
- 开闭原则:无需修改现有代码,就可以引入新的策略,易于扩展。
- 责任分离:将算法的定义和使用分离,遵循单一职责原则。
❌ 缺点
- 客户端需要了解策略:客户端必须知道所有的策略类,并自行决定使用哪个。
- 策略类数量增加:如果策略很多,可能会导致类爆炸现象。
- 增加对象创建成本:每个策略都是一个对象,可能会增加内存占用。
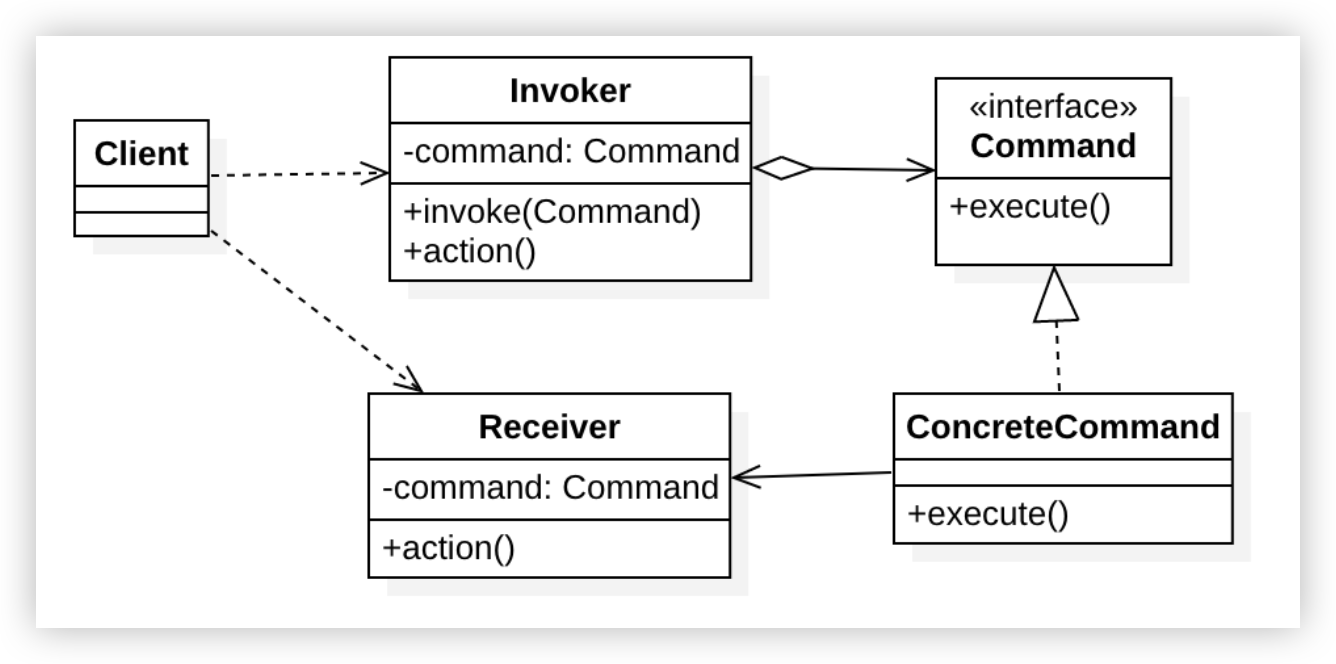
# 15. 命令模式(Command Pattern)
命令模式是一种行为型设计模式,它将一个请求封装为一个对象,从而使你可以用不同的请求对客户进行参数化,实现请求的排队、记录、撤销和重做等功能。
核心思想: 将动作请求封装成对象,实现调用者和接收者的解耦,并支持可撤销的操作和命令队列。
📌 适用场景
- 需要将请求的发送者和请求的接收者解耦。
- 需要参数化对象的操作,或将操作存储在队列中。
- 需要支持撤销/重做操作、事务处理或操作日志记录。
- 需要组合命令成为复杂命令(宏命令)。
| 角色 | 职责 |
|---|---|
| Command(命令接口) | 声明执行操作的方法接口 |
| ConcreteCommand(具体命令) | 实现命令接口,绑定接收者,调用接收者的方法 |
| Invoker(调用者) | 持有命令对象并触发命令的执行 |
| Receiver(接收者) | 知道如何实施与执行一个请求相关的操作 |
| Client(客户端) | 创建ConcreteCommand对象并设置接收者 |
示例:智能家居遥控器
假设我们要实现一个智能家居遥控器,其中:
- 遥控器(Invoker)可以控制不同的电器设备。
- 需要支持开关灯、调节音量等不同命令。
- 希望能够实现撤销上一个操作的功能。
// 1️⃣ Command(命令接口):定义命令的执行方法
interface Command {
    void execute();
    void undo();  // 撤销命令
}

// 2️⃣ Receiver(接收者):灯
class Light {
    private String location;

    public Light(String location) {
        this.location = location;
    }

    public void on() {
        System.out.println("💡 " + location + "灯已打开");
    }

    public void off() {
        System.out.println("🔌 " + location + "灯已关闭");
    }
}

// 2️⃣ Receiver(接收者):音响
class Stereo {
    private String location;
    private int volume = 0;

    public Stereo(String location) {
        this.location = location;
    }

    public void on() {
        System.out.println("🔊 " + location + "音响已打开");
    }

    public void off() {
        System.out.println("🔇 " + location + "音响已关闭");
    }

    public void setVolume(int volume) {
        this.volume = volume;
        System.out.println("🔊 " + location + "音响音量设置为: " + volume);
    }

    public int getVolume() {
        return volume;
    }
}

// 3️⃣ ConcreteCommand(具体命令):开灯命令
class LightOnCommand implements Command {
    private Light light;

    public LightOnCommand(Light light) {
        this.light = light;
    }

    @Override
    public void execute() {
        light.on();
    }

    @Override
    public void undo() {
        light.off();
    }
}

// 3️⃣ ConcreteCommand(具体命令):关灯命令
class LightOffCommand implements Command {
    private Light light;

    public LightOffCommand(Light light) {
        this.light = light;
    }

    @Override
    public void execute() {
        light.off();
    }

    @Override
    public void undo() {
        light.on();
    }
}

// 3️⃣ ConcreteCommand(具体命令):调高音量命令
class StereoVolumeUpCommand implements Command {
    private Stereo stereo;
    private int prevVolume;

    public StereoVolumeUpCommand(Stereo stereo) {
        this.stereo = stereo;
    }

    @Override
    public void execute() {
        prevVolume = stereo.getVolume();
        stereo.setVolume(prevVolume + 1);
    }

    @Override
    public void undo() {
        stereo.setVolume(prevVolume);
    }
}

// 3️⃣ ConcreteCommand(具体命令):无操作命令
class NoCommand implements Command {
    @Override
    public void execute() {
        // 什么也不做
    }

    @Override
    public void undo() {
        // 什么也不做
    }
}

// 4️⃣ Invoker(调用者):遥控器
class RemoteControl {
    private Command[] onCommands;
    private Command[] offCommands;
    private Command undoCommand;

    public RemoteControl() {
        onCommands = new Command[5];
        offCommands = new Command[5];

        Command noCommand = new NoCommand();
        for (int i = 0; i < 5; i++) {
            onCommands[i] = noCommand;
            offCommands[i] = noCommand;
        }
        undoCommand = noCommand;
    }

    public void setCommand(int slot, Command onCommand, Command offCommand) {
        onCommands[slot] = onCommand;
        offCommands[slot] = offCommand;
    }

    public void onButtonPressed(int slot) {
        onCommands[slot].execute();
        undoCommand = onCommands[slot];
    }

    public void offButtonPressed(int slot) {
        offCommands[slot].execute();
        undoCommand = offCommands[slot];
    }

    public void undoButtonPressed() {
        System.out.println("⏪ 撤销上一个操作");
        undoCommand.undo();
    }
}

// 5️⃣ Client(客户端)
public class CommandPatternDemo {
    public static void main(String[] args) {
        // 创建遥控器(调用者)
        RemoteControl remote = new RemoteControl();

        // 创建接收者
        Light livingRoomLight = new Light("客厅");
        Light kitchenLight = new Light("厨房");
        Stereo stereo = new Stereo("客厅");

        // 创建具体命令并设置接收者
        LightOnCommand livingRoomLightOn = new LightOnCommand(livingRoomLight);
        LightOffCommand livingRoomLightOff = new LightOffCommand(livingRoomLight);

        LightOnCommand kitchenLightOn = new LightOnCommand(kitchenLight);
        LightOffCommand kitchenLightOff = new LightOffCommand(kitchenLight);

        StereoVolumeUpCommand stereoVolumeUp = new StereoVolumeUpCommand(stereo);

        // 将命令设置到遥控器的插槽中
        remote.setCommand(0, livingRoomLightOn, livingRoomLightOff);
        remote.setCommand(1, kitchenLightOn, kitchenLightOff);
        remote.setCommand(2, stereoVolumeUp, new NoCommand());

        // 模拟按下遥控器按钮
        System.out.println("=== 按下客厅灯开按钮 ===");
        remote.onButtonPressed(0);

        System.out.println("\n=== 按下厨房灯开按钮 ===");
        remote.onButtonPressed(1);

        System.out.println("\n=== 按下撤销按钮 ===");
        remote.undoButtonPressed();

        System.out.println("\n=== 按下音量增加按钮 ===");
        remote.onButtonPressed(2);
        remote.onButtonPressed(2);

        System.out.println("\n=== 按下撤销按钮 ===");
        remote.undoButtonPressed();
    }
}
2
3
4
5
6
7
8
9
10
11
12
13
14
15
16
17
18
19
20
21
22
23
24
25
26
27
28
29
30
31
32
33
34
35
36
37
38
39
40
41
42
43
44
45
46
47
48
49
50
51
52
53
54
55
56
57
58
59
60
61
62
63
64
65
66
67
68
69
70
71
72
73
74
75
76
77
78
79
80
81
82
83
84
85
86
87
88
89
90
91
92
93
94
95
96
97
98
99
100
101
102
103
104
105
106
107
108
109
110
111
112
113
114
115
116
117
118
119
120
121
122
123
124
125
126
127
128
129
130
131
132
133
134
135
136
137
138
139
140
141
142
143
144
145
146
147
148
149
150
151
152
153
154
155
156
157
158
159
160
161
162
163
164
165
166
167
168
169
170
171
172
173
174
175
176
177
178
179
180
181
182
183
184
185
186
187
188
189
190
191
192
193
194
195
196
197
198
199
200
201
202
203
204
🌟 输出
=== 按下客厅灯开按钮 ===
💡 客厅灯已打开

=== 按下厨房灯开按钮 ===
💡 厨房灯已打开

=== 按下撤销按钮 ===
⏪ 撤销上一个操作
🔌 厨房灯已关闭

=== 按下音量增加按钮 ===
🔊 客厅音响音量设置为: 1
🔊 客厅音响音量设置为: 2

=== 按下撤销按钮 ===
⏪ 撤销上一个操作
🔊 客厅音响音量设置为: 1
2
3
4
5
6
7
8
9
10
11
12
13
14
15
16
17
✅ 优点
- 解耦请求与执行:将请求发送者和接收者完全解耦,发送者无需知道接收者的任何信息。
- 可扩展性强:可以很容易地增加新命令,无需修改已有代码(符合开闭原则)。
- 支持撤销与重做:通过命令对象可以方便地实现撤销/重做功能。
- 支持宏命令:可以将多个命令组合成一个复合命令,实现更复杂的功能。
- 支持事务:可以将命令对象存储在历史记录中,实现日志记录和事务恢复。
❌ 缺点
- 类数量增加:每增加一个命令就要增加一个具体命令类,可能导致类爆炸。
- 命令的粒度:确定命令的粒度大小可能比较困难。
- 系统复杂度增加:虽然解耦了调用者和接收者,但增加了许多中间类,使系统更加复杂。
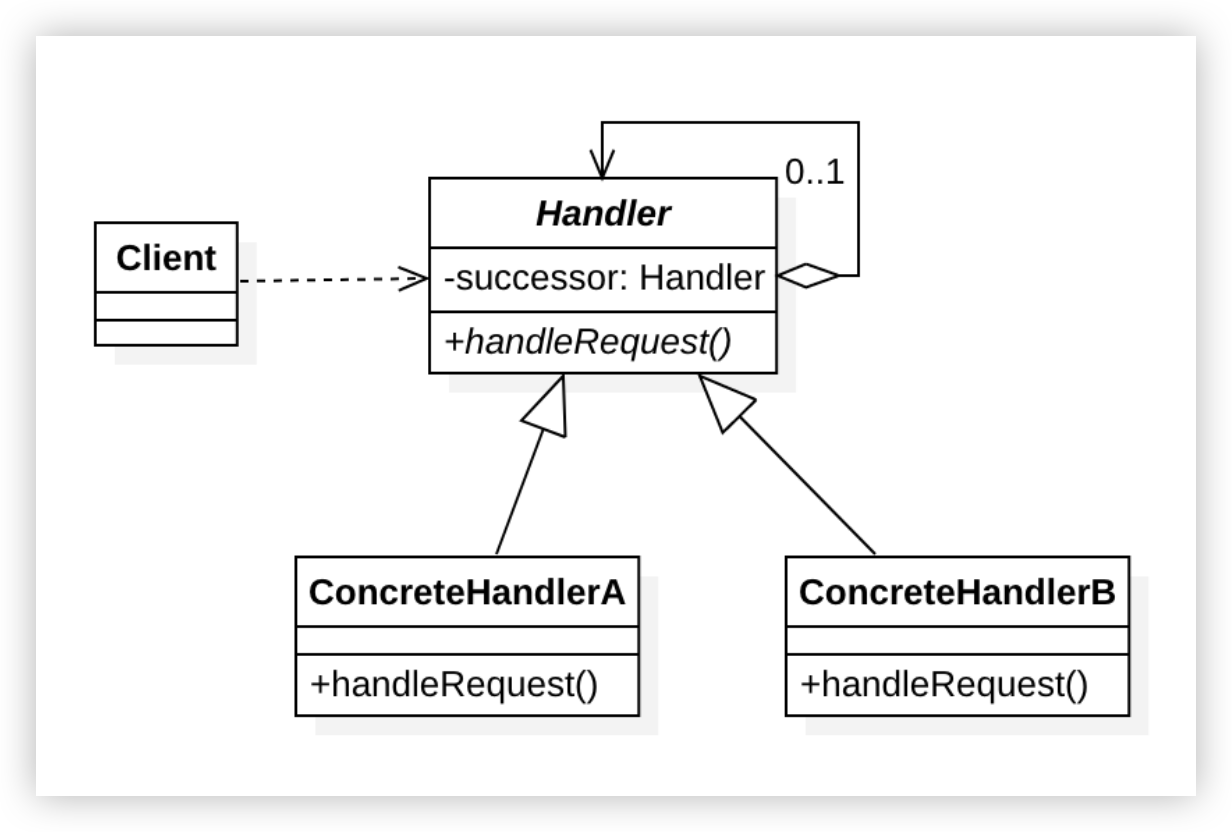
# 16. 职责链模式(Chain of Responsibility Pattern)
职责链模式是一种行为型设计模式,它允许多个对象按顺序处理同一个请求,直到有一个对象处理完为止,从而避免请求的发送者和接收者之间的耦合关系。
核心思想: 将能够处理同一类请求的对象连成一条链,请求沿着这条链传递,直到链上的某个对象能够处理它为止,实现请求发送者和处理者的解耦。
📌 适用场景
- 有多个对象可以处理同一请求,但具体由哪个对象处理在运行时才能确定。
- 不明确指定接收者的情况下,向多个对象中的一个提交请求。
- 需要动态指定一组对象处理请求,例如基于职责或权限等因素。
- 需要请求在处理链中逐级审批或过滤,Java Web应用中的
javax.servlet.Filter接口使用职责链模式处理HTTP请求。
| 角色 | 职责 |
|---|---|
| Handler(处理者抽象类) | 定义处理请求的接口,设置后继处理者 |
| ConcreteHandler(具体处理者) | 实现处理请求的方法,若自己无法处理则转发给后继者 |
| Client(客户端) | 创建处理链,向链上的具体处理者提交请求 |
示例:企业审批流程
假设我们要实现一个公司报销审批系统,其中:
- 不同级别的费用需要不同级别的管理者审批。
- 部门经理可以审批1000元以下的报销请求。
- 总监可以审批5000元以下的报销请求。
- CEO可以审批10000元以下的报销请求。
- 超过CEO权限的报销请求需要董事会审批。
// 1️⃣ 报销请求类
class ExpenseRequest {
private int amount;
private String purpose;
public ExpenseRequest(int amount, String purpose) {
this.amount = amount;
this.purpose = purpose;
}
public int getAmount() {
return amount;
}
public String getPurpose() {
return purpose;
}
}
// 2️⃣ Handler(处理者抽象类):审批者
abstract class Approver {
protected Approver successor;
protected String name;
public Approver(String name) {
this.name = name;
}
// 设置后继审批者
public void setSuccessor(Approver successor) {
this.successor = successor;
}
// 处理请求的抽象方法
public abstract void processRequest(ExpenseRequest request);
}
// 3️⃣ ConcreteHandler(具体处理者):部门经理
class DepartmentManager extends Approver {
public DepartmentManager(String name) {
super(name);
}
@Override
public void processRequest(ExpenseRequest request) {
if (request.getAmount() <= 1000) {
System.out.println("👨💼 部门经理 " + name + " 已批准报销请求: ¥"
+ request.getAmount() + " 用于: " + request.getPurpose());
} else if (successor != null) {
System.out.println("👨💼 部门经理 " + name + " 无权批准,转交上级...");
successor.processRequest(request);
}
}
}
// 3️⃣ ConcreteHandler(具体处理者):总监
class Director extends Approver {
public Director(String name) {
super(name);
}
@Override
public void processRequest(ExpenseRequest request) {
if (request.getAmount() <= 5000) {
System.out.println("👩💼 总监 " + name + " 已批准报销请求: ¥"
+ request.getAmount() + " 用于: " + request.getPurpose());
} else if (successor != null) {
System.out.println("👩💼 总监 " + name + " 无权批准,转交上级...");
successor.processRequest(request);
}
}
}
// 3️⃣ ConcreteHandler(具体处理者):CEO
class CEO extends Approver {
public CEO(String name) {
super(name);
}
@Override
public void processRequest(ExpenseRequest request) {
if (request.getAmount() <= 10000) {
System.out.println("🧑💼 CEO " + name + " 已批准报销请求: ¥"
+ request.getAmount() + " 用于: " + request.getPurpose());
} else if (successor != null) {
System.out.println("🧑💼 CEO " + name + " 无权批准,转交上级...");
successor.processRequest(request);
}
}
}
// 3️⃣ ConcreteHandler(具体处理者):董事会
class Board extends Approver {
public Board(String name) {
super(name);
}
@Override
public void processRequest(ExpenseRequest request) {
System.out.println("🏢 董事会 " + name + " 已批准报销请求: ¥"
+ request.getAmount() + " 用于: " + request.getPurpose());
System.out.println("⚠️ 注意: 该报销金额较大,需在季度财报中特别说明");
}
}
// 4️⃣ Client(客户端)
public class ChainOfResponsibilityDemo {
public static void main(String[] args) {
// 创建审批者对象
Approver manager = new DepartmentManager("张经理");
Approver director = new Director("李总监");
Approver ceo = new CEO("王总");
Approver board = new Board("执行董事会");
// 创建职责链
manager.setSuccessor(director);
director.setSuccessor(ceo);
ceo.setSuccessor(board);
// 创建报销请求
ExpenseRequest request1 = new ExpenseRequest(800, "购买办公用品");
ExpenseRequest request2 = new ExpenseRequest(3000, "团队建设活动");
ExpenseRequest request3 = new ExpenseRequest(8000, "客户招待");
ExpenseRequest request4 = new ExpenseRequest(25000, "更新办公设备");
// 处理请求
System.out.println("=== 处理报销申请1 ===");
manager.processRequest(request1);
System.out.println("\n=== 处理报销申请2 ===");
manager.processRequest(request2);
System.out.println("\n=== 处理报销申请3 ===");
manager.processRequest(request3);
System.out.println("\n=== 处理报销申请4 ===");
manager.processRequest(request4);
}
}
2
3
4
5
6
7
8
9
10
11
12
13
14
15
16
17
18
19
20
21
22
23
24
25
26
27
28
29
30
31
32
33
34
35
36
37
38
39
40
41
42
43
44
45
46
47
48
49
50
51
52
53
54
55
56
57
58
59
60
61
62
63
64
65
66
67
68
69
70
71
72
73
74
75
76
77
78
79
80
81
82
83
84
85
86
87
88
89
90
91
92
93
94
95
96
97
98
99
100
101
102
103
104
105
106
107
108
109
110
111
112
113
114
115
116
117
118
119
120
121
122
123
124
125
126
127
128
129
130
131
132
133
134
135
136
137
138
139
🌟 输出
=== 处理报销申请1 ===
👨💼 部门经理 张经理 已批准报销请求: ¥800 用于: 购买办公用品
=== 处理报销申请2 ===
👨💼 部门经理 张经理 无权批准,转交上级...
👩💼 总监 李总监 已批准报销请求: ¥3000 用于: 团队建设活动
=== 处理报销申请3 ===
👨💼 部门经理 张经理 无权批准,转交上级...
👩💼 总监 李总监 无权批准,转交上级...
🧑💼 CEO 王总 已批准报销请求: ¥8000 用于: 客户招待
=== 处理报销申请4 ===
👨💼 部门经理 张经理 无权批准,转交上级...
👩💼 总监 李总监 无权批准,转交上级...
🧑💼 CEO 王总 无权批准,转交上级...
🏢 董事会 执行董事会 已批准报销请求: ¥25000 用于: 更新办公设备
⚠️ 注意: 该报销金额较大,需在季度财报中特别说明
2
3
4
5
6
7
8
9
10
11
12
13
14
15
16
17
18
✅ 优点
- 解耦发送者和接收者:请求的发送者和接收者之间没有直接引用关系。
- 动态组合处理者:可以在运行时动态改变链的结构,增删处理者。
- 增强了给对象指派职责的灵活性:通过改变链内的成员或调整顺序,允许动态调整职责。
- 符合开闭原则:无需修改现有代码,可以在链中添加新的处理者。
❌ 缺点
- 不保证被处理:请求可能到达链的末端都得不到处理。
- 调试困难:请求的处理过程不易观察,难以调试。
- 性能问题:对于长链,请求可能需要经过很多处理者,影响性能。
- 递归终止:如果链的构造不当,可能导致循环调用或无限递归。
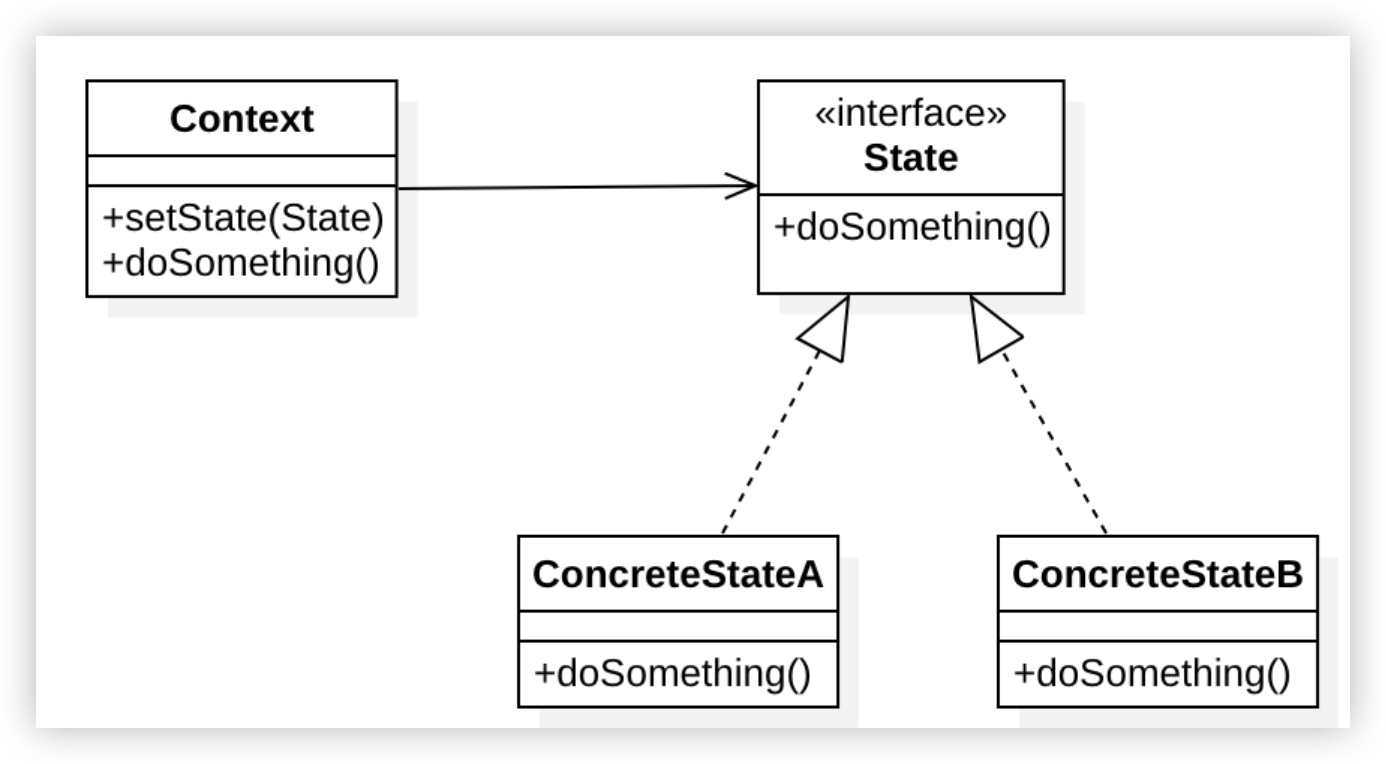
# 17. 状态模式(State Pattern)
状态模式是一种行为型设计模式,它允许对象在其内部状态发生变化时改变其行为,看起来像是改变了自身的类,从而将状态相关的行为集中管理并与具体对象解耦。
核心思想: 将每个状态封装成一个独立的类,通过状态对象来控制对象的不同行为,避免使用大量的条件语句来处理状态转换,实现状态与行为的分离。
📌 适用场景
- 一个对象的行为取决于其当前状态,且状态变化时行为也随之改变。
- 代码中包含大量与对象状态相关的条件语句,需要简化逻辑。
- 需要在一个系统中清晰地定义和管理对象的状态转换。
- 一个对象的状态可以在运行时动态切换,如游戏角色的状态(正常、受伤、无敌)。
| 角色 | 职责 |
|---|---|
| Context(环境类) | 持有当前状态,提供外部调用接口,委托状态处理行为 |
| State(状态抽象类/接口) | 定义状态的公共行为接口 |
| ConcreteState(具体状态) | 实现每个状态的具体行为,并可处理状态转换 |
示例:订单状态管理
假设我们要实现一个电商订单管理系统,订单可能处于以下状态:
- 待支付:订单已创建,用户需支付。
- 已支付:支付完成,等待发货。
- 已发货:商品已发出,等待签收。
- 已完成:用户签收,订单结束。
// 1️⃣ State(状态接口):订单状态
interface OrderState {
    void handle(Order order); // 处理订单行为
}

// 2️⃣ ConcreteState(具体状态):待支付状态
class PendingPaymentState implements OrderState {
    @Override
    public void handle(Order order) {
        System.out.println("📦 订单 " + order.getOrderId() + " 当前状态:待支付");
        System.out.println("💰 请支付订单金额:" + order.getAmount() + " 元");
        // 模拟支付成功后状态转换
        order.setState(new PaidState());
        System.out.println("✅ 支付成功,状态变更为:已支付");
    }
}

// 2️⃣ ConcreteState(具体状态):已支付状态
class PaidState implements OrderState {
    @Override
    public void handle(Order order) {
        System.out.println("📦 订单 " + order.getOrderId() + " 当前状态:已支付");
        System.out.println("🚚 正在准备发货...");
        // 模拟发货后状态转换
        order.setState(new ShippedState());
        System.out.println("✅ 发货完成,状态变更为:已发货");
    }
}

// 2️⃣ ConcreteState(具体状态):已发货状态
class ShippedState implements OrderState {
    @Override
    public void handle(Order order) {
        System.out.println("📦 订单 " + order.getOrderId() + " 当前状态:已发货");
        System.out.println("📬 商品运输中,请耐心等待...");
        // 模拟签收后状态转换
        order.setState(new CompletedState());
        System.out.println("✅ 用户签收,状态变更为:已完成");
    }
}

// 2️⃣ ConcreteState(具体状态):已完成状态
class CompletedState implements OrderState {
    @Override
    public void handle(Order order) {
        System.out.println("📦 订单 " + order.getOrderId() + " 当前状态:已完成");
        System.out.println("🎉 订单已完成,感谢您的购买!");
    }
}

// 3️⃣ Context(环境类):订单
class Order {
    private String orderId;
    private double amount;
    private OrderState state;

    public Order(String orderId, double amount) {
        this.orderId = orderId;
        this.amount = amount;
        this.state = new PendingPaymentState(); // 初始状态为待支付
    }

    // 委托状态处理行为
    public void process() {
        state.handle(this);
    }

    // 设置当前状态
    public void setState(OrderState state) {
        this.state = state;
    }

    public String getOrderId() {
        return orderId;
    }

    public double getAmount() {
        return amount;
    }
}

// 4️⃣ Client(客户端)
public class StatePatternDemo {
    public static void main(String[] args) {
        // 创建订单
        Order order = new Order("ORD12345", 199.99);

        // 模拟订单处理流程
        System.out.println("=== 处理订单:第1步 ===");
        order.process(); // 待支付 -> 已支付

        System.out.println("\n=== 处理订单:第2步 ===");
        order.process(); // 已支付 -> 已发货

        System.out.println("\n=== 处理订单:第3步 ===");
        order.process(); // 已发货 -> 已完成

        System.out.println("\n=== 处理订单:第4步 ===");
        order.process(); // 已完成
    }
}
2
3
4
5
6
7
8
9
10
11
12
13
14
15
16
17
18
19
20
21
22
23
24
25
26
27
28
29
30
31
32
33
34
35
36
37
38
39
40
41
42
43
44
45
46
47
48
49
50
51
52
53
54
55
56
57
58
59
60
61
62
63
64
65
66
67
68
69
70
71
72
73
74
75
76
77
78
79
80
81
82
83
84
85
86
87
88
89
90
91
92
93
94
95
96
97
98
99
100
101
🌟 输出
=== 处理订单:第1步 ===
📦 订单 ORD12345 当前状态:待支付
💰 请支付订单金额:199.99 元
✅ 支付成功,状态变更为:已支付

=== 处理订单:第2步 ===
📦 订单 ORD12345 当前状态:已支付
🚚 正在准备发货...
✅ 发货完成,状态变更为:已发货

=== 处理订单:第3步 ===
📦 订单 ORD12345 当前状态:已发货
📬 商品运输中,请耐心等待...
✅ 用户签收,状态变更为:已完成

=== 处理订单:第4步 ===
📦 订单 ORD12345 当前状态:已完成
🎉 订单已完成,感谢您的购买!
2
3
4
5
6
7
8
9
10
11
12
13
14
15
16
17
18
✅ 优点
- 封装状态行为:每个状态的行为都被封装到单独的类中,逻辑清晰。
- 消除条件语句:避免使用大量
if-else或switch-case,提高代码可维护性。 - 状态转换明确:状态之间的切换逻辑集中在具体状态类中,便于管理。
- 符合开闭原则:新增状态只需添加新的状态类,无需修改现有代码。
❌ 缺点
- 类数量增加:每种状态都需要一个类,可能导致类数量膨胀。
- 复杂性提升:对于简单场景,使用状态模式可能显得过于繁琐。
- 状态切换实现复杂:如果状态转换逻辑复杂,可能需要在状态类中维护较多代码。
- 初始化开销:需要在对象创建时指定初始状态,增加少量开销。
通过这种方式,状态模式将订单的每种状态独立出来,使得行为随着状态变化而变化,既直观又易于扩展!
# 18. 观察者模式(Observer Pattern)
观察者模式是一种行为型设计模式,它定义了对象之间的一种一对多的依赖关系,当一个对象的状态发生变化时,所有依赖它的对象都会得到通知并自动更新,从而实现松耦合的发布-订阅机制。
核心思想: 将主题(被观察者)和观察者分离开来,主题维护一个观察者列表,当主题状态变化时,通知所有观察者,让它们自行处理更新逻辑。
📌 适用场景
- 一个对象的状态变化需要通知其他多个对象,且这些对象之间无需直接耦合。
- 需要实现事件广播或发布-订阅机制,例如消息队列、UI事件监听。
- 一个抽象模型有两方面,其中一方面依赖于另一方面,需要动态更新。
- Java 中的
java.util.Observable和java.util.Observer(已废弃)或 AWT/Swing 事件监听机制使用了观察者模式。
| 角色 | 职责 |
|---|---|
| Subject(主题/被观察者抽象) | 定义注册、移除、通知观察者的接口,维护观察者列表 |
| ConcreteSubject(具体主题) | 实现主题接口,状态变化时通知所有观察者 |
| Observer(观察者抽象) | 定义更新接口,接收主题的通知 |
| ConcreteObserver(具体观察者) | 实现更新方法,根据主题状态执行具体逻辑 |
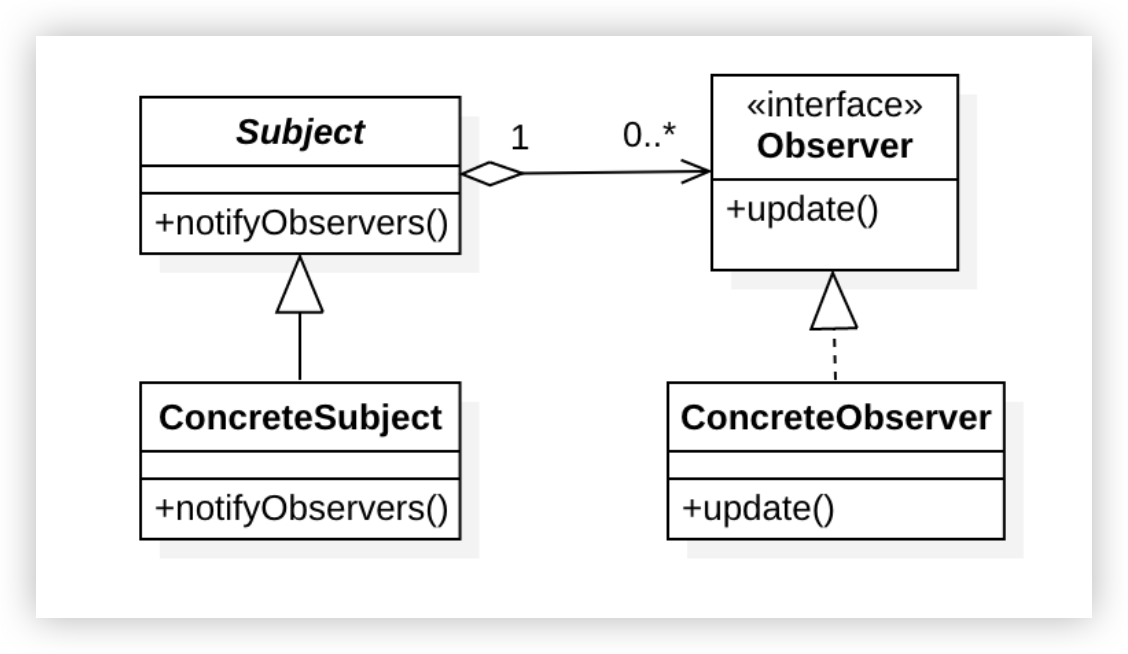
示例:天气预报系统
假设我们要实现一个天气预报系统:
- 天气站(主题)负责发布天气数据(如温度、湿度)。
- 手机应用和电子屏幕(观察者)订阅天气站,实时接收并展示天气更新。
import java.util.ArrayList;
import java.util.List;

// 1️⃣ Observer(观察者接口):天气观察者
interface WeatherObserver {
    void update(float temperature, float humidity);
}

// 2️⃣ Subject(主题抽象类):天气站
abstract class WeatherStation {
    private List<WeatherObserver> observers = new ArrayList<>();

    // 注册观察者
    public void addObserver(WeatherObserver observer) {
        observers.add(observer);
    }

    // 移除观察者
    public void removeObserver(WeatherObserver observer) {
        observers.remove(observer);
    }

    // 通知所有观察者
    public void notifyObservers(float temperature, float humidity) {
        for (WeatherObserver observer : observers) {
            observer.update(temperature, humidity);
        }
    }

    // 抽象方法,子类实现具体逻辑
    public abstract void setWeatherData(float temperature, float humidity);
}

// 3️⃣ ConcreteSubject(具体主题):具体天气站
class ConcreteWeatherStation extends WeatherStation {
    private float temperature;
    private float humidity;

    @Override
    public void setWeatherData(float temperature, float humidity) {
        this.temperature = temperature;
        this.humidity = humidity;
        System.out.println("🌤️ 天气站更新数据 - 温度: " + temperature + "°C, 湿度: " + humidity + "%");
        notifyObservers(temperature, humidity); // 数据更新后通知观察者
    }
}

// 4️⃣ ConcreteObserver(具体观察者):手机应用
class MobileApp implements WeatherObserver {
    private String name;

    public MobileApp(String name) {
        this.name = name;
    }

    @Override
    public void update(float temperature, float humidity) {
        System.out.println("📱 手机应用 " + name + " 收到更新 - 温度: " + temperature + "°C, 湿度: " + humidity + "%");
    }
}

// 4️⃣ ConcreteObserver(具体观察者):电子屏幕
class DisplayScreen implements WeatherObserver {
    private String location;

    public DisplayScreen(String location) {
        this.location = location;
    }

    @Override
    public void update(float temperature, float humidity) {
        System.out.println("📺 电子屏幕 " + location + " 显示更新 - 温度: " + temperature + "°C, 湿度: " + humidity + "%");
    }
}

// 5️⃣ Client(客户端)
public class ObserverPatternDemo {
    public static void main(String[] args) {
        // 创建天气站
        ConcreteWeatherStation weatherStation = new ConcreteWeatherStation();

        // 创建观察者
        WeatherObserver mobileApp = new MobileApp("用户A的天气App");
        WeatherObserver displayScreen = new DisplayScreen("市中心广场");

        // 注册观察者
        weatherStation.addObserver(mobileApp);
        weatherStation.addObserver(displayScreen);

        // 更新天气数据
        System.out.println("=== 第一次天气更新 ===");
        weatherStation.setWeatherData(25.5f, 60.0f);

        System.out.println("\n=== 移除电子屏幕观察者 ===");
        weatherStation.removeObserver(displayScreen);

        System.out.println("\n=== 第二次天气更新 ===");
        weatherStation.setWeatherData(28.0f, 55.0f);
    }
}
2
3
4
5
6
7
8
9
10
11
12
13
14
15
16
17
18
19
20
21
22
23
24
25
26
27
28
29
30
31
32
33
34
35
36
37
38
39
40
41
42
43
44
45
46
47
48
49
50
51
52
53
54
55
56
57
58
59
60
61
62
63
64
65
66
67
68
69
70
71
72
73
74
75
76
77
78
79
80
81
82
83
84
85
86
87
88
89
90
91
92
93
94
95
96
97
98
99
100
🌟 输出
=== 第一次天气更新 ===
🌤️ 天气站更新数据 - 温度: 25.5°C, 湿度: 60.0%
📱 手机应用 用户A的天气App 收到更新 - 温度: 25.5°C, 湿度: 60.0%
📺 电子屏幕 市中心广场 显示更新 - 温度: 25.5°C, 湿度: 60.0%

=== 移除电子屏幕观察者 ===

=== 第二次天气更新 ===
🌤️ 天气站更新数据 - 温度: 28.0°C, 湿度: 55.0%
📱 手机应用 用户A的天气App 收到更新 - 温度: 28.0°C, 湿度: 55.0%
2
3
4
5
6
7
8
9
10
✅ 优点
- 松耦合:主题和观察者之间通过抽象接口交互,互不依赖具体实现。
- 支持广播通信:一个主题可以通知多个观察者,实现高效的事件分发。
- 动态管理观察者:可以在运行时添加或移除观察者,灵活性高。
- 符合开闭原则:新增观察者无需修改主题代码。
❌ 缺点
- 通知开销大:如果观察者数量过多,通知所有观察者可能影响性能。
- 内存泄漏风险:未及时移除的观察者可能导致内存泄漏。
- 更新顺序不可控:观察者接收通知的顺序无法保证,可能导致逻辑问题。
- 复杂性增加:对于简单场景,引入观察者模式可能显得过于复杂。
通过观察者模式,天气站和观察者之间实现了松散耦合,天气数据更新时无需直接调用具体观察者的方法,极大地提高了系统的可扩展性和维护性!
# 19. 中介者模式(Mediator Pattern)
中介者模式是一种行为型设计模式,它通过引入一个中介者对象来封装一组对象之间的交互,从而减少对象之间的直接引用,降低系统耦合度,使对象间通信更加灵活和可控。
核心思想: 将多个对象之间的复杂交互集中到中介者中管理,对象不再直接相互通信,而是通过中介者进行协调,实现集中式控制和解耦。
📌 适用场景
- 一组对象之间存在复杂的多对多交互,导致系统难以维护。
- 需要通过一个中央控制点来协调多个对象的行为或状态。
- 对象之间高度耦合,修改一个对象会影响多个其他对象。
- 常见于 GUI 系统(如按钮、文本框间的交互)或聊天系统中(用户通过服务器通信)。
| 角色 | 职责 |
|---|---|
| Mediator(中介者抽象) | 定义与同事对象通信的接口 |
| ConcreteMediator(具体中介者) | 实现中介者接口,协调各个同事对象的交互 |
| Colleague(同事抽象) | 定义同事类的公共行为,持有中介者引用 |
| ConcreteColleague(具体同事) | 实现具体行为,通过中介者与其它同事通信 |
示例:机场塔台调度系统
假设我们要实现一个机场塔台调度系统:
- 塔台(中介者)负责协调飞机之间的起飞和降落。
- 飞机(同事)需要通过塔台请求跑道使用权或报告状态。
// 1️⃣ Mediator(中介者接口):塔台
interface ControlTower {
    void requestTakeoff(Plane plane);
    void requestLanding(Plane plane);
    void notifyStatus(String message);
}

// 2️⃣ ConcreteMediator(具体中介者):具体塔台
class AirportControlTower implements ControlTower {
    private boolean runwayBusy = false;

    @Override
    public void requestTakeoff(Plane plane) {
        if (!runwayBusy) {
            runwayBusy = true;
            System.out.println("🛫 塔台批准 " + plane.getFlightNumber() + " 起飞,跑道已占用");
            plane.confirmTakeoff();
        } else {
            System.out.println("⚠️ 塔台通知 " + plane.getFlightNumber() + ":跑道忙碌,请等待");
        }
    }

    @Override
    public void requestLanding(Plane plane) {
        if (!runwayBusy) {
            runwayBusy = true;
            System.out.println("🛬 塔台批准 " + plane.getFlightNumber() + " 降落,跑道已占用");
            plane.confirmLanding();
        } else {
            System.out.println("⚠️ 塔台通知 " + plane.getFlightNumber() + ":跑道忙碌,请盘旋等待");
        }
    }

    @Override
    public void notifyStatus(String message) {
        System.out.println("📡 塔台广播: " + message);
        if (message.contains("完成")) {
            runwayBusy = false; // 跑道释放
        }
    }
}

// 3️⃣ Colleague(同事抽象类):飞机
abstract class Plane {
    protected ControlTower tower;
    protected String flightNumber;

    public Plane(ControlTower tower, String flightNumber) {
        this.tower = tower;
        this.flightNumber = flightNumber;
    }

    public String getFlightNumber() {
        return flightNumber;
    }

    public abstract void requestTakeoff();
    public abstract void requestLanding();
    public abstract void confirmTakeoff();
    public abstract void confirmLanding();
}

// 4️⃣ ConcreteColleague(具体同事):客机
class PassengerPlane extends Plane {
    public PassengerPlane(ControlTower tower, String flightNumber) {
        super(tower, flightNumber);
    }

    @Override
    public void requestTakeoff() {
        System.out.println("✈️ 客机 " + flightNumber + " 请求起飞");
        tower.requestTakeoff(this);
    }

    @Override
    public void requestLanding() {
        System.out.println("✈️ 客机 " + flightNumber + " 请求降落");
        tower.requestLanding(this);
    }

    @Override
    public void confirmTakeoff() {
        System.out.println("✅ 客机 " + flightNumber + " 起飞成功");
        tower.notifyStatus("客机 " + flightNumber + " 起飞完成");
    }

    @Override
    public void confirmLanding() {
        System.out.println("✅ 客机 " + flightNumber + " 降落成功");
        tower.notifyStatus("客机 " + flightNumber + " 降落完成");
    }
}

// 4️⃣ ConcreteColleague(具体同事):货机
class CargoPlane extends Plane {
    public CargoPlane(ControlTower tower, String flightNumber) {
        super(tower, flightNumber);
    }

    @Override
    public void requestTakeoff() {
        System.out.println("🚛 货机 " + flightNumber + " 请求起飞");
        tower.requestTakeoff(this);
    }

    @Override
    public void requestLanding() {
        System.out.println("🚛 货机 " + flightNumber + " 请求降落");
        tower.requestLanding(this);
    }

    @Override
    public void confirmTakeoff() {
        System.out.println("✅ 货机 " + flightNumber + " 起飞成功");
        tower.notifyStatus("货机 " + flightNumber + " 起飞完成");
    }

    @Override
    public void confirmLanding() {
        System.out.println("✅ 货机 " + flightNumber + " 降落成功");
        tower.notifyStatus("货机 " + flightNumber + " 降落完成");
    }
}

// 5️⃣ Client(客户端)
public class MediatorPatternDemo {
    public static void main(String[] args) {
        // 创建塔台
        ControlTower tower = new AirportControlTower();

        // 创建飞机
        Plane plane1 = new PassengerPlane(tower, "CA123");
        Plane plane2 = new CargoPlane(tower, "FX456");

        // 模拟调度过程
        System.out.println("=== 第一架飞机起飞 ===");
        plane1.requestTakeoff();

        System.out.println("\n=== 第二架飞机请求降落(跑道忙碌) ===");
        plane2.requestLanding();

        System.out.println("\n=== 第一架飞机起飞完成,第二架飞机再请求降落 ===");
        plane2.requestLanding();
    }
}
2
3
4
5
6
7
8
9
10
11
12
13
14
15
16
17
18
19
20
21
22
23
24
25
26
27
28
29
30
31
32
33
34
35
36
37
38
39
40
41
42
43
44
45
46
47
48
49
50
51
52
53
54
55
56
57
58
59
60
61
62
63
64
65
66
67
68
69
70
71
72
73
74
75
76
77
78
79
80
81
82
83
84
85
86
87
88
89
90
91
92
93
94
95
96
97
98
99
100
101
102
103
104
105
106
107
108
109
110
111
112
113
114
115
116
117
118
119
120
121
122
123
124
125
126
127
128
129
130
131
132
133
134
135
136
137
138
139
140
141
142
143
144
145
🌟 输出
=== 第一架飞机起飞 ===
✈️ 客机 CA123 请求起飞
🛫 塔台批准 CA123 起飞,跑道已占用
✅ 客机 CA123 起飞成功
📡 塔台广播: 客机 CA123 起飞完成

=== 第二架飞机请求降落(跑道忙碌) ===
🚛 货机 FX456 请求降落
⚠️ 塔台通知 FX456:跑道忙碌,请盘旋等待

=== 第一架飞机起飞完成,第二架飞机再请求降落 ===
🚛 货机 FX456 请求降落
🛬 塔台批准 FX456 降落,跑道已占用
✅ 货机 FX456 降落成功
📡 塔台广播: 货机 FX456 降落完成
2
3
4
5
6
7
8
9
10
11
12
13
14
15
✅ 优点
- 降低耦合度:对象之间不直接交互,通过中介者通信,减少依赖。
- 集中控制:交互逻辑集中在中介者中,便于管理和修改。
- 简化对象关系:将多对多的复杂关系简化为中介者的一对多关系。
- 提高可维护性:修改交互规则只需调整中介者逻辑。
❌ 缺点
- 中介者复杂性:随着交互增多,中介者可能变得臃肿难以维护。
- 单点故障风险:中介者若出现问题,可能影响整个系统。
- 性能瓶颈:所有通信都经过中介者,可能成为性能瓶颈。
- 设计难度:需要合理划分中介者和同事的职责,否则易导致混乱。
通过中介者模式,飞机无需直接协调彼此的起降,而是依赖塔台进行统一调度,系统结构更加清晰,扩展性也得到了提升!
# 20. 迭代器模式(Iterator Pattern)
迭代器模式是一种行为型设计模式,它提供了一种方法来顺序访问一个聚合对象(如列表、数组、集合等)中的各个元素,而无需暴露其底层实现细节,从而实现遍历操作与聚合对象的解耦。
核心思想: 将遍历逻辑抽取到独立的迭代器对象中,聚合对象只需提供一个接口来创建迭代器,用户通过迭代器访问元素,无需关心聚合的内部结构。
📌 适用场景
- 需要以统一的方式遍历不同类型的聚合对象(如列表、树、图)。
- 聚合对象的内部结构复杂,不适合直接暴露给客户端。
- 需要提供多种遍历方式(如正序、逆序),但不希望修改聚合对象。
- Java 中的
java.util.Iterator和java.util.Iterable接口是迭代器模式的典型实现。
| 角色 | 职责 |
|---|---|
| Iterator(迭代器接口) | 定义遍历元素的接口(hasNext、next 等方法) |
| ConcreteIterator(具体迭代器) | 实现迭代器接口,维护遍历位置,执行具体遍历逻辑 |
| Aggregate(聚合接口) | 定义创建迭代器的接口 |
| ConcreteAggregate(具体聚合) | 实现聚合接口,创建对应的迭代器,提供数据存储 |

示例:自定义播放列表
假设我们要实现一个音乐播放列表,支持顺序播放歌曲:
- 播放列表(聚合对象)存储歌曲。
- 迭代器负责遍历播放列表中的歌曲。
import java.util.ArrayList;
import java.util.List;

// 1️⃣ Iterator(迭代器接口):播放列表迭代器
interface PlaylistIterator {
    boolean hasNext(); // 是否有下一个元素
    String next();     // 获取下一个元素
}

// 2️⃣ ConcreteIterator(具体迭代器):具体播放列表迭代器
class SongIterator implements PlaylistIterator {
    private List<String> songs;
    private int position = 0;

    public SongIterator(List<String> songs) {
        this.songs = songs;
    }

    @Override
    public boolean hasNext() {
        return position < songs.size();
    }

    @Override
    public String next() {
        if (hasNext()) {
            return songs.get(position++);
        }
        return null;
    }
}

// 3️⃣ Aggregate(聚合接口):播放列表
interface Playlist {
    PlaylistIterator createIterator(); // 创建迭代器
}

// 4️⃣ ConcreteAggregate(具体聚合):具体播放列表
class MusicPlaylist implements Playlist {
    private List<String> songs;

    public MusicPlaylist() {
        this.songs = new ArrayList<>();
    }

    public void addSong(String song) {
        songs.add(song);
    }

    @Override
    public PlaylistIterator createIterator() {
        return new SongIterator(songs);
    }
}

// 5️⃣ Client(客户端)
public class IteratorPatternDemo {
    public static void main(String[] args) {
        // 创建播放列表
        MusicPlaylist playlist = new MusicPlaylist();

        // 添加歌曲
        playlist.addSong("Song A - Pop");
        playlist.addSong("Song B - Rock");
        playlist.addSong("Song C - Jazz");
        playlist.addSong("Song D - Classical");

        // 获取迭代器
        PlaylistIterator iterator = playlist.createIterator();

        // 遍历播放列表
        System.out.println("🎵 开始播放音乐列表:");
        while (iterator.hasNext()) {
            String song = iterator.next();
            System.out.println("▶️ 正在播放: " + song);
        }
    }
}
2
3
4
5
6
7
8
9
10
11
12
13
14
15
16
17
18
19
20
21
22
23
24
25
26
27
28
29
30
31
32
33
34
35
36
37
38
39
40
41
42
43
44
45
46
47
48
49
50
51
52
53
54
55
56
57
58
59
60
61
62
63
64
65
66
67
68
69
70
71
72
73
74
75
76
77
78
🌟 输出
🎵 开始播放音乐列表:
▶️ 正在播放: Song A - Pop
▶️ 正在播放: Song B - Rock
▶️ 正在播放: Song C - Jazz
▶️ 正在播放: Song D - Classical
2
3
4
5
✅ 优点
- 封装遍历逻辑:客户端无需了解聚合对象的内部结构,遍历逻辑由迭代器负责。
- 支持多种遍历方式:可以为同一聚合对象创建不同的迭代器(如逆序、过滤)。
- 解耦聚合与遍历:聚合对象专注于数据管理,迭代器专注于遍历。
- 符合单一职责原则:遍历职责独立于聚合对象,职责划分清晰。
❌ 缺点
- 类数量增加:需要为每个聚合对象创建对应的迭代器,增加了代码复杂性。
- 额外开销:对于简单集合,引入迭代器可能显得多余,增加性能开销。
- 实现复杂性:如果聚合结构复杂(如树或图),迭代器的实现会更困难。
- 受限于线性遍历:传统迭代器模式更适合线性结构,处理非线性结构需额外设计。
通过迭代器模式,播放列表的歌曲遍历被完全封装,用户只需通过迭代器接口访问元素,而无需关心歌曲是如何存储的,极大提高了代码的灵活性和可维护性!
# 21. 访问者模式(Visitor Pattern)
访问者模式是一种行为型设计模式,它允许在不修改对象结构的情况下,为对象添加新的操作,通过将操作逻辑分离到访问者类中,实现功能扩展与数据结构的解耦。
核心思想: 将数据结构与操作分离,定义一个访问者接口,对象接受访问者并调用其方法,从而让访问者执行特定操作,适用于结构稳定但操作多变的场景。
📌 适用场景
- 对象结构稳定,但需要频繁添加新的操作。
- 一组对象需要执行多种不同且不相关的操作,且不希望污染对象本身的类。
- 数据结构与操作逻辑需要独立演化,避免因操作变化修改对象类。
- 常用于编译器中的语法树处理、XML/JSON 对象解析等场景。
| 角色 | 职责 |
|---|---|
| Visitor(访问者接口) | 定义访问不同元素的方法接口 |
| ConcreteVisitor(具体访问者) | 实现访问者接口,为每种元素提供具体操作 |
| Element(元素接口) | 定义接受访问者的接口(accept 方法) |
| ConcreteElement(具体元素) | 实现元素接口,接受访问者并调用其对应方法 |
| ObjectStructure(对象结构) | 管理元素集合,提供遍历接口供访问者操作 |
示例:文件系统扫描
假设我们要实现一个文件系统扫描工具:
- 文件和文件夹(元素)组成文件系统。
- 访问者可以计算文件大小或统计文件类型。
import java.util.ArrayList;
import java.util.List;

// 1️⃣ Visitor(访问者接口):文件系统访问者
interface FileSystemVisitor {
    void visit(File file);
    void visit(Folder folder);
}

// 2️⃣ ConcreteVisitor(具体访问者):计算总大小
class SizeCalculator implements FileSystemVisitor {
    private long totalSize = 0;

    @Override
    public void visit(File file) {
        totalSize += file.getSize();
    }

    @Override
    public void visit(Folder folder) {
        // 文件夹本身无大小,遍历其内容
        for (FileSystemElement element : folder.getElements()) {
            element.accept(this);
        }
    }

    public long getTotalSize() {
        return totalSize;
    }
}

// 2️⃣ ConcreteVisitor(具体访问者):统计文件类型
class TypeCounter implements FileSystemVisitor {
    private int fileCount = 0;
    private int folderCount = 0;

    @Override
    public void visit(File file) {
        fileCount++;
    }

    @Override
    public void visit(Folder folder) {
        folderCount++;
        for (FileSystemElement element : folder.getElements()) {
            element.accept(this);
        }
    }

    public void printStats() {
        System.out.println("📊 文件数量: " + fileCount + ", 文件夹数量: " + folderCount);
    }
}

// 3️⃣ Element(元素接口):文件系统元素
interface FileSystemElement {
    void accept(FileSystemVisitor visitor);
}

// 4️⃣ ConcreteElement(具体元素):文件
class File implements FileSystemElement {
    private String name;
    private long size;

    public File(String name, long size) {
        this.name = name;
        this.size = size;
    }

    @Override
    public void accept(FileSystemVisitor visitor) {
        visitor.visit(this);
    }

    public long getSize() {
        return size;
    }

    public String getName() {
        return name;
    }
}

// 4️⃣ ConcreteElement(具体元素):文件夹
class Folder implements FileSystemElement {
    private String name;
    private List<FileSystemElement> elements = new ArrayList<>();

    public Folder(String name) {
        this.name = name;
    }

    public void addElement(FileSystemElement element) {
        elements.add(element);
    }

    @Override
    public void accept(FileSystemVisitor visitor) {
        visitor.visit(this);
    }

    public List<FileSystemElement> getElements() {
        return elements;
    }

    public String getName() {
        return name;
    }
}

// 5️⃣ ObjectStructure(对象结构):文件系统
class FileSystem {
    private List<FileSystemElement> elements = new ArrayList<>();

    public void addElement(FileSystemElement element) {
        elements.add(element);
    }

    public void accept(FileSystemVisitor visitor) {
        for (FileSystemElement element : elements) {
            element.accept(visitor);
        }
    }
}

// 6️⃣ Client(客户端)
public class VisitorPatternDemo {
    public static void main(String[] args) {
        // 创建文件系统结构
        FileSystem fileSystem = new FileSystem();

        File file1 = new File("document.pdf", 1024);
        File file2 = new File("image.jpg", 2048);

        Folder folder1 = new Folder("Photos");
        folder1.addElement(new File("photo1.png", 512));
        folder1.addElement(new File("photo2.png", 768));

        Folder rootFolder = new Folder("Root");
        rootFolder.addElement(file1);
        rootFolder.addElement(file2);
        rootFolder.addElement(folder1);

        fileSystem.addElement(rootFolder);

        // 使用访问者计算总大小
        System.out.println("=== 计算文件系统总大小 ===");
        SizeCalculator sizeCalculator = new SizeCalculator();
        fileSystem.accept(sizeCalculator);
        System.out.println("📏 总大小: " + sizeCalculator.getTotalSize() + " 字节");

        // 使用访问者统计文件类型
        System.out.println("\n=== 统计文件和文件夹数量 ===");
        TypeCounter typeCounter = new TypeCounter();
        fileSystem.accept(typeCounter);
        typeCounter.printStats();
    }
}
2
3
4
5
6
7
8
9
10
11
12
13
14
15
16
17
18
19
20
21
22
23
24
25
26
27
28
29
30
31
32
33
34
35
36
37
38
39
40
41
42
43
44
45
46
47
48
49
50
51
52
53
54
55
56
57
58
59
60
61
62
63
64
65
66
67
68
69
70
71
72
73
74
75
76
77
78
79
80
81
82
83
84
85
86
87
88
89
90
91
92
93
94
95
96
97
98
99
100
101
102
103
104
105
106
107
108
109
110
111
112
113
114
115
116
117
118
119
120
121
122
123
124
125
126
127
128
129
130
131
132
133
134
135
136
137
138
139
140
141
142
143
144
145
146
147
148
149
150
151
152
153
154
155
156
157
158
🌟 输出
=== 计算文件系统总大小 ===
📏 总大小: 4352 字节

=== 统计文件和文件夹数量 ===
📊 文件数量: 4, 文件夹数量: 2
2
3
4
5
✅ 优点
- 分离操作与结构:操作逻辑独立于元素类,新增操作无需修改元素。
- 符合开闭原则:只需新增访问者类即可扩展功能。
- 集中相关操作:将对一组元素的相关操作封装在访问者中,逻辑清晰。
- 灵活性高:不同访问者可为同一元素结构执行不同操作。
❌ 缺点
- 增加元素难度:新增元素类型需修改所有访问者,违反开闭原则。
- 实现复杂:需要为每种元素定义访问接口,初始设计成本较高。
- 访问权限问题:元素需暴露足够信息给访问者,可能破坏封装性。
- 性能开销:遍历复杂结构时,频繁调用可能影响效率。
通过访问者模式,文件系统的扫描操作(如计算大小、统计类型)与文件结构分离,新增功能只需定义新的访问者,极大提高了系统的扩展性!
# 22. 备忘录模式(Memento Pattern)
备忘录模式是一种行为型设计模式,它允许在不破坏对象封装性的前提下,捕获并保存对象的内部状态,以便在需要时恢复到该状态,常用于实现撤销或回滚功能。
核心思想: 通过创建备忘录对象存储对象的状态快照,对象可以将状态委托给备忘录保存,并在未来通过备忘录恢复状态,实现状态的外部化管理。
📌 适用场景
- 需要保存对象某个时刻的状态快照,以便后续恢复。
- 对象的状态需要支持回滚或撤销操作,如文本编辑器的 Undo 功能。
- 对象的内部状态不希望直接暴露,但需要提供状态保存和恢复机制。
- 游戏中的存档/读档、数据库事务回滚等场景。
| 角色 | 职责 |
|---|---|
| Originator(发起人) | 创建备忘录保存当前状态,并可通过备忘录恢复状态 |
| Memento(备忘录) | 存储发起人的状态,提供获取状态的接口 |
| Caretaker(管理者) | 负责保存和传递备忘录,但不修改其内容 |
示例:文本编辑器撤销功能
假设我们要实现一个文本编辑器,支持输入文本并撤销到上一次状态:
- 编辑器(发起人)记录当前文本内容。
- 备忘录保存文本状态快照。
- 管理者维护备忘录列表以支持撤销。
import java.util.ArrayList;
import java.util.List;

// 1️⃣ Memento(备忘录):文本状态
class TextMemento {
    private String content;

    public TextMemento(String content) {
        this.content = content;
    }

    public String getContent() {
        return content;
    }
}

// 2️⃣ Originator(发起人):文本编辑器
class TextEditor {
    private String content;

    public TextEditor() {
        this.content = "";
    }

    public void write(String text) {
        this.content += text;
        System.out.println("✍️ 当前内容: " + content);
    }

    // 创建备忘录
    public TextMemento save() {
        return new TextMemento(content);
    }

    // 通过备忘录恢复状态
    public void restore(TextMemento memento) {
        this.content = memento.getContent();
        System.out.println("⏪ 恢复内容: " + content);
    }

    public String getContent() {
        return content;
    }
}

// 3️⃣ Caretaker(管理者):撤销管理
class UndoManager {
    private List<TextMemento> history = new ArrayList<>();
    private TextEditor editor;

    public UndoManager(TextEditor editor) {
        this.editor = editor;
    }

    public void saveState() {
        history.add(editor.save());
        System.out.println("💾 已保存状态,历史记录数: " + history.size());
    }

    public void undo() {
        if (history.isEmpty()) {
            System.out.println("⚠️ 无可撤销的状态");
            return;
        }
        TextMemento lastState = history.remove(history.size() - 1);
        editor.restore(lastState);
        System.out.println("📜 剩余历史记录数: " + history.size());
    }
}

// 4️⃣ Client(客户端)
public class MementoPatternDemo {
    public static void main(String[] args) {
        // 创建编辑器和管理者
        TextEditor editor = new TextEditor();
        UndoManager undoManager = new UndoManager(editor);

        // 编辑文本并保存状态
        System.out.println("=== 编辑文本 ===");
        editor.write("Hello, ");
        undoManager.saveState();

        editor.write("World!");
        undoManager.saveState();

        editor.write(" How are you?");
        System.out.println("📝 当前内容: " + editor.getContent());

        // 执行撤销操作
        System.out.println("\n=== 执行撤销 ===");
        undoManager.undo();

        System.out.println("\n=== 再次撤销 ===");
        undoManager.undo();

        System.out.println("\n=== 再次撤销(无状态) ===");
        undoManager.undo();
    }
}
2
3
4
5
6
7
8
9
10
11
12
13
14
15
16
17
18
19
20
21
22
23
24
25
26
27
28
29
30
31
32
33
34
35
36
37
38
39
40
41
42
43
44
45
46
47
48
49
50
51
52
53
54
55
56
57
58
59
60
61
62
63
64
65
66
67
68
69
70
71
72
73
74
75
76
77
78
79
80
81
82
83
84
85
86
87
88
89
90
91
92
93
94
95
96
97
98
99
🌟 输出
=== 编辑文本 ===
✍️ 当前内容: Hello,
💾 已保存状态,历史记录数: 1
✍️ 当前内容: Hello, World!
💾 已保存状态,历史记录数: 2
✍️ 当前内容: Hello, World! How are you?
📝 当前内容: Hello, World! How are you?

=== 执行撤销 ===
⏪ 恢复内容: Hello, World!
📜 剩余历史记录数: 1

=== 再次撤销 ===
⏪ 恢复内容: Hello,
📜 剩余历史记录数: 0

=== 再次撤销(无状态) ===
⚠️ 无可撤销的状态
2
3
4
5
6
7
8
9
10
11
12
13
14
15
16
17
18
✅ 优点
- 封装性好:备忘录保护了发起人的内部状态,仅暴露必要接口。
- 支持撤销:方便实现状态回滚功能,提升用户体验。
- 职责分离:状态保存与管理职责分离,符合单一职责原则。
- 灵活性高:可通过管理者扩展多级撤销或快照功能。
❌ 缺点
- 内存开销:保存多个备忘录可能占用大量内存,尤其是状态复杂时。
- 性能影响:频繁创建和恢复备忘录可能影响系统性能。
- 管理复杂性:需要额外代码管理备忘录的存储和生命周期。
- 状态泄露风险:如果备忘录未妥善封装,可能导致状态意外暴露。
通过备忘录模式,文本编辑器实现了撤销功能,状态管理被分离到备忘录和管理者中,编辑器本身无需关心状态的保存和恢复逻辑,代码结构更加清晰且易于扩展!
# 23. 解释器模式(Interpreter Pattern)
解释器模式是一种行为型设计模式,它为某种语言定义一套语法规则,并通过解释器对象来解析和执行这些规则的表达式,通常用于处理特定领域的语言或简单脚本。
核心思想: 将语言的语法表示为抽象语法树(AST),每个语法规则对应一个解释器类,通过递归调用解释器来计算或执行表达式的结果。
📌 适用场景
- 需要解释和执行一种特定语言,如正则表达式、SQL 查询、数学表达式。
- 语言的语法规则相对简单且固定,适合用类层次结构表示。
- 对性能要求不高,愿意牺牲效率换取灵活性。
- 常用于编译器、计算器、配置文件解析等场景。
| 角色 | 职责 |
|---|---|
| AbstractExpression(抽象表达式) | 定义解释方法的接口,所有表达式需实现 |
| TerminalExpression(终结符表达式) | 表示语言中的基本元素,直接执行具体操作 |
| NonTerminalExpression(非终结符表达式) | 表示复合规则,包含其他表达式,递归调用解释 |
| Context(上下文) | 提供解释器所需的环境信息或全局状态 |
| Client(客户端) | 构建语法树并调用解释器执行 |
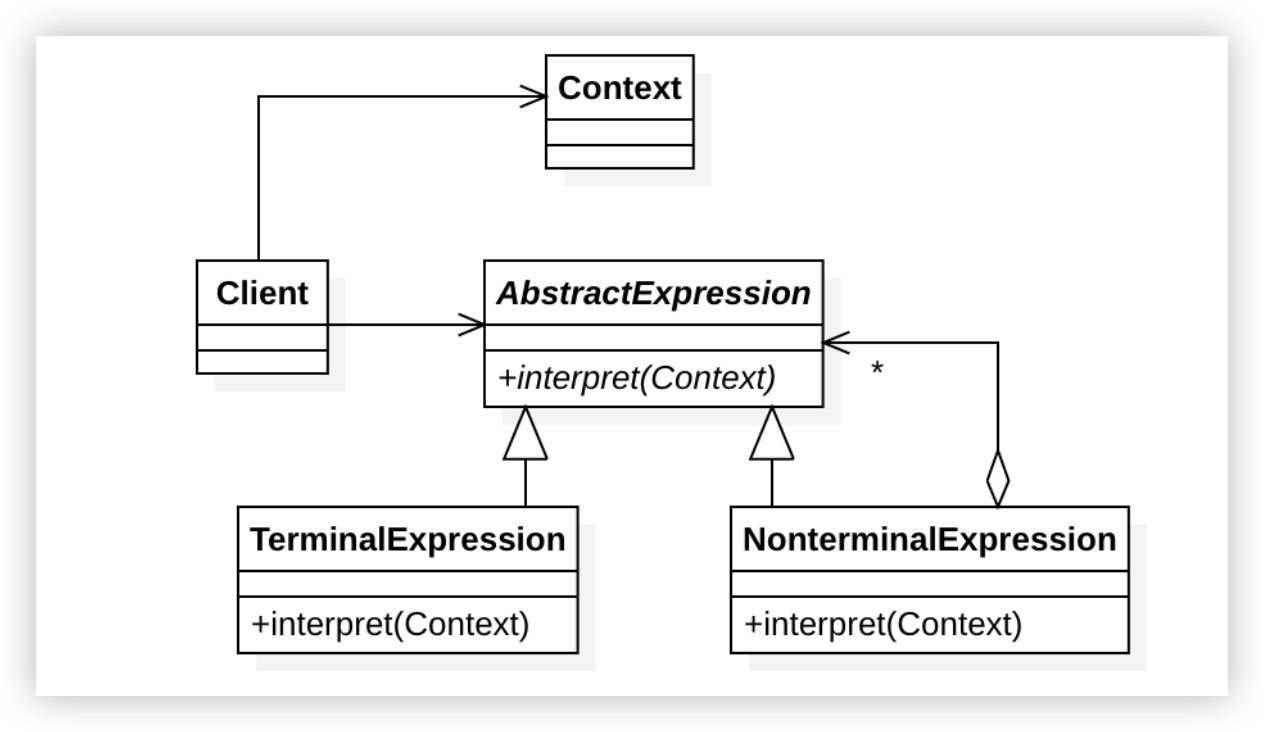
示例:简单数学表达式计算
假设我们要实现一个数学表达式解释器,支持加法和减法:
- 输入格式如
"3 + 5 - 2"。 - 通过解释器计算结果。
import java.util.Stack;

// 1️⃣ Context(上下文):表达式解析环境
class Context {
    private String expression;

    public Context(String expression) {
        this.expression = expression.replaceAll("\\s+", ""); // 去除空格
    }

    public String getExpression() {
        return expression;
    }
}

// 2️⃣ AbstractExpression(抽象表达式):数学表达式
interface Expression {
    int interpret(Context context);
}

// 3️⃣ TerminalExpression(终结符表达式):数字
class NumberExpression implements Expression {
    private int number;

    public NumberExpression(int number) {
        this.number = number;
    }

    @Override
    public int interpret(Context context) {
        return number;
    }
}

// 4️⃣ NonTerminalExpression(非终结符表达式):加法
class AddExpression implements Expression {
    private Expression left;
    private Expression right;

    public AddExpression(Expression left, Expression right) {
        this.left = left;
        this.right = right;
    }

    @Override
    public int interpret(Context context) {
        return left.interpret(context) + right.interpret(context);
    }
}

// 4️⃣ NonTerminalExpression(非终结符表达式):减法
class SubtractExpression implements Expression {
    private Expression left;
    private Expression right;

    public SubtractExpression(Expression left, Expression right) {
        this.left = left;
        this.right = right;
    }

    @Override
    public int interpret(Context context) {
        return left.interpret(context) - right.interpret(context);
    }
}

// 5️⃣ Client(客户端):表达式解析器
public class InterpreterPatternDemo {
    public static Expression parseExpression(Context context) {
        Stack<Expression> stack = new Stack<>();
        String[] tokens = context.getExpression().split("(?<=\\d)(?=\\+|-)|(?<=\\+|-)(?=\\d)");

        for (String token : tokens) {
            if (token.equals("+")) {
                Expression right = stack.pop();
                Expression left = stack.pop();
                stack.push(new AddExpression(left, right));
            } else if (token.equals("-")) {
                Expression right = stack.pop();
                Expression left = stack.pop();
                stack.push(new SubtractExpression(left, right));
            } else {
                stack.push(new NumberExpression(Integer.parseInt(token)));
            }
        }
        return stack.pop();
    }

    public static void main(String[] args) {
        // 创建上下文
        Context context = new Context("3 + 5 - 2");

        // 解析并解释表达式
        System.out.println("=== 解析表达式: " + context.getExpression() + " ===");
        Expression expression = parseExpression(context);
        int result = expression.interpret(context);
        System.out.println("🧮 计算结果: " + result);
    }
}
2
3
4
5
6
7
8
9
10
11
12
13
14
15
16
17
18
19
20
21
22
23
24
25
26
27
28
29
30
31
32
33
34
35
36
37
38
39
40
41
42
43
44
45
46
47
48
49
50
51
52
53
54
55
56
57
58
59
60
61
62
63
64
65
66
67
68
69
70
71
72
73
74
75
76
77
78
79
80
81
82
83
84
85
86
87
88
89
90
91
92
93
94
95
96
97
98
99
🌟 输出
=== 解析表达式: 3+5-2 ===
🧮 计算结果: 6
2
解析过程说明
- 输入
"3 + 5 - 2"被拆分为["3", "+", "5", "-", "2"]。 - 栈操作:
- 压入
3→[3]。 - 压入
5→[3, 5]。 - 遇到
+,弹出5和3,压入3 + 5→[8]。 - 压入
2→[8, 2]。 - 遇到
-,弹出2和8,压入8 - 2→[6]。
- 压入
- 最终结果为
6。
✅ 优点
- 易于扩展:新增语法规则只需添加新的表达式类,符合开闭原则。
- 职责清晰:每种语法规则由独立类处理,逻辑分离。
- 灵活性高:可以动态构建和解释复杂的语法树。
- 领域特定语言:非常适合实现简单的 DSL(领域特定语言)。
❌ 缺点
- 性能低下:复杂表达式需要递归解析,效率较低。
- 类数量膨胀:每种语法规则都需要一个类,复杂语言会导致类过多。
- 维护困难:语法规则繁多时,管理表达式类和解析逻辑变得复杂。
- 适用范围有限:只适合简单的语言,复杂的语言解析通常使用专用工具(如 ANTLR)。
通过解释器模式,我们实现了一个简单的数学表达式计算器,将加法和减法的逻辑封装到表达式类中,虽然实现较基础,但展示了模式的核心思想:语法与解释的分离!